Get monthly coaching and support to FINALLY gain momentum in your business without burning out in the process. 🦄 Learn more about WAIM Unlimited.

While we love productivity, we’re NOT trying to be the most productive humans ever and we don’t enjoy hustle-culture. However, we are constantly trying to improve our efficiency and use systems that make our lives easier.
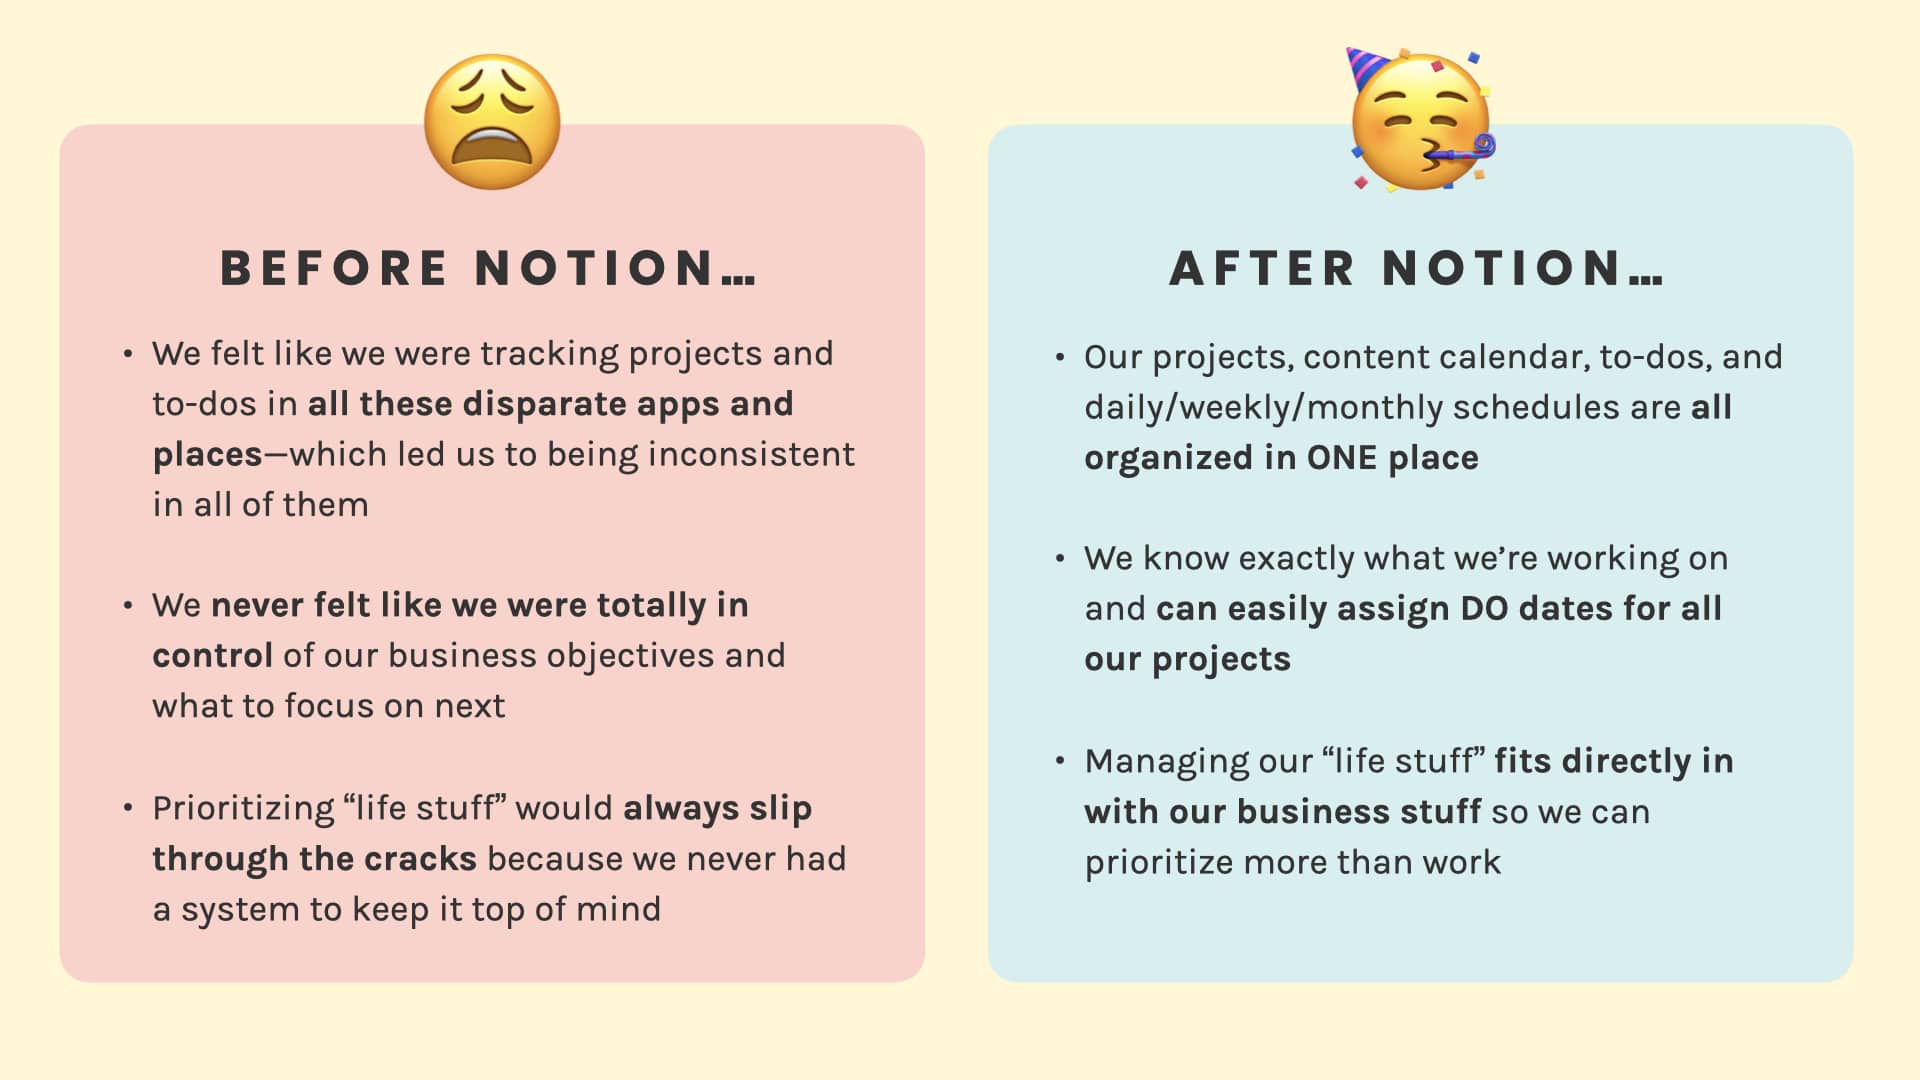
When wearing multiple hats in your online business, it becomes all too easy for tasks, projects, and goals to fall through the cracks.
As creative people, we don’t always think about organization first, but organization has actually made us MORE creative.
When you can get all of your to-dos, your tasks, the overwhelm of everything you have to think about out of your brain and into a system, it leaves more room for creativity, for having ideas and for executing those ideas.
When you can get all of your to-dos, your tasks, the overwhelm of everything you have to think about out of your brain and into a system, it leaves more room for creativity, for having ideas and for executing those ideas.
Let us share a big, juicy secret with you: Sustainable habits and being consistent are the most* important things necessary when trying to reach your goals.
*When we say most important, we mean the most important things YOU can control. We don’t want to ignore or minimize that privilege is real and not everyone has the same advantages.
But alas, forming new habits can be a struggle!
We all love to read/watch/listen to other people talk about their holy grail productivity tools and habit-building hacks, but it’s important that you figure out what works best for YOU and your unique situation.
Here’s the truth about our journey with organizing our business and staying on top of things using different productivity tools/tactics over the years…

Every time we discover a new productivity tool or app, our motivation and organization shoot up! We get really excited and we spend hours setting up a new app to ensure maximum productivity but then, a few months (maybe even weeks) later, the adrenaline of the new shiny app wears off and we just stop using it. #wompwomp
It happened with Trello.
It happened with Asana.
It happened with digital planning.
It happened with Airtable.
We craved consistency in our organization systems. We wanted a system that was flexible enough that we could adjust when we got bored (or didn’t feel as productive). We also wanted something versatile enough to manage multiple types of organization so we could focus on actually using just ONE system, not three different apps and systems.
Notion is what finally fit that criteria.
Before we dive into how we use Notion to organize our lives and businesses, let’s go through a little crash course on the basics of how Notion works.
Notion is a system of interconnected pages. You can add content to each page by using different types of content blocks.

There are many different content blocks in Notion such as:
We like to think of Notion as a system of blocks for you to build whatever you want.
You can pick and choose the blocks that would work for every single page in your Notion workspace.
But by far, the feature that stands out the most is the ability to create Databases.
Notion Databases allow you to organize similar pages and assign different properties to them.
While databases seemed complicated and clunky with other productivity apps, Notion has really nailed this feature!
You can visualize the same Database in different ways using Views (Gallery, Calendar, Board, Timeline, etc):

You can also create Templates to load a pre-made set of content blocks for every page.
The best part of Notion is using all these blocks together to build whatever dashboards and pages are most helpful to keep your life and business organized. Truly, the possibilities are endless and that’s what makes Notion powerful!
Note: This section is a very abridged overview of Notion and all its functionalities. Notion has very robust and easy-to-understand help docs so if you want to deep dive into a specific feature, you can go to their help docs to learn more about it.
After many months of using Notion, we took a look at the MOST important databases and pages we use here at Wandering Aimfully and then we organized it into a system we could teach to you!
And that system has an acronym, because DUH.
🦅🦅🦅 (feel free to do your own bird screech sound effects for added flare!)

The remainder of this article will be less about the ins and outs of how to set up the S.O.A.R. Notion system, and more about how we USE the system to run our lives and businesses more efficiently and calmly. Our S.O.A.R. System template is only available to our paying Wandering Aimfully members. Hopefully, you’ll be able to create your own system from what you learn based on our setup!
Before we dive into each component of the system, we’re going to give you an overview of the key pages in our S.O.A.R. Notion system. This will give you a reference point for everything in the system, then we’ll show you how we actually USE it.
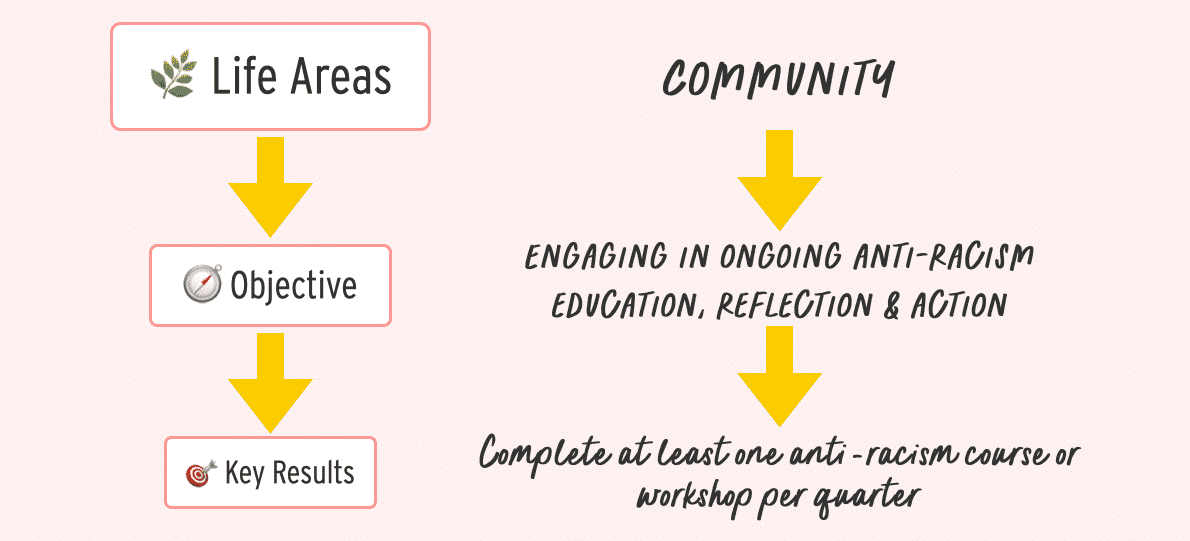
The pages in this category are the foundation blocks of setting the vision for what we are aiming for, what areas of growth we want to see, and what projects will help us get there.
We have three main databases for the Setup part of the system:
In this database, we’ve listed out all of the areas in our life that we want to pay attention to. Think of broad categories like Family, Finances, and Knowledge and Learning. Here are the exact Life Area categories we use:
In order to cultivate each Life Area, we’ve created a relation property that is linked to the Goal Tracker database (more on this below) so we can set goals for each area of our life.

For example, in the Finances life area, we set a goal to get 20 sales of an online course during launch.
💡 Tip: One of the ways we also like to use the Life Areas database is by rating it on a weekly basis (during our Weekly Reviews, more on this in Part 4) using a scale from 1 to 10 based on the attention it got during that week. Afterwards, we sort it from highest to lowest, we can clearly see which Life Areas we could be cultivating more or we can decide what our current priorities are.
In this database, we add each goal as a Key Result (specific, measurable outcome) and identify the Objective (more intangible and broad) that it aligns with.
Each goal is connected to a Life Area and to Projects (if applicable) using relation properties. We also have a date property to take note of when we want the goal to be completed.
![]()
For example, the key result is to write & publish 5 new articles, and the objective it’s trying to serve is to increase organic website traffic. This key result is connected to the Work Productivity life area and the Blog project.
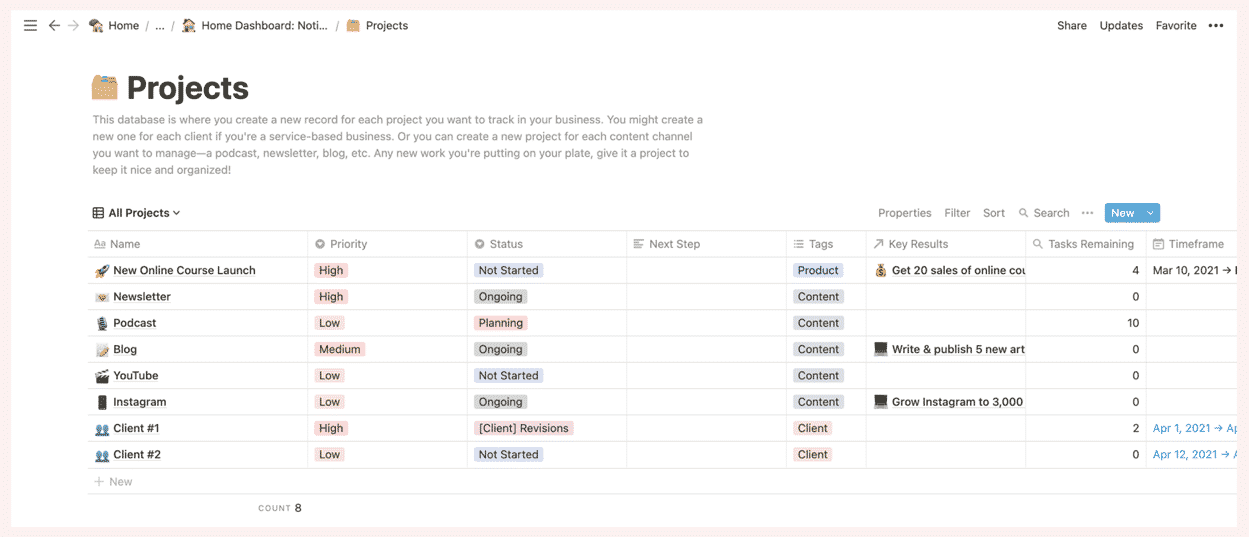
This database consists of any projects that we want to track for our business(es). This could range from launching a new course, tracking an ongoing marketing channel like Podcasts, to managing your Clients, etc.
We find it really helpful to create Projects for content creation as it’s easy to have those recurring “projects” slip through the cracks week by week if you don’t plan them accordingly with everything else.
The PAGE area of each project is where you can manage everything related to just that project. We’ve created a Project Template where we set objectives and key results for the project. We also create the tasks associated with the project and compile the resources and inspiration for it.

Just to further clarify how these all work together, we like to think of it as:
Here’s a specific example:
You can also apply the same concept to your Projects. For example:

The pages in this category are the smaller bits that projects and initiatives get broken into. These pages help us move the bigger projects forward.
We have three main databases for the Organize part of the system: Tasks, Content Calendar, and Social Posts.
All of our tasks across all of our Life Areas and Projects go into this master Task Manager database.
For each task, we assign a DO Date which is the date we plan to actually work on the task, not the deadline.
Quick shout-out to August Bradley; we believe he came up with the term “DO Date” for his own Notion system.
We also connect each task to the Project or Content Piece (more on this later) the task is related to via relation properties.

For example, the task record podcast falls into the Podcast project and the Episode 01 content piece. That way, we’re able to see all the tasks in the context of the project or specific content it falls under.
💡 Tip: You can also estimate how long your tasks take and then log a Start Time and End Time (using two date properties) to see how long each task actually takes. If you’re diligent about tracking your time for each task, it’ll be easier to estimate times for similar tasks in the future.
All of our content (articles, podcasts, newsletters, YouTube videos) goes into one master Content Calendar database.
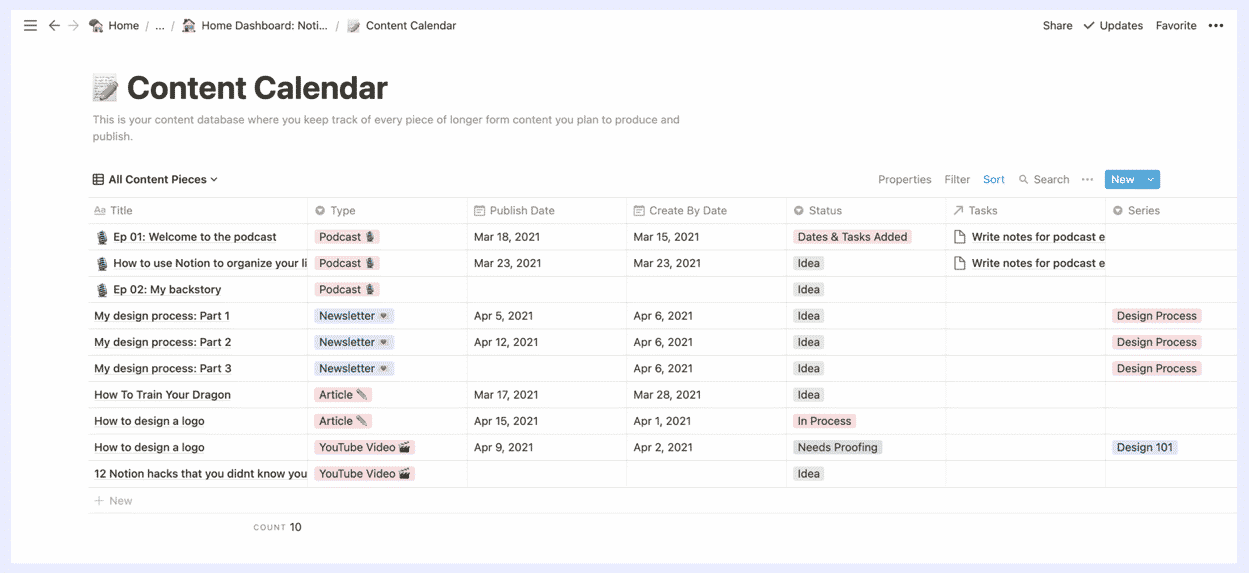
We use the type property to differentiate between the different content channels and to set the status of each content piece. We also add a Publish By date (deadline) and a Create By date (when the majority of the creation will happen) to each content piece.
The Social Posts database functions similarly to the Content Calendar but we prefer to keep it separate because if you’re posting on your socials every day, it can get cluttered very quickly.
We use the type property to differentiate between the different platforms and to set the status of each social post.
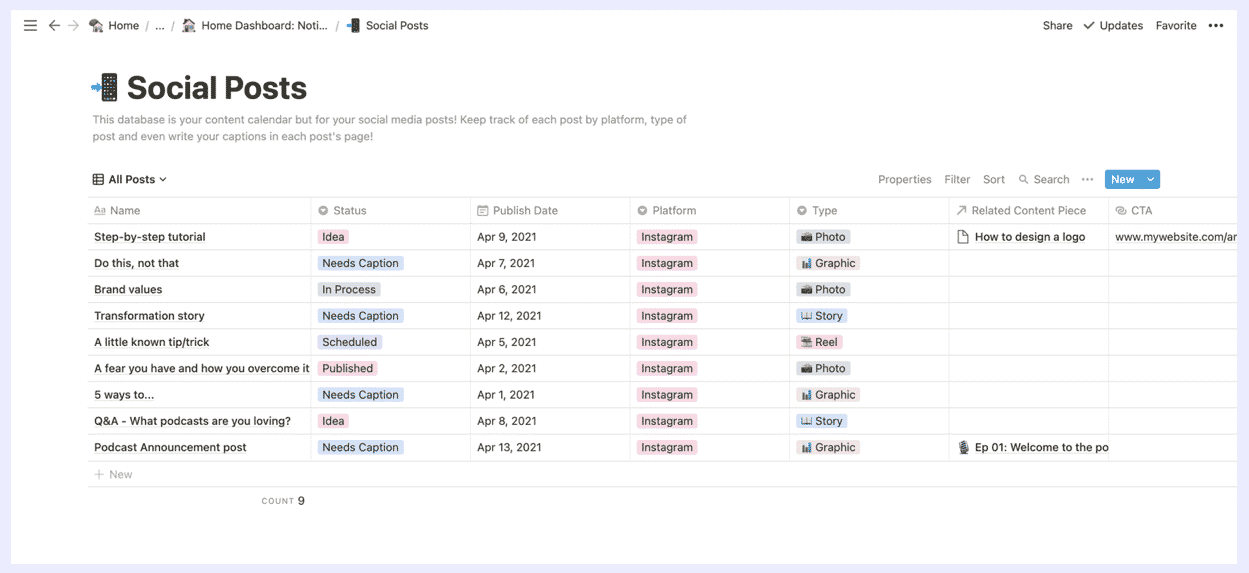
The Calendar View for both the Content Calendar and Social Posts databases are especially helpful to see when our content and when the related social posts get published.

The pages in this category are the dashboards and pages designed to actually GET. THINGS. DONE. most efficiently.
We have three main pages for the Act part of the system:
This is really where the system starts to come together because this is where you execute on all of the stuff that you did in the set-up and organize sections.
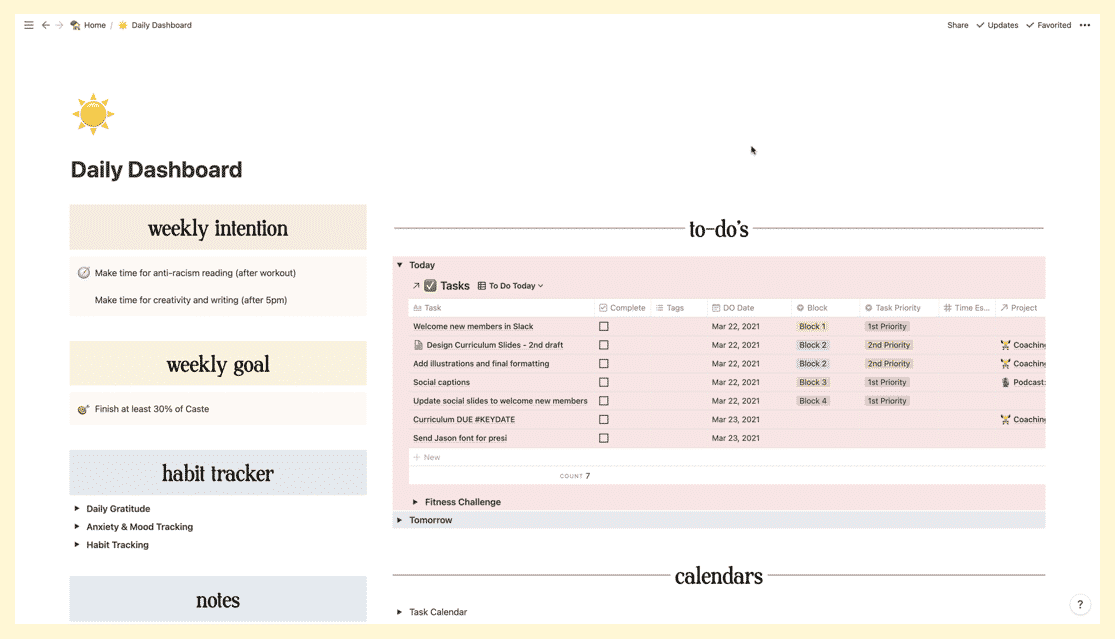
This page is where we spend most of our time in Notion every single day.
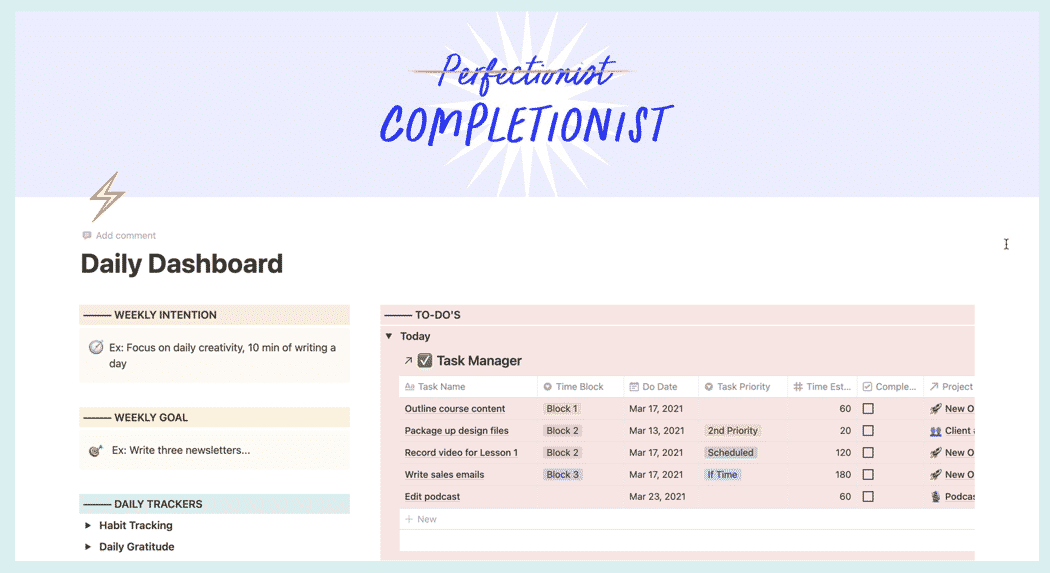
You can customize your own daily dashboard but for our system, we have spaces for:
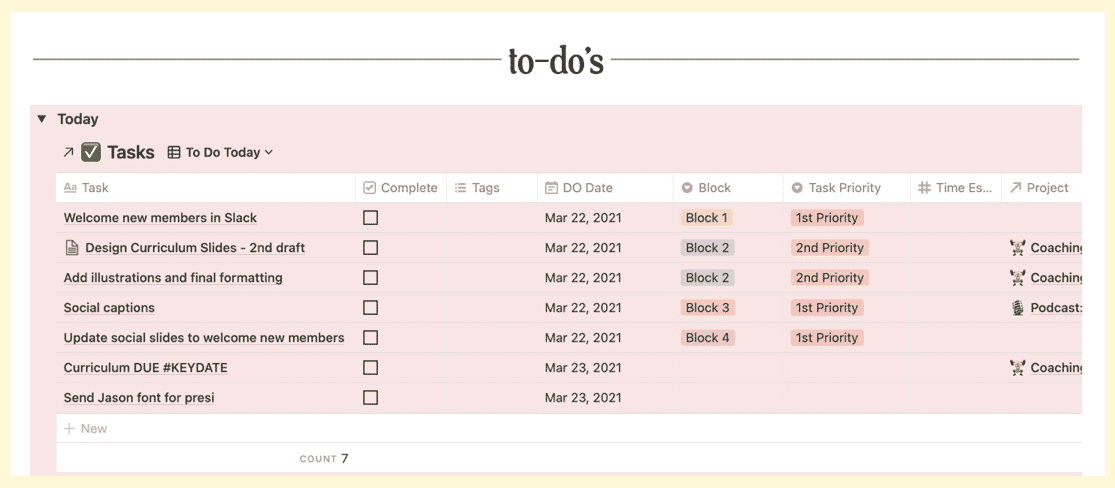
The most actionable part of the Daily Dashboard (and where the magic really happens) is the Daily Task Manager. This is the same database as your Task Manager but it is filtered to show only the uncompleted tasks whose Do Dates are today and previous days.
This way, tasks don’t fall through the cracks because you are always reminded every day which tasks you assigned to be done today and the tasks you didn’t manage to complete from previous days.
The tasks are always piling up in this section so if there’s a task we haven’t done for a week, that tells us that we’re not prioritizing this task and we either need to do it or set it for a date in the future.
We also have linked databases to our Projects and Goal Trackers so we can quickly jump to a specific project if we need to.
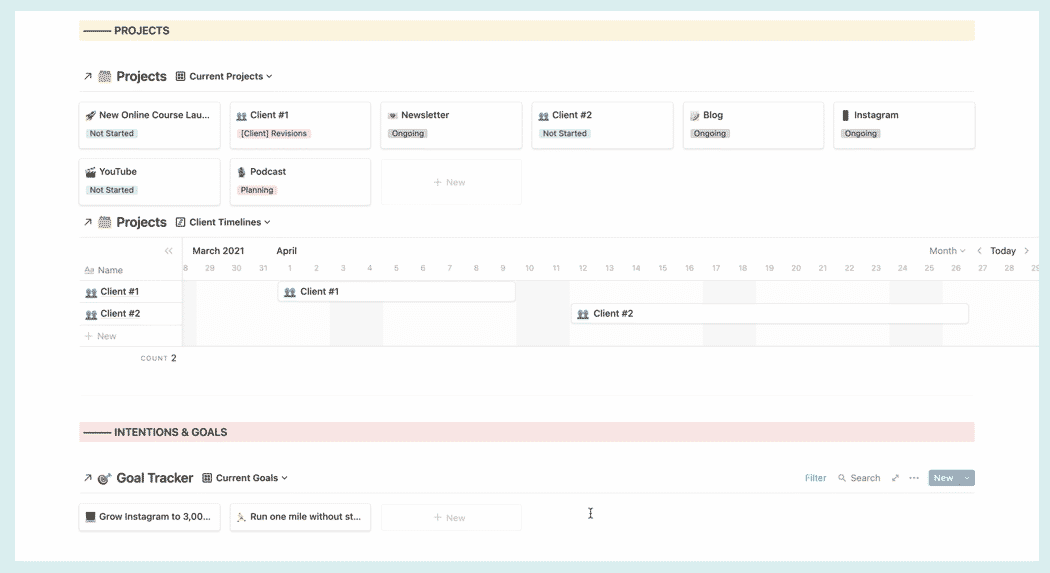
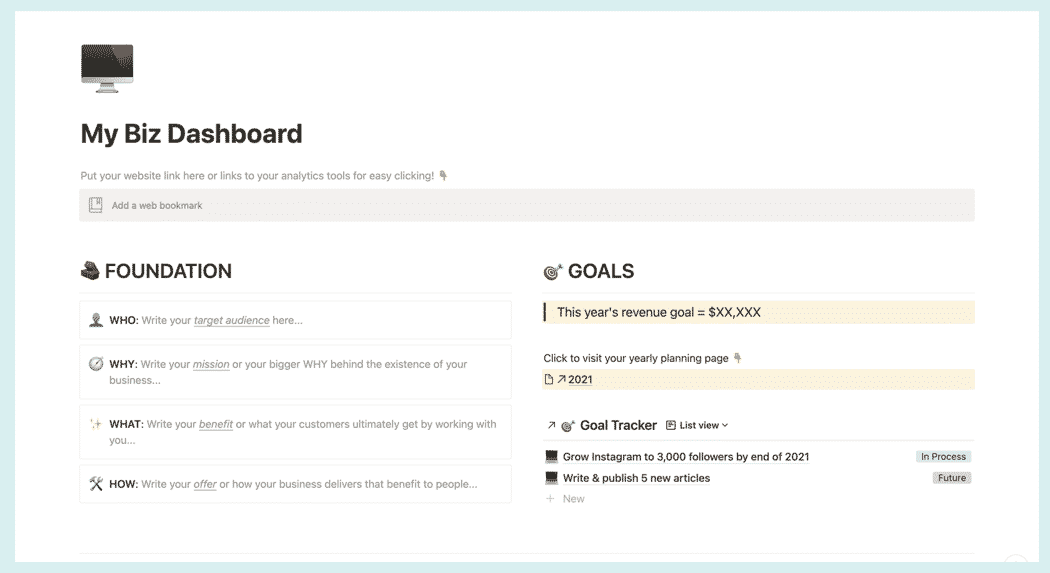
The Biz Dashboard is a page where you can see your business at-a-glance. Think of it as a living and breathing page of where you can implement the things you’re learning for your business.
In this dashboard, we have:
4Qs: These are the core questions you need to answer to know what you’re doing and what your business can offer to people. We talk more about this in the Foundation section of our 5-Step Business Checklist.
Goals: This is where we write our revenue goal for the year as well as list our business-specific goals from the Goal Tracker database.
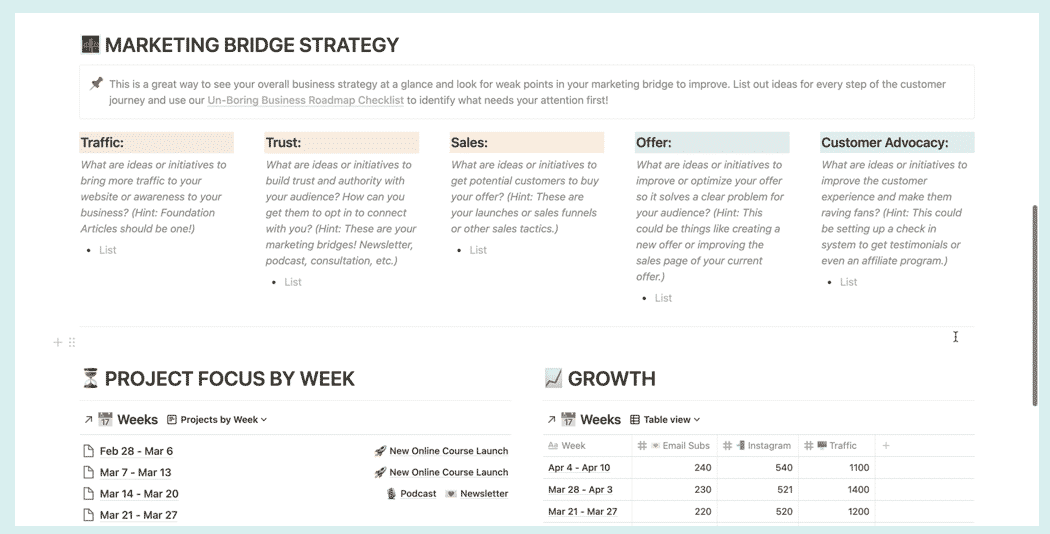
Marketing Bridge Strategy: This little section is where we can see at-a-glance, “Are we hitting initiatives at every step of the critical marketing bridge puzzle?” We share more about the Marketing Bridge concept in this article.
Project Focus By Week: Each week, we like to set our project focus which is especially useful if you’re juggling multiple projects at a time.
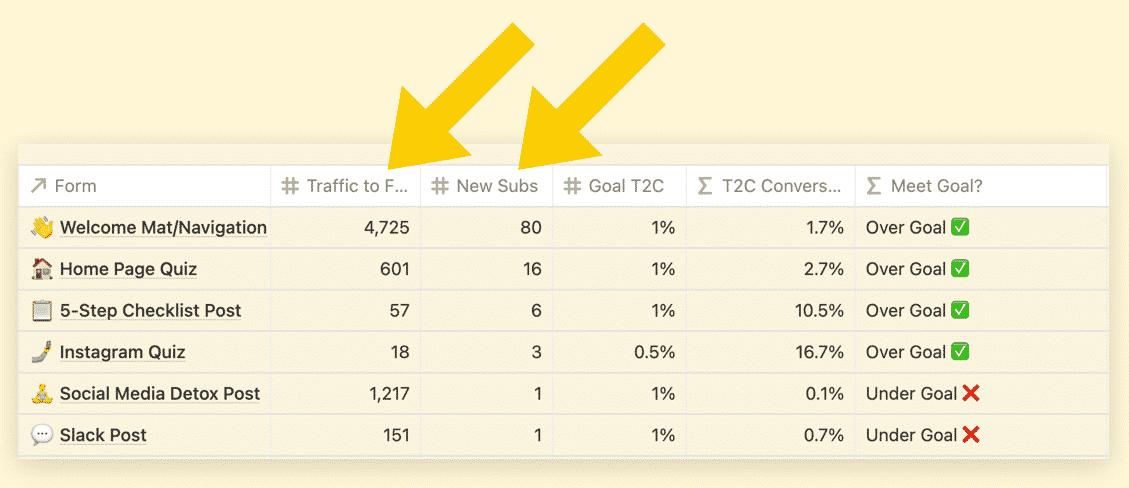
Growth: We also track specific metrics in our business each week such as traffic and newsletter subscribers.
💡 Tip: You can also dedicate a space for business-related files! For example, you can compile all of the worksheets you’ve been filling out for to gain clarity on your business in this dashboard so they get lost in the catacombs of your file folders.
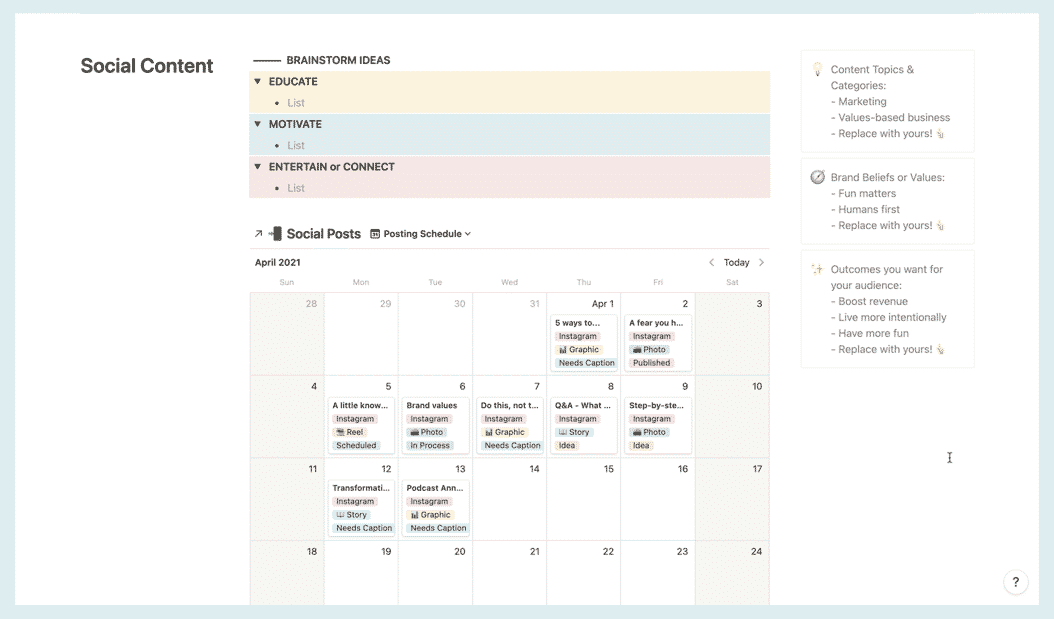
The Content Factory Dashboard helps us stay on track on all of our content channels. We use this dashboard to:
We’ve found that an efficient way for us to generate content ideas is to write all our ideas in a stream-of-consciousness style and then decide afterward the content channel that is best suited for each idea.

We use the same drag-and-drop concept for batch ideating and scheduling our Social Posts.
In the Scheduling section of our Content Factory Dashboard, we have a list view of our Content Calendar database which is filtered to show only the content pieces that have not been assigned a Publish Date, basically ideas that are floating around but haven’t actually made it in our Content Calendar.
From this list view, we can then drag each content piece idea to a calendar view (using the Publish Date) of our Content Calendar database to easily assign a publish date.
This process makes sure that all of our content ideas are captured and ready to be scheduled.
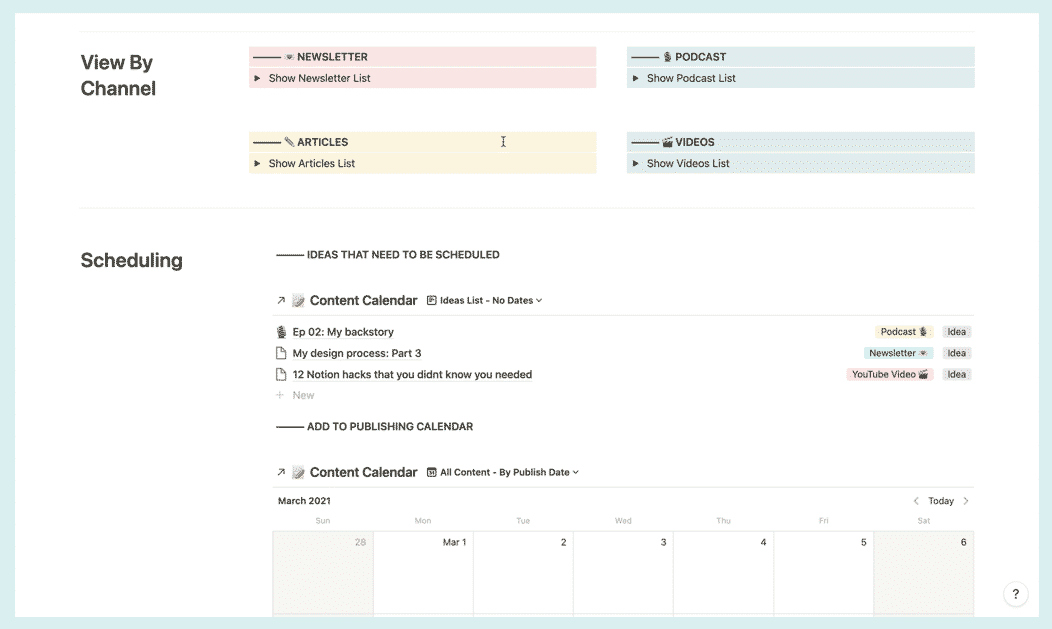
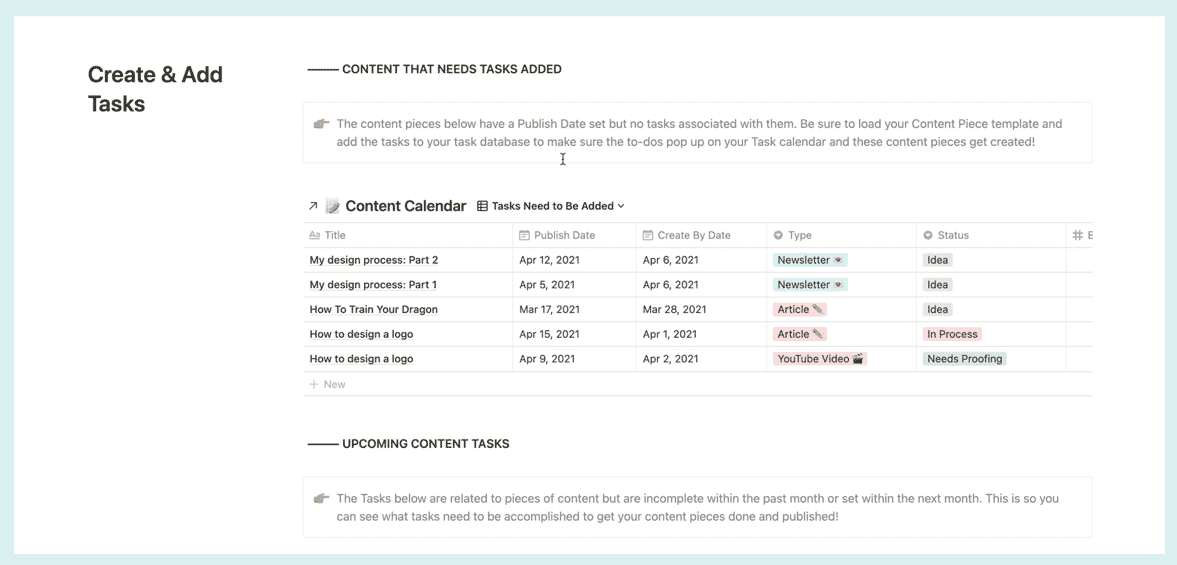
Once we’ve added our publishing dates, we go to this section to create tasks related to each content piece.
The pages in this category are the time-based pages and databases that help us check in regularly, plan for the future, and review all we accomplish.
The main databases for the Review part of the system: Daily Habit Tracking and Weekly, Monthly & Yearly Planning.
This is crucial because even if you spend all the time setting everything up in Notion, if you don’t come back to it often and don’t give yourself set times to invigorate and maintain the system, it will not work.
Even if you spend all the time setting everything up in Notion, if you don’t come back to it often and don’t give yourself set times to invigorate and maintain the system, it will not work.
In this database, each entry corresponds to a single day. We created properties to correspond to specific habits, metrics, and information we want to track on a daily basis.
Each day is also connected to a specific week in the Weeks database so we can review that information later on during the Weekly Review process (more on this below).
![]()
Moving on to the Weeks database, each entry in here corresponds to a single week.
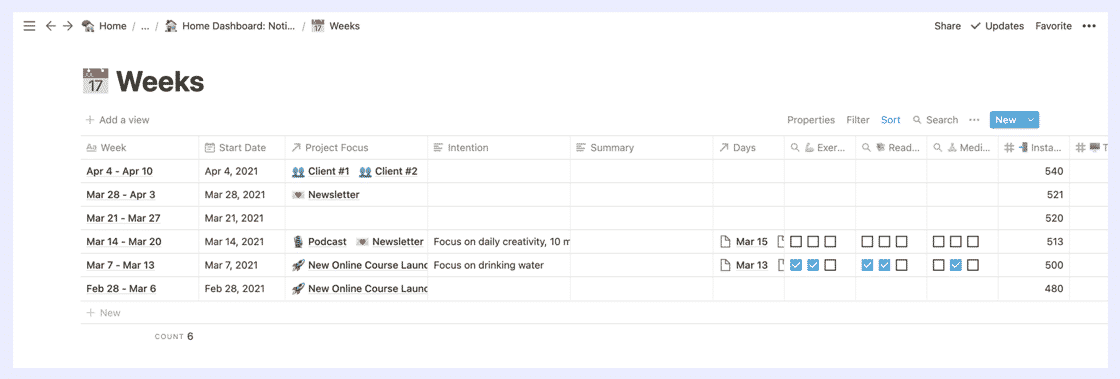
The properties for the Weeks database are a little bit different because it rolls up or aggregates the data you’ve tracked in your Daily Tracking database.
For example, if you recorded the following data for the Exercise habit (property) in your Daily Tracking database:
In your Weeks database, you’ll see this for the Exercise roll-up property:
You can roll up all kinds of data like habits, daily mood, sleep hours, business metrics (average traffic, total newsletter sign-ups), and even your daily gratitude.
![]()
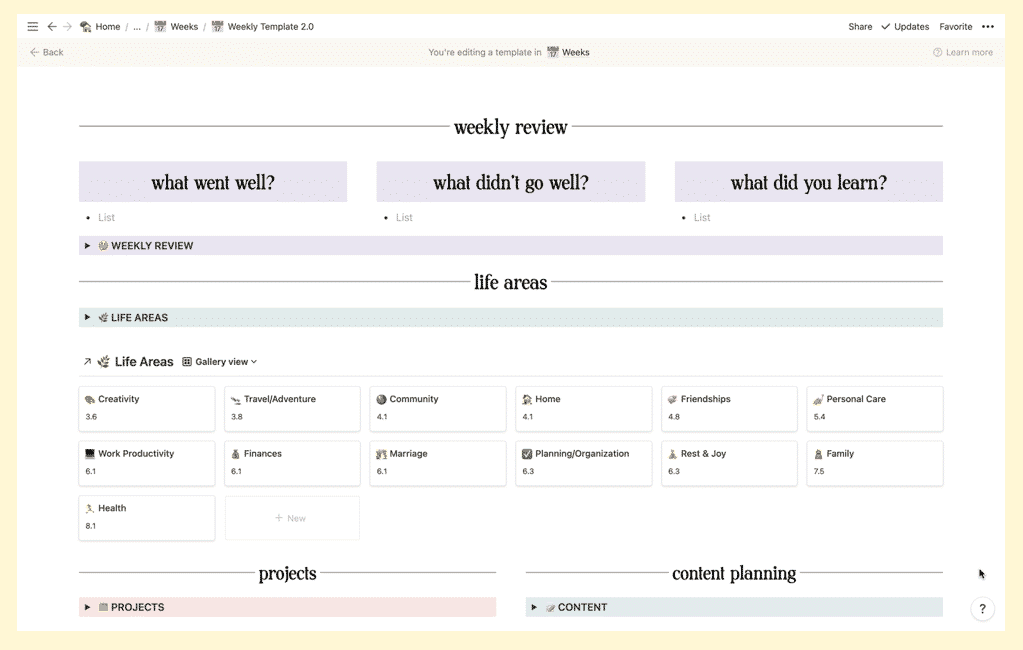
Inside each of the Weekly pages (remember, each entry in a database is also a page!), we’ve created a Weekly Planning & Review Template.
In this page, we summarize what went well (or didn’t go well) and what we learned from the week. We check in on our Life Areas and Goal Trackers to see which areas we need to give more attention to. Then we hop in on planning for our Projects and Upcoming Tasks to make sure we’re on track or if we need to reschedule tasks. We also look at our Content Calendar and Social Posts to check our upcoming content pieces and make sure that we have enough ideas batched and planned for the next two weeks. And lastly, we have a section for tracking specific growth metrics in our business.
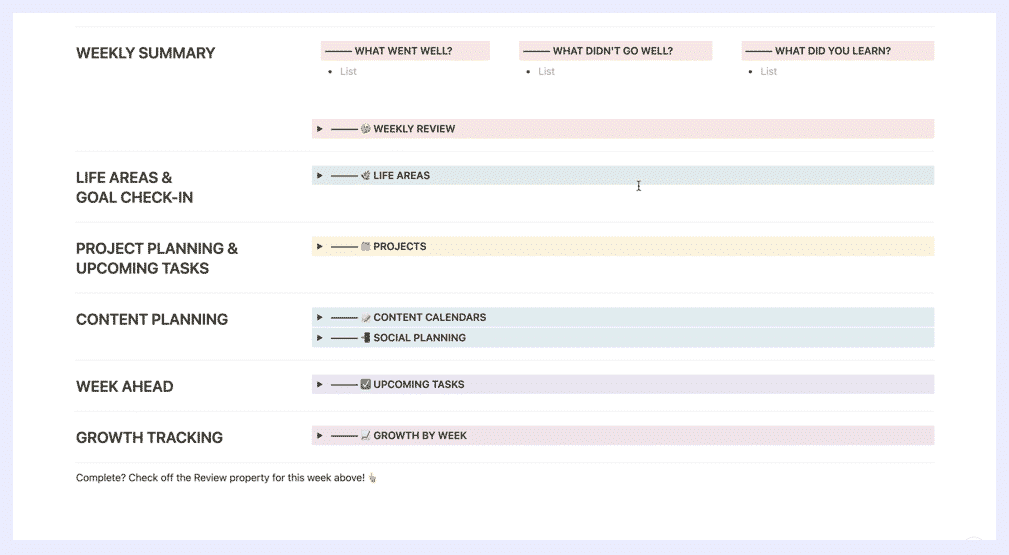
📝 Quick Note: Each section in this Weekly Planning & Review Template is actually hidden under a toggle button (that little triangle ▸ on the left side of each colored box). If we expand each toggle, we have content blocks that pull in data from all of the databases we’ve worked on in the Set-Up, Action, and Organize parts of the S.O.A.R. Notion System.
Think of it this way: Weekly Planning is Boss You and the Daily Dashboard is the Employee You. The Daily Dashboard is for getting stuff done every day and the Weekly Planning is for setting what needs to be done every day.
We also do Monthly and Yearly Reviews, which is set up similarly to the Weekly Reviews, but we review and plan broader aspects of our life and business.
You can also watch us break down our (free!) Yearly Planning Notion Template in this video:
Now that you’ve got the lay of the land, let us show you how we actually USE our Notion System!
There are a lot of components in our Notion System so you’re probably wondering: How do all these blocks work together to help us actually run our business better?
Let’s walk you through it!
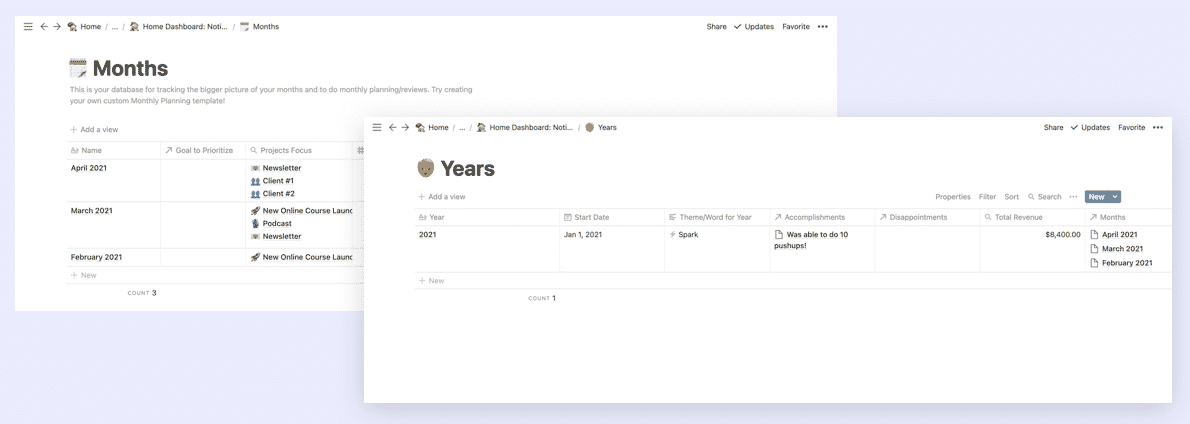
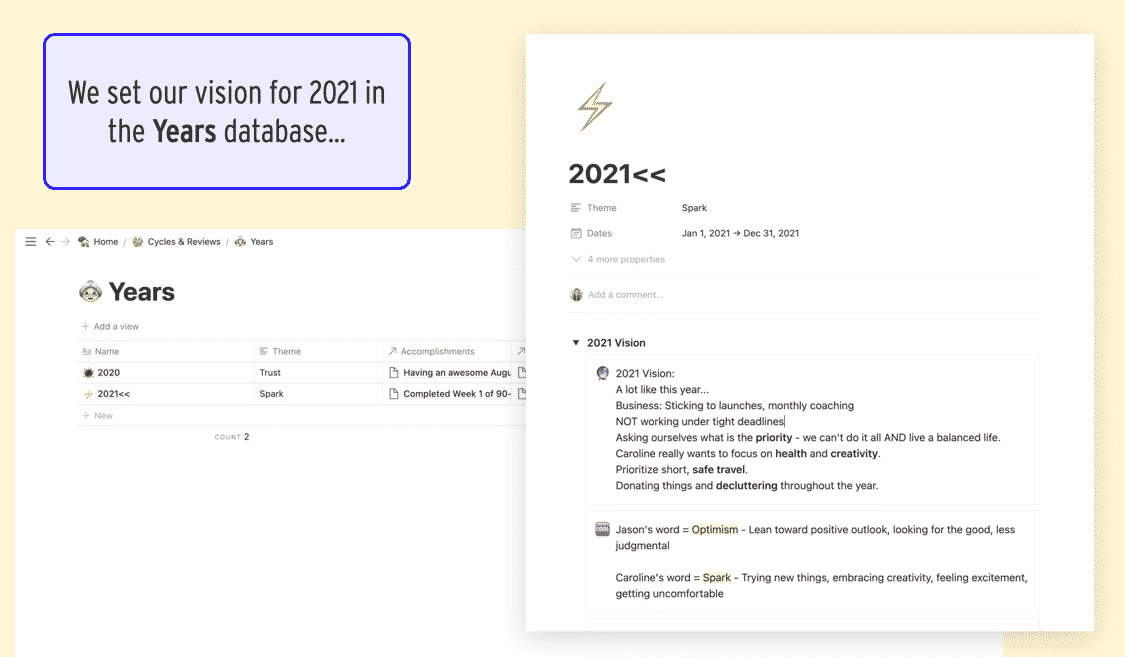
First, we set our vision for the year in the Years database…
Then we turn that vision into concrete financial goals and project plans for Q1 in our Quarters database…

👉👉 For example: at the beginning of Q1, we set up projects for our January Flash Sale and Spring Enrollment Launch, and when we finally decided on the Notion Starter Pack as our spring “product,” we turned that into a project as well.
When we make a new project, we load our New Project template, and brainstorm tasks. We pull those into our Tasks database, and we’ll usually also estimate time for each task at this point too and assign a “Do Date”
We also usually add goals at the Project level as well so we know what we’re aiming to achieve with that project.

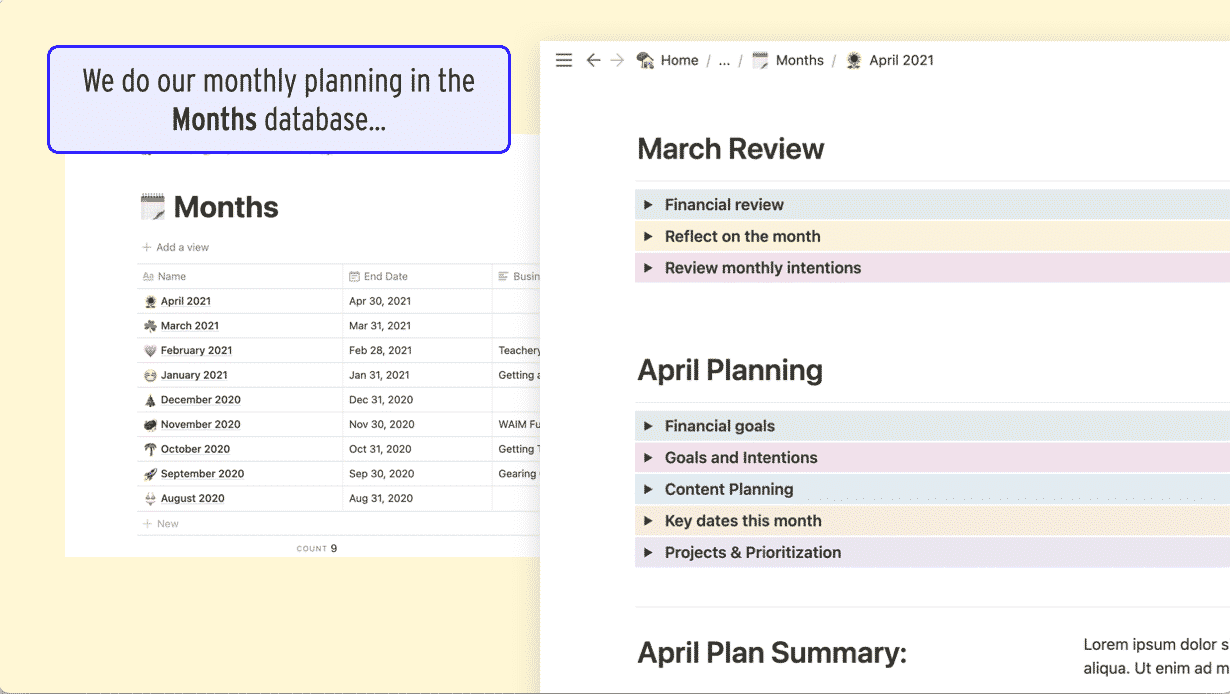
We have a project for each content channel. We plan our publishing schedule a month ahead at a time during our Monthly Planning meeting.
We do our monthly planning in the Months database…
Usually, our Content Calendar is empty or half-empty at this point, which means we need content ideas!
We can use this page to come up with ideas or schedule content that are in the idea stage and needs a Publish Date.

For example, if we have an idea for a new podcast episode, we can add it in the Brainstorm section of our dashboard and drag it into the Podcast column.
Or we can go to the Podcast project page directly and drag our “Ideas” view onto our Calendar View to assign a Publish Date to them.
Once episodes have a Publish Date, that’s when we load in our “Podcast Episode” template and create tasks to actually MAKE that piece of content.

On a monthly basis, we also have our Budget Meeting 🤑💸. We use this dashboard page to input our expenses, our income, see our profit for the month, and see our spending compared to our budget.
We evaluate Life Areas, Projects, Goals, Content, and basically just check in with the whole system to see what needs to be updated or tackled in the upcoming week.
This is where I (👩🏻🦰 Caroline) do my “Intentional Balance Inventory” where I rate my Life Areas 1-10 based on how much attention they got the previous week. If I want to shift my focus to an area that is being neglected, I set that as my weekly intention in our Daily Dashboard so I see it every day.
During that Weekly Review, we’re also logging any stats we want to track for our conversions, etc.
And, also during the Weekly Review, we’re rearranging any tasks for the upcoming week to better even out my schedule and batch tasks if necessary. Don’t be afraid to have a bad week and then need to rearrange your tasks, it happens to us too!
The first thing we do is add a new day to our Daily Tracking and we fill out our gratitude, our habit trackers.
![]()
This section of our Dashboard is where we spend our day though. We assign priorities to our tasks or we designate them for 1 of our 4 “work blocks.”
If it’s a task where we want to track our time, we set the Start Time when we begin and we set the End Time when we’re done.
That’s it! And still, you might be like… WHOA.

This system is complex but you’re really only updating it at specific times. When we do our Weekly Review, it usually only takes about an hour max but that hour is the most powerful hour that we spend on our business because it sets us up for everything else.
If your head is up in the Notion-clouds with all the databases, blocks, properties and dashboards, here’s a quick little zoomed out recap to show you how we use the S.O.A.R. Notion System to run our life and business:

We start by mapping out our year and setting goals for our life and business as a whole.
During the Quarterly Planning, we create our new Project pages, set up goals and create tasks for those projects.
This is when we set up our Content Calendar for the month, update our Content Factory Dashboard, and do our Budget Meeting to check in on our financials.
Every week, we review and update our Life Areas, set our daily intentions in the Daily Dashboard, plan our Social Posts, track our Growth metrics, and make adjustments to the Tasks we’ve already entered in our system.
This is where we do our Daily Tracking, where we take action on our Tasks, track our time and GET. THINGS. DONE 🥳
It seems like a lot but again, you’re only updating the system:
Everything else is working for you behind the scenes and you are just presented with the things that you need at the time you need them.
The final thing to remember: If your life and business have felt disorganized in the past, we’re with you! This system in Notion has really helped us get a stronghold on everything that’s important for us to focus on.
Good luck and happy organizing! 👋
We’ve been using Instagram since 2013 and oh how the times have changed.
Stories, filters, IGTV—it can be hard to keep up with all the new features (not to mention the algorithm). However, the first feature Instagram started with (Posts) has stood the test of time and will continue to be one of the most valuable parts of the platform.
In this article, you’ll find 14 unique Instagram post ideas that can help your content stand out from everyone else’s! Don’t know what to post to drum up engagement? Pick from this list and put your own spin on it to see what resonates with your audience.
Sound good? Let’s dive in!
We had to start with the Instagram OG—photos! Want to bring more life to your photos? Try using the markup app on your phone or apps like Procreate and Over to add illustrations or layers to your photos.
We love the way Arabella adds fun embellishments to her photos which really make them stand out next to a see of other photos in the feed.
We love using the app Over to add embellishments, so unsurprisingly Over’s Instagram account is a great place to look for inspiration!
Again, starting simple here because quotes are everywhere, but with good reason! Take a line from your best article or newsletter and turn it into a quote card with branded elements like we did here:
OR…you can take a page out of Amy’s book and keep the design super simple to let the words shine.
It’s the era of embracing cross-platform content! By using a design that embraces the status update layout of Twitter, you can grab someone’s attention with a longer quote.
Similar to the status update idea, this is about using digital tools we all recognize (reminders, emails, etc.) to enter your own custom message.
Refinery29 recreates a “compose email” set up here with their own brand fonts which is a uniquely compelling way to present a basic quote.
🔥 Tip: use an app like Over to insert a fun background image or pattern in your brand’s color story.
Think of a sentiment you want to communicate and what visual object or illustration could enhance the meaning.
Not the best artist? That’s cool. 🔥 Tip: You can still search for royalty-free illustrations or drawings online or with an app like Over and pair with text.
Artsy Affirmations could have included this text as the post, but the addition of the large scissors adds a nice visual element.
Already using illustrations? Take them up a notch by adding an animated element. 🔥 Tip: You can use an app like Procreate or Rough Animator to draw frames and export as an .mp4 video file for easy uploading to Instagram OR you can actually use Keynote to make a frame animation and export as a video as well!
You can use a cool app like Pixaloop to make parts of your images move, adding an eye-catching dynamic quality to your images. You can also use Google Photos automatic animation feature to take similar photos and turn them into an animated photo.

This is especially great for artists, but it’s not exclusively for them! People love seeing behind the scenes of how others work, so think about how you can share your process in a helpful/interesting way.
We love the way Gal Shir shares his illustration process in these gorgeous videos.
More and more people are using the multiple-image carousels to teach or inform. Think of it as a mini slideshow presentation. How can you share valuable content and tell a story? You can also the same functionality to share portfolio images.
An infographic is a visual way to express data or information. You could share steps in a process, statistics, or use a graph to share something relatable that makes your audience feel connected to you.
Spark Sustainability is using data here to promote conversation about climate change.
We love the way Liz and Mollie incorporate data visualization with relatable illustrations.
See a popular meme going around? Think about how you can customize it so it will be entertaining for your specific audience.
For example, The Everygirl knows their audience are mostly millennial women who will appreciate this Rachel Green from friends reference.
Look for reaction GIFs and add your own captions that are relevant for the kind of content you share with your audience.
🔥 Tip: You don’t have to go looking for reactions, you can create your own. Take a short reaction clip of yourself and add your caption.
Hello Sunshine used this popular reaction gif to relate to their audience about coming back to work after a long weekend.
Find a way to highlight awesome things your customers have said about your business in a visually interesting way.
This is a simple but effective execution from The Social Media CEO. Screenshot great comments or emails and put them over a fun photo background:
This works especially well if you have a physical product, but encourage your audience to share their own photos using a specific hashtag and you can repost (with a proper credit shoutout of course!)
The Start Today Brand does this with their Start Today journals, sharing customer images of the journals in real life.
If you want to create content that grows your visibility, the keys are experimentation and listening.
Try different types of visual content and see what your audience responds to. It might take a few different executions of each idea for you to figure out if it’s something you want to keep doing.
Here’s an example of the first micro-blog carousel (idea #9) we tried versus one that was created a few months later:
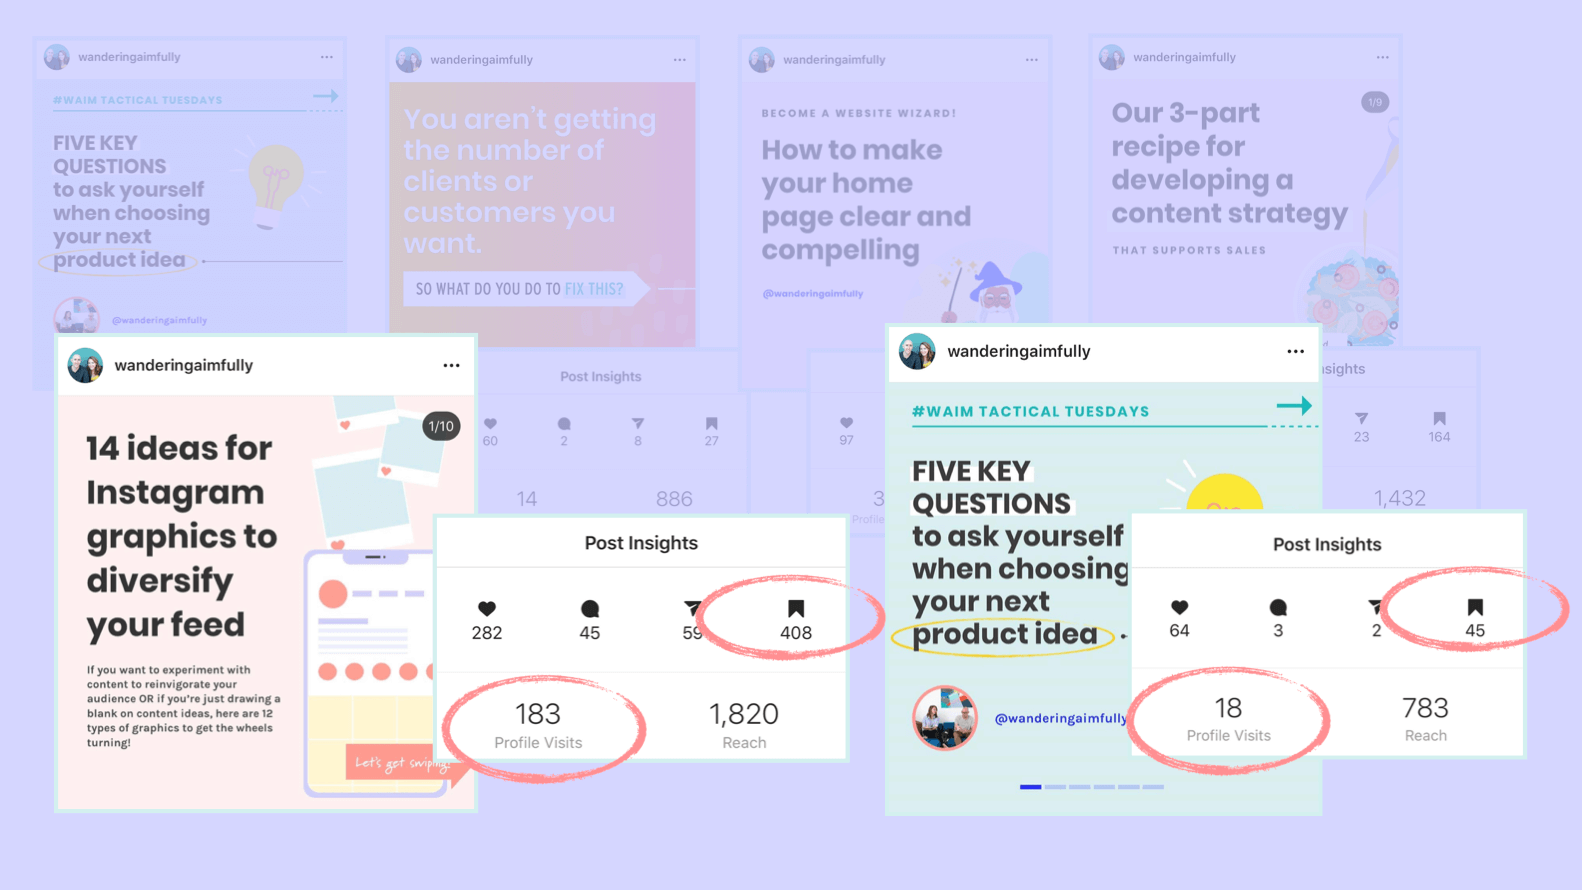
*The 10x growth in shares and saves proves that our IG audience has really started to enjoy these types of posts as we’ve continued to create new ones!
Look at other engagement metrics like saves and shares. A post might get low likes but a ton of shares, and that’s what you want to keep doing because it will lead to people discovering your business on IG.
Most of all, have fun with the platform, engage with your audience, and share content that feels right for YOU. 👍
**
Enjoy this post? Bookmark it for later by saving it to Pinterest!
The whole thing feels so… permanent, doesn’t it?
Believe me, I’ve been there. But the goal of this guide is to lead you through a simple step-by-step process that will eliminate that pressure as much as possible.
If you invest the time in each section of this guide, it will provide you with the prompts necessary to come up with a name that offers a meaningful, clever and timeless foundation for your brand.
Let’s look at four tips for making the most of this naming process…
Make sure that you’re in a motivated, energized state when you sit down to begin. We want those creative juices to be flowing like crazy, and if you’re trying to tackle this guide after a 12-hour workday when your mind feels fried, you may not be in the best frame of mind to reap its benefits.
In order for ideas to thrive, they need to feel free to roam. As you dive in, try to limit the pressure you put on yourself to come up with the Best Business Name Of All Time – at least at first. This open-minded approach will give your brain the safe space it needs to form connections and set fire to sparks of inspiration.
There may be times during this guide that you feel you’ve hit a creative wall. That’s okay. Don’t try to force it. If you find yourself stuck, walk away for a bit and let your ideas marinate. You want to build in the necessary time to let your mind mull things over and to sit with your ideas so that you feel you’re making the best decision for your business.
This is YOUR business after all. It’s your idea that you’re ushering into existence and this should be an exciting part of that process, so enjoy it!
Before we dive in and start brainstorming, let’s briefly review WHY coming up with a great name is so vital to your business and your brand.
Your business name is the foundation of your brand. It’s one of the most important ways you can make a first impression on your potential clients or customers.
When people hear or see the name of your business, they’ll begin forming an immediate perception of your company.
Is it catchy? Easy to remember?
A name is important because it’s the foundation that you lay everything else in your brand over top of. In fact, it’s likely the single most defining element of your brand because it informs all other parts.
Once you’ve decided on a name, it can be extremely difficult to change down the road, and if you do, you run the risk of losing any brand equity that you might have built up over time. That’s all the more reason to come up with the right name right off the bat – one that not only feels aligned with the business you want to build, but one that can grow and adapt to your various business goals in the future.
The good news is, this guide will walk you through these important considerations, and many more. The result will be a name that provides you that excellent foundation and first impression you’re looking for.
In order to arrive at that perfect name – whether it be for your business, your product, or your latest e-course – you want to start with as much relevant inspiration as you can.
To provide you with that inspiration, we’re going to come up with as many words as possible as potential jumping-off points. Think of these words as little seedlings that will hopefully grow into one fully mature, grand oak of a name.
You want to create an environment without criticism or judgment. So, as you move through this phase, don’t worry about which words you like or dislike right now or what sounds like a great business name and what doesn’t. This stage is one of those rare instances when quantity outweighs quality.
At this stage, there is no such thing as a bad idea.
We don’t mind “bad ideas” at this stage of the process (brainstorming). Bad ideas can often spark the inspiration necessary for good ideas, so try to keep an open mind with yourself!
To get this brainstorm party started, write down a list of words based on the following prompts. If you can, try to come up with at least 20-30 per list!
A. List words that come to mind when you think of the products you want to sell, the service you want to provide, or WHAT your business does. As many as you can! (Example: Are you a coffee shop? Some words that come to mind: beans, hot, brew, pour, mug, foam, grounds, roast, cup, etc.)
B. List adjectives and attributes that you want people to associate with your business. (Example: Is your coffee shop all about quality coffee sourced from around the globe and giving back to those farm communities? In that case, your words might be: caring, kind, good, giving, helpful, grateful, delicious, global, quality, craft, etc.)
C. (Optional): Is your business personal to you? Maybe it’s a personal brand or a family business? Also write down words that have personal meaning to you. (ie. names, nicknames, street names you grew up on, areas of your hometown, words that have significance from your childhood, etc.)
Warning! If you choose to incorporate a personal name or place into your business name, be careful. Do you plan to sell your company in the future or transfer ownership? What happens to Uncle Bert’s Bistro when Uncle Bert wants to retire? If you’re a video production company in Michigan and want to go by “Michigan Media House” are you limiting your potential customer base? If you decide you’re willing to travel for projects, will customers think you only service the Michigan area? These are things you want to be mindful of if you decide to include these personal elements in your name.
D. Now go one step further and think of metaphors or related words for some of the words you wrote in A + B above. Think of what other words come to mind when you think of those words (eg. quick >> rabbit; jewel >> precious; cute >> button.) Let your brain run wild! (Based on my coffee shop example: craft >> maker, blacksmith, apprentice. Giving >> hands, heart. etc.)
Remember how in Part One there were no bad ideas and everyone was welcome at the party? Well, Part Two is when we hire a bouncer to work the door and bad ideas start being asked to leave. This stage is when we take your list of words and narrow it down.
Pay attention to the gut reaction you have when you hear a word or read it.
If so, circle those words on your list, and re-write them down!
Once you have a solid list of words that you feel good about, then it’s time to take those seeds and finagle/arrange/combine/transform them into a business name.
Imagine that your words from Part Two are your Legos — they’re the building blocks of your name. Now it’s time for us to put them together in different ways and see what we can create.
Explore each of the following prompts using your “building block” words and write down potential names that you can form:
Heads-up! Make sure that if you go this route, your business name is conceptually sound and not overly trendy. (For instance, even though I’m a coffee shop that sells high-quality coffee, “QualiCof” is probably not the most timeless brand name.) Put yourself in the shoes of your consumer and ask, would I scoff or roll my eyes at this name? If the answer is yes, then don’t choose it!
Once you have some different potential names written down from Part Three, go through each one using the following questions to narrow down your list even further:
A. Does this name sound good to me when I say it out loud?
B. Does this name align with the mission of my business and how I want people to perceive it?
C. If I told people this name in passing, would they find it easy to remember/easy to spell?
D. Do I plan to expand my business to include other products or services in the future, and if so, does this name give me the flexibility to do so?
As you go through your list, prioritize your favorite names by writing a 1, 2, 3, and so on next to them. You’ll want multiple options in case your name’s domain isn’t available or your social media handles are taken. These are important factors that we’ll go through in Part Five.
But first, take a moment to look back at your list.
Do you have a few good leads but nothing that feels completely right? That’s okay! Sometimes these things need a little bit of time to marinate.
Try walking away for a while and letting your subconscious stew on your list from Part Three. Play a game, do some exercise or tackle an art project. Allowing your mind to activate different areas will give your creative muscles a rest, and it’s likely that when you come back to this guide, you’ll have a renewed perspective on things.

Tip: We recommend getting out in nature if you’re hitting a mental roadblock. It ALWAYS helps us!
Try adding new words to your list. Are there words that continue to come back up over and over again?
As I mentioned in the beginning of this guide, your name is the foundation for your brand so you want to make sure it feels right. Have patience and keep the ideas flowing until you reach a conclusion that feels like it fits.
If you DO feel like you’ve found the right fit, continue to on!
Now that you have a name you feel confident about, you want to make sure that it’s viable in terms of intellectual property, marketing, and social media. Here is an important list of factors to consider when making sure your business name is available for marketing purposes:
You can use a free tool like Lean Domain Search to search for your business name and several other domains including your desired name.
Is your new name or a version of it available across popular social media platforms in case you want to use them to promote? You can use Namech_k to easily check ALL social media sites in one spot (pretty neat, huh?)
Search in the federal database if you’re in the US to check the trademark database (wow that website is awful!) You can also Google your business name to make sure that another popular business isn’t using it even if they don’t have a trademark.
Is it memorable and different enough that you will stand out? Does it feel like it can stand on its own above anything similar? For us, there are other sites that use the phrase “Wandering Aimfully” but it’s verrrry far and few between.
And guess what, if you make it through all those questions unscathed?
You’ve put in the work necessary to create the best possible foundation for your business and brand. Now it’s time to buy your domain, grab your social media handles and launch your business!
If this guide was helpful, consider sharing it using the “T’it” or “F’it” buttons below 👍
Oh hello there 👋! The blind auction to purchase our first brand and website has completed! But GUESS WHAT? We’re making more Squarespace Templates… Enter your email below to make sure you don’t miss out on the next one!
We’ll be creating a fictional brand (complete with a logo and custom brand elements) and then selling the entire thing in a fun way.
We love branding, design, building Squarespace websites, sharing our processes, documenting the journey, making money in unique ways, and THIS experiment is bringing all of those elements together!
What started as a simple comment I made to Jason (“I think I want to get back into doing some design work”) has turned into the in-depth post you are currently reading. Jason and I knew we didn’t want to actually take on a client and deal with the back-and-forth nature of that relationship, as we did that for years and it’s not what we’re focusing on now. So instead, we asked ourselves, how could we get creative with this idea and do something different with brand and website design?
Watch the introduction video Jason and I recorded about what we’re calling Building A Squarespace Site from Start to Finish (or BASSSF, as Jason loooves to say):
In the next couple sections of this post, you’ll get to watch me break down every step as IF I were working with a client. I’ll be walking you through the processes I’ve honed over the years, which include:

We love doing things differently around Wandering Aimfully. We believe thinking outside the proverbial box can not only help you stand out but it can help you generate revenue. Well, we’re putting that belief to the test with this project.
At the end of this post, ONE person (or company) will be able to purchase the completed brand and Squarespace site. But, we aren’t just slapping a price tag on things, we have something fun up our sleeves.
If you enjoy projects like this, jump our email list so you don’t miss when we announce the next one:

Hello friends and welcome to the Week One update of BASSSF! 👋 If you were wondering, yes, Jason is constantly saying “BASSSSSSFahhh” around the house (not just in these videos).
As you’ll see in the mood board video below, I deviated from my normal branding process just a bit by starting with color palette inspiration and building out the mood board from that starting point.
If I was working with a client to build this brand, I would go through the steps that I layout inside Better Branding Course (our in-depth branding course included in our Wandering Aimfully membership #shamelessplug) to uncover the client’s Brand Story. This would include things like:
However, since I didn’t really have a business or person to inform my tone words, I was left to my own devices to come up with my own. Rather than pull five random words out of thin air, I let creative inspiration guide me to a color palette I thought was interesting and I assembled my tone words as I found each of my mood board images.

I know this project is supposed to focus on building a Squarespace website, but in my experience designing something just to “look good” isn’t fulfilling or challenging. In order to end up with a site that I felt could translate to a real business out there, I needed to know what “brand” my final website would be promoting.
Even if you’re a business with an existing brand you’re happy with, I recommend putting together a new mood board if you’re planning on refreshing your website. You may just find new details and design inspiration that elevates your final site that much more.
Once I had my mood board finalized, it was time to turn that into a brand that would inform the design of my website.
Many of our members inside Wandering Aimfully and those of you who read our content primarily fall into the category of “freelancer looking to also sell digital products.” I knew I wanted my final site to be able to serve an ultimate business owner who would need a way to both promote their services AND their products. So, I decided my placeholder brand is a “creative studio” who offers marketing consulting packages and an online marketing course. This, of course, could easily be swapped out for any kind of freelancer. A copywriter who offers writing services and a copywriting course, or a designer who offers design services and a design course. You get the idea.
For those of you who aren’t full-time designers, making the leap from a mood board of random images to suddenly picking out fonts and designing a logo is daunting. That’s why in this video I walk you through a process I go over extensively inside Better Branding Course called “building your visual vocabulary.”
Building a visual vocabulary simply means accumulating an understanding of how certain visual details translate to an emotion, tone, or feeling.
Why does a dark indigo watercolor painting evoke a sense of moodiness? Why does a skinny serif font feel traditional and delicate while a thick sans-serif font feels bold and modern? These are the connections you want to pay attention to and use them to build a rolodex of design decisions.
This will make it much easier to turn your mood board and tone words into a brand identity design (logo, color palette, typography, graphic elements, etc.)
In the Brand Styles video (below), you’ll see me speak to each of the tone words and what visual details in my mood board connect to those tone words. Then, you’ll see me take that detective work and turn it into a list of graphic elements or “building blocks” to formulate my brand.
You’ll see my tricks for testing out custom fonts and graphics before you buy them, and you’ll see me experiment with creating my own graphic elements based on the inspiration found in my mood board.
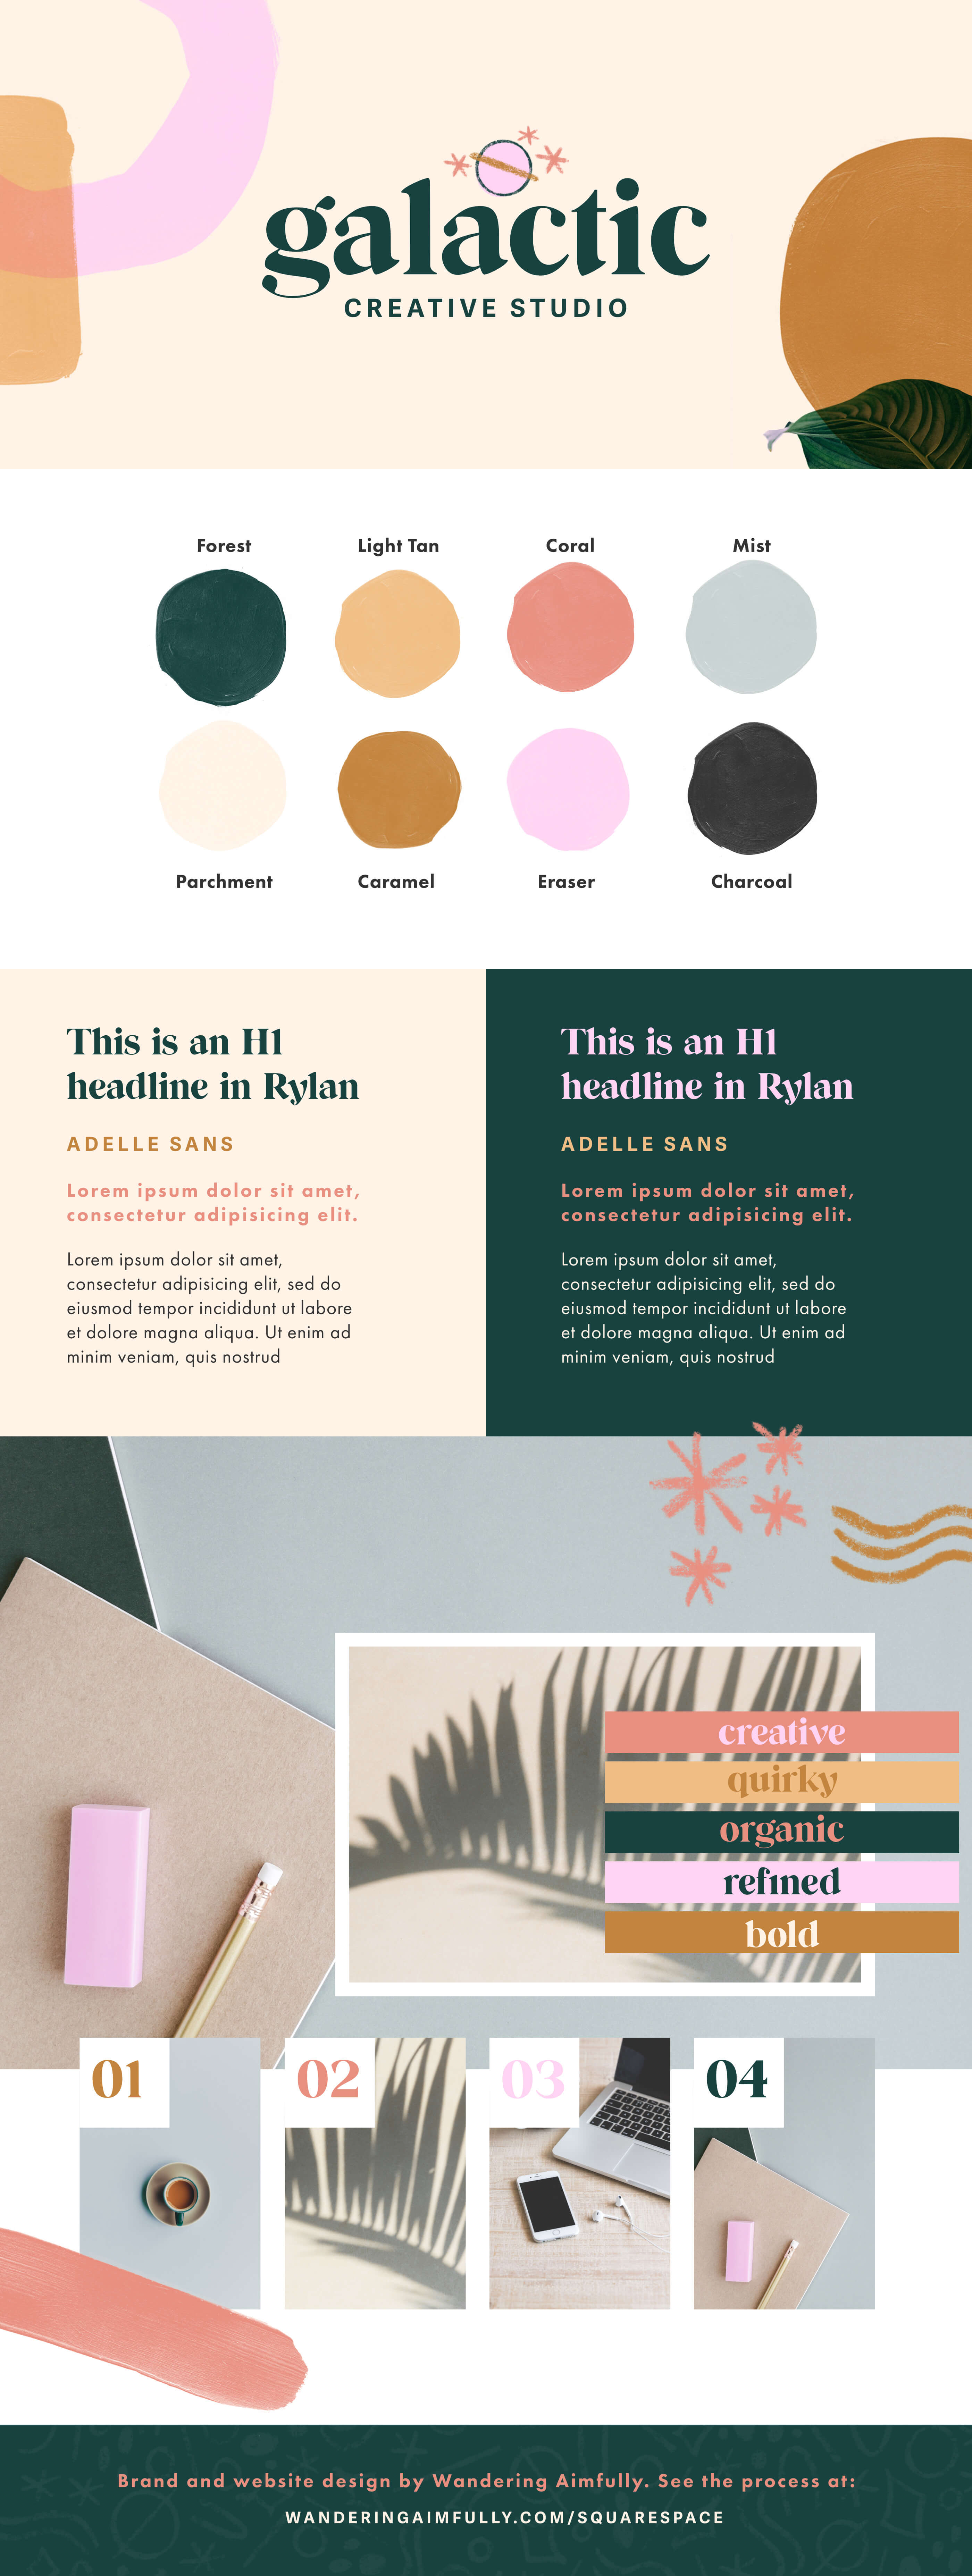
Here’s a look at the final brand board. Now that we have this completed, we’re ready to START the Squarespace website build next week!

Alright, we are back with another exciting installment of BASSSSF! Who’s ready to actually jump into Squarespace?!
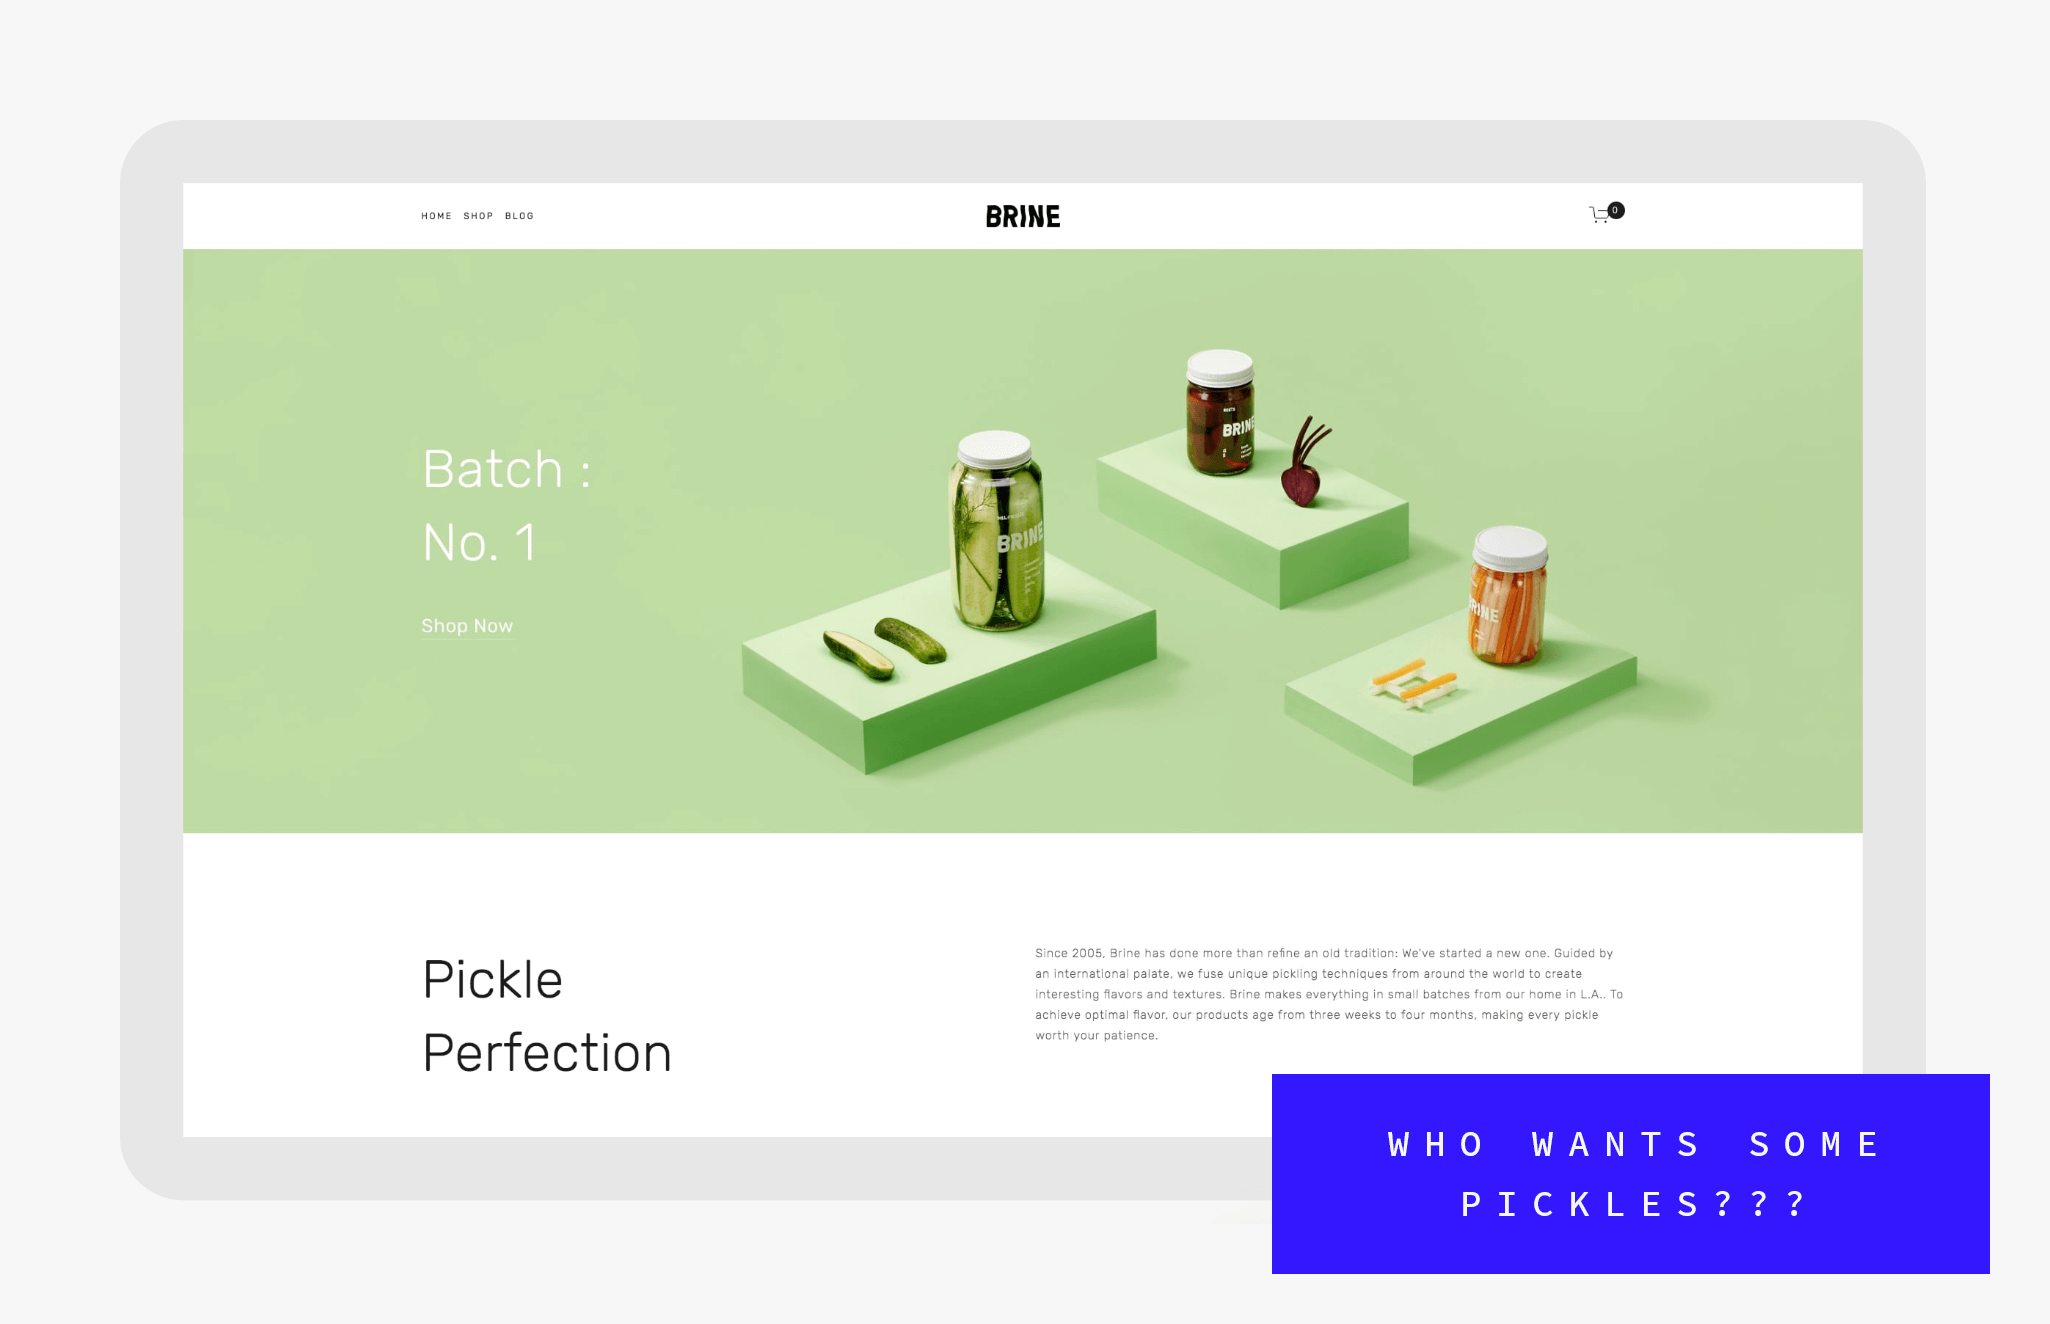
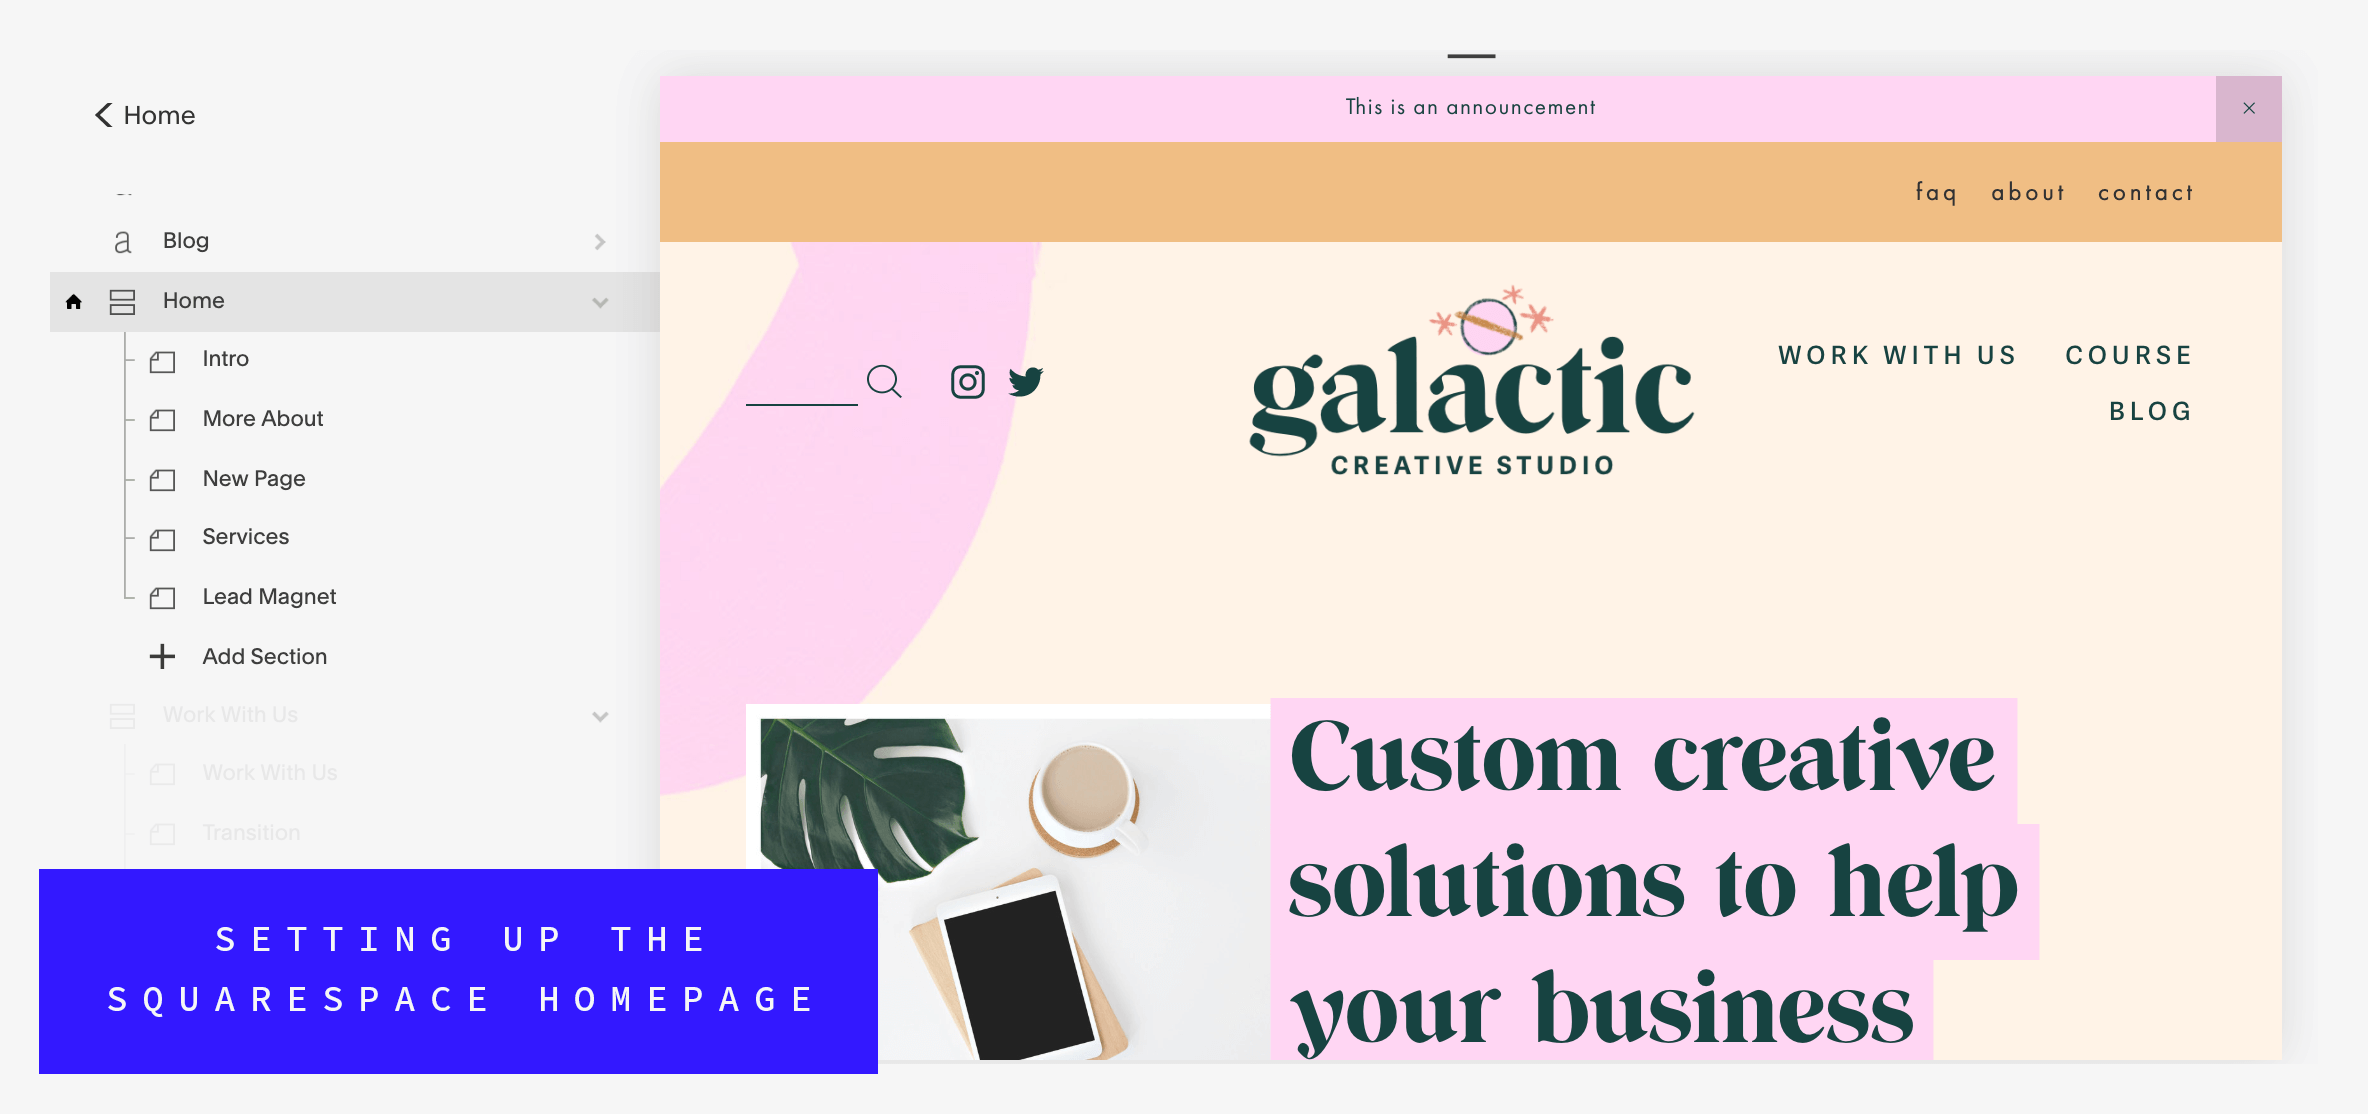
Now that we have solidified the brand, it’s time to bring that brand to life by creating a unique and custom website design. The first step in the process for me is to pick a Squarespace template and set up the basic pages in the site. Lately, I’ve been using the Brine Squarespace template because it has all the features and flexibility any small business could need and plenty of design options to choose from.
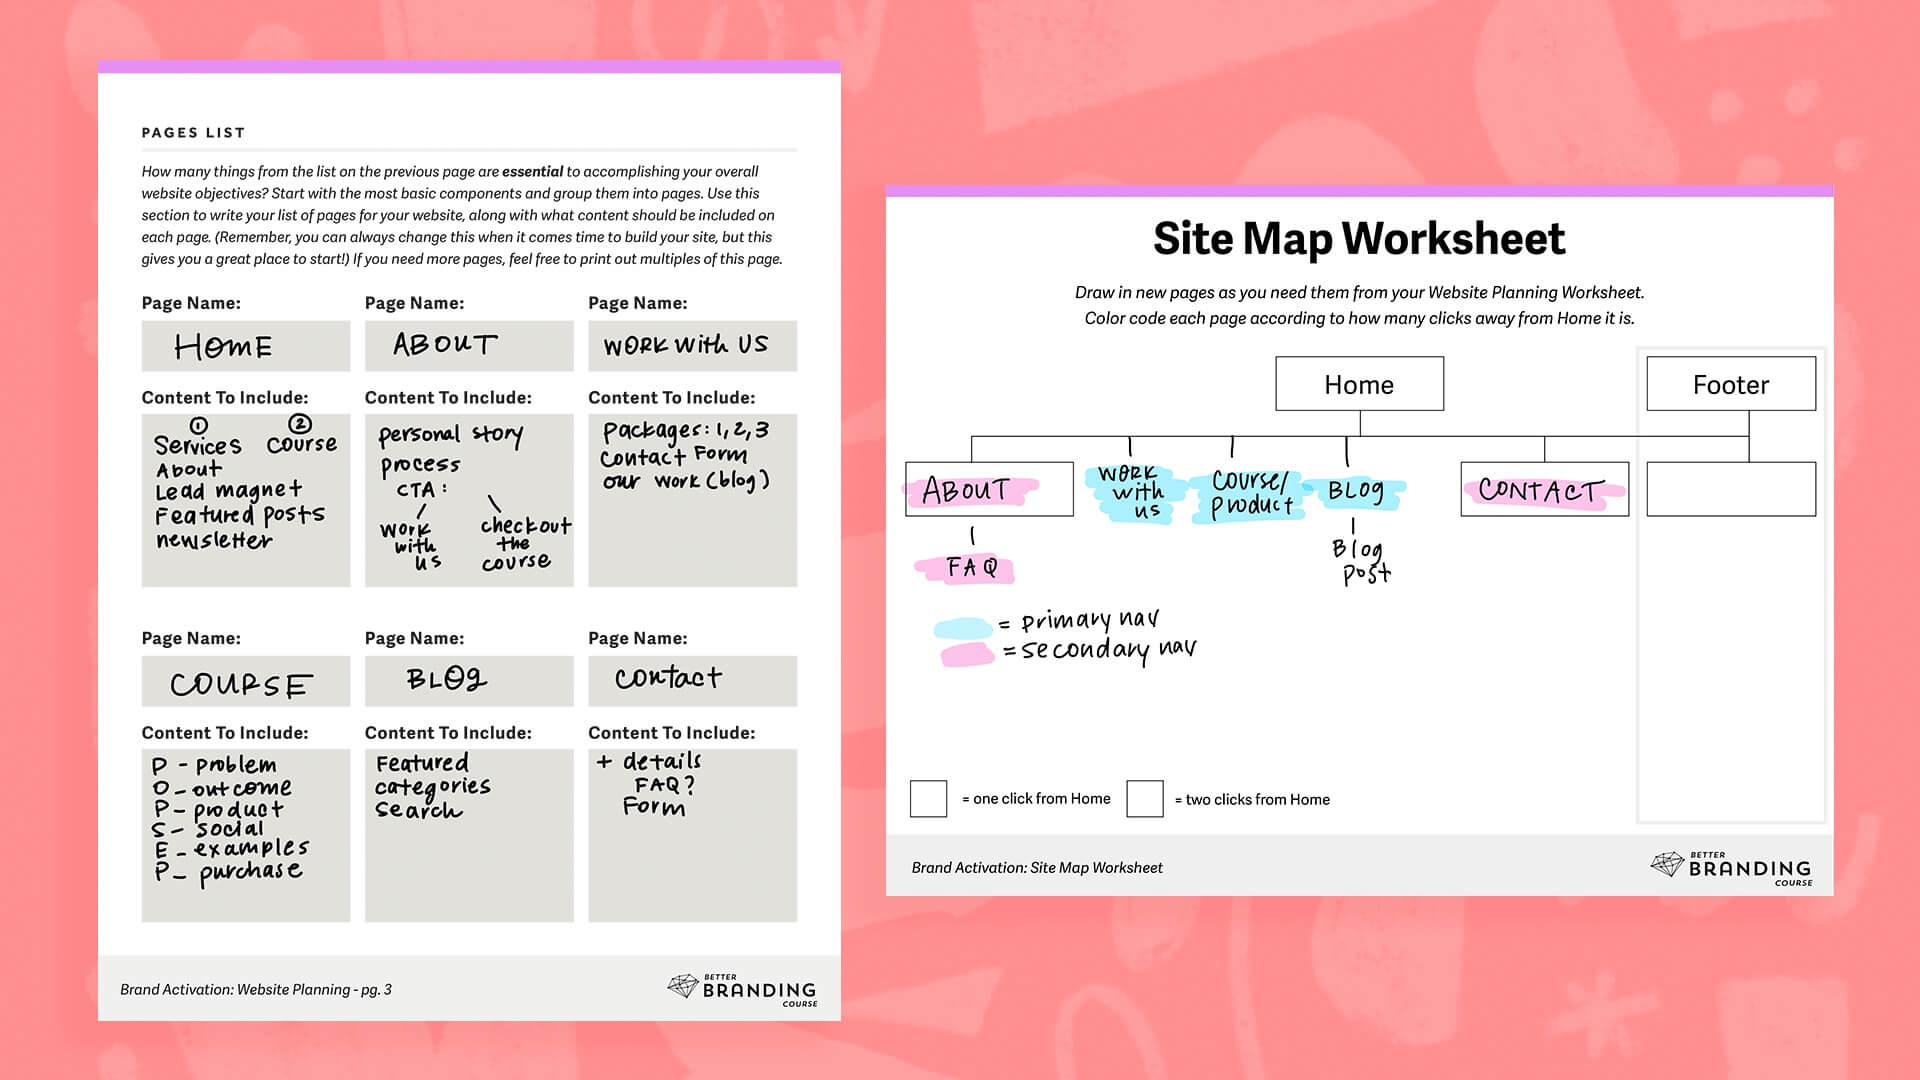
I took a few minutes to plan out what pages I wanted this basic site to have, as well as to brainstorm some ideas about what content would live on each page so I could make sure this site had the basic necessities a future owner would need to run their business. I also sketched out a VERY basic site map just to figure out what pages I wanted to have in my navigation. For a more complicated site, I would advise spending more time to think through the architecture of the site, but in this case, every page is basically accessible from the home page so it’s pretty straightforward. I did decide that I wanted to separate my pages into a primary and secondary navigation, just to keep the main options in the navigation as streamlined as possible and really lead users to the two money-making pages on the site, being “Work With Us” and “Course.”
With my site architecture decided, I easily add these various pages to my Squarespace site in the corresponding navigation sections. Before I add any content to those pages, though, there’s a very important step in the process I have to tackle: my brand styles page!
A very important step in the process that you’ll watch me complete in the first video below is creating a “Brand Styles” page in my Squarespace site. I do this before I ever layout any content on my pages.
For my Brand Styles page, I add all my headings and paragraph text (in index sections with a background banner and without), all the various image block style designs, and a few blog summary blocks. This way, I can take a half-hour or so to decide on which brand fonts to apply to my headings, how I want to apply my brand colors to various elements on the site, and I can install my custom brand font before I even lay out my pages.
Isn’t the Brand Styles page super fun??
Adding the creation of a Brand Styles page as a step in my Squarespace design process has been a GAME CHANGER. It allows me to apply my brand identity elements (fonts, colors, etc.) and style some basic content blocks before I ever start adding content to my pages. This does two things: 1) It saves me time from having to adjust my site styles every time I add a content block during my layout phase and 2) it reduces decision fatigue during my layout process because I’ve already decided on most of the visual styling. Plus, after the end of laying out the content on my pages and inserting all my content blocks, my site already looks incredibly “branded” and then all I have to worry about is final customizations and design details.
Once the Brand Styles page is created, the next step in the process is to actually add content to each page and decide on the overall layout—the order and arrangement of elements on the page. Again, before I ever hop into Squarespace I like to sketch things out just a bit on a loose wireframe. This allows me to see at a glance whether I’ll need text vs. images or any other visual components in order to communicate the basic things I want to include.
For the more complex pages that might require more information, I’ll turn those into “index” pages in Squarespace, which just gives you the ability to stack multiple sections on top of one another.
I start with my home page, sectioning out the content I want to include as needed and then adding the basic content blocks that I need. For example, if I know I want an image in a particular section, I’ll add an image block and play around with the design settings to utilize the different image styles that Squarespace offers. (This is also when it’s nice to have pre-branded elements thanks to our Brand Styles page stage of the process.)
I DON’T obsess over the final layout at this point in the site creation process. My only concerns are that a) all the content I want on the page has been added via content blocks, b) it’s in the order I want it scrolling down the page, and c) I’ve thought about arranging the position of elements in a visually pleasing way.
I do this for every single page of the site, adding text, images, buttons, and galleries where I see fit and making sure to include filler text and images so I can start to see the visual design of each page emerge.
Watch as I lay out the home page and about pages, and share some of my basic tips for this layout stage of the process…
Okay, once I had each page’s basic layout and content solidified, it was time to crank up the magic! This last phase of the process is where the design really starts to feel custom and one-of-a-kind.
These details basically fall into one of these three categories:
I use custom background banners to layer in my branded graphic elements and break up the recognizable “striped” look of a Squarespace template index page. Then, for my image blocks, I embellish my photos with things like borders or shapes to create a more custom and finished effect that goes beyond the standard website photo. And lastly, I pepper in small graphics and content separators to add unexpected moments between more standard layout elements like photos and text blocks.
Watch as I go through each of these design additions to customize the home page:
Pro-tip: I use the home page as a sort of sandbox to test out different design executions before jumping into any other pages.
Once I’m happy with the final home page design, that’s when I repeat those design executions in similar ways throughout the rest of my pages to make the whole site more custom. After all my pages are designed, that’s when I head back into my Squarespace settings and finalize every last detail like my favicon, styling the different add-ons like an announcement bar or email pop-up and optimize my designs for mobile.

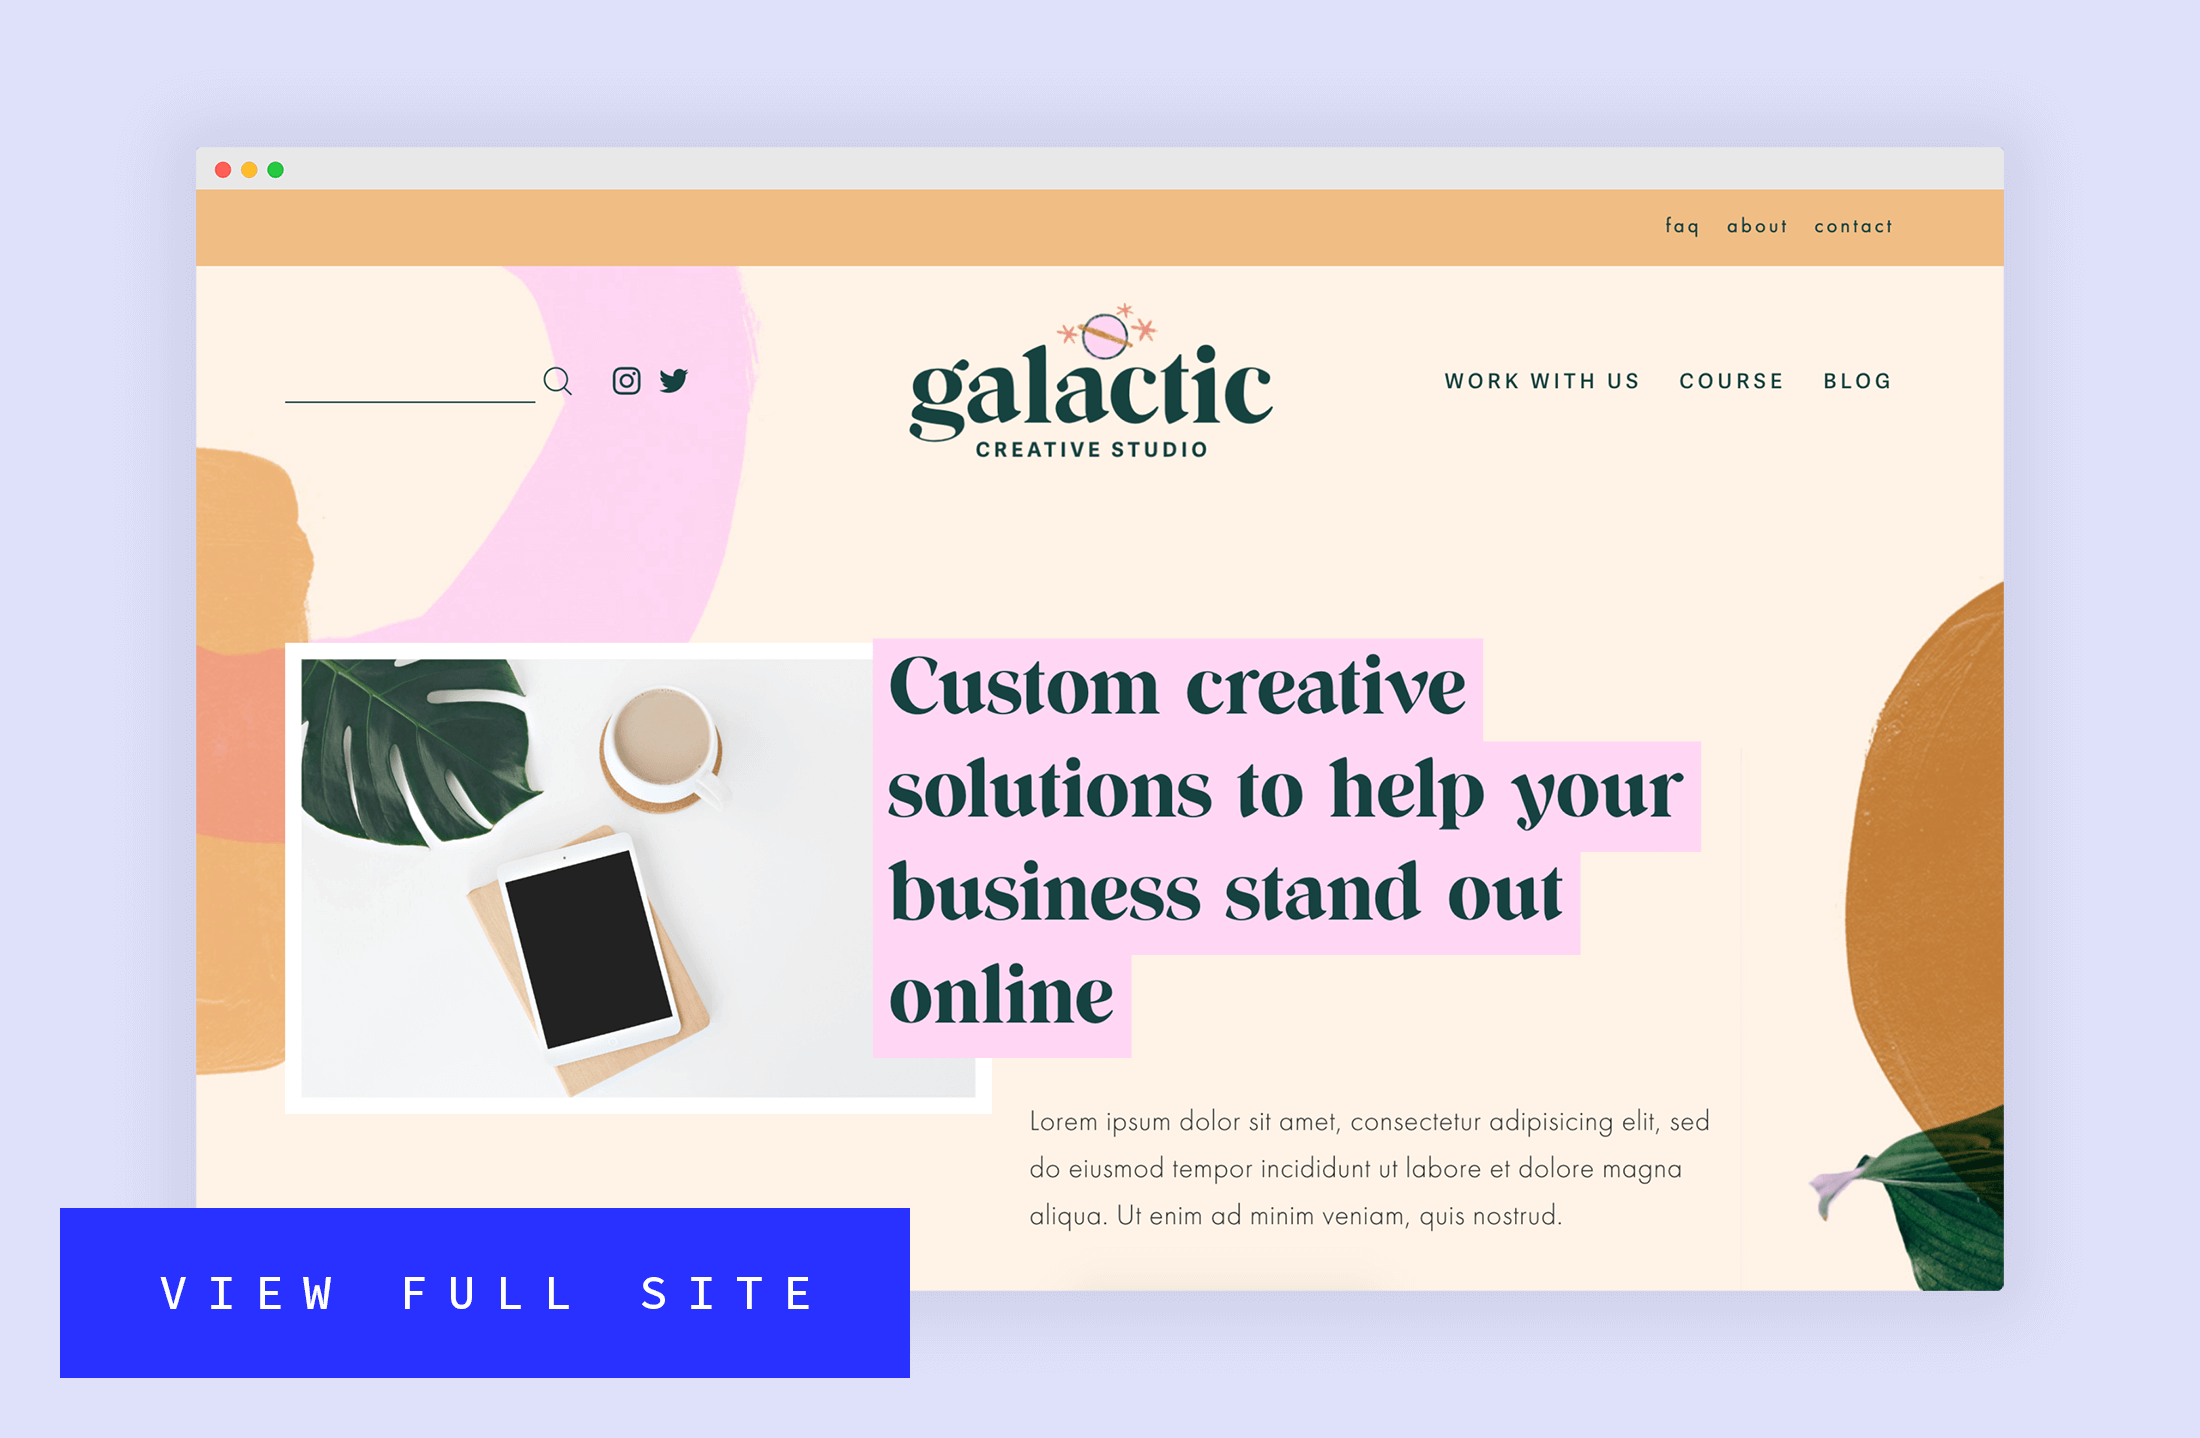
Sound the trumpets, it’s time for the big reeeeveeeeeal! We are so excited to share the finished website for BASSSF and showcase the brand in action…
In that reveal video (not an HGTV show, sorry Jason) we talked in detail about the finished website, but here’s a list of everything that was completed in the final week:
WHEW! That’s quite the list of stuff to accomplish and make sure was branded and looking sharp.

Head on over to the Galactic Creative Studio website and click around!
You can also click this fancy image too…


If you watched the reveal video then you know we sold the entire BASSSF brand and Squarespace site using a blind auction. But if you didn’t watch the video, we simply held a blind auction where people submitted bids to buy the brand and site over a 5-day period.
Once the auction ended, we contacted the high bidder and started the process of payment and transferring all the goodies. And a friendly reminder: This was NOT a template or kit that will be sold again! Only ONE person/company now owns the Galactic Creative Studio brand and site 👍
Thanks for checking out our BASSSF project and we hope you enjoyed it! If you want to see more projects like this from us in the future, hop on our email list and stay tuned!
Since starting the Wandering Aimfully, even back in the days when it was called BuyMyFuture/BuyOurFuture, we’ve had so many people reach out asking for advice about how to reach their business and life goals. While we’ve offered individualized advice to many over the years, we have noticed some overall themes that pop up time and time again.
Questions like:
Our remedies for these common challenges most often boil down to the most foundational parts of running a business. Namely…
So many of these things are things you already know—they’re things you feel should be in place for your life and business already—yet sometimes the simplest things are the hardest to pay attention to.
Sometimes the simplest things are the hardest to pay attention to.
Let’s face it: Finances are scary, productivity isn’t sexy, and choosing one focus is uncomfortable, especially for multi-passionate and creative people like those in the Wandering Aimfully community.
But believe us, getting clear on these things is the only way to make sure your business is built on a solid, sustainable foundation going forward.
We want you to use this as motivation to finally get these foundational pieces in the right place to gain more clarity and focus.
So, it’s back to basics we go!
Here’s an outline of what we’ll work through together:
Alright, with the WAIM community awesomeness out of the way, let’s get these business basics ducks in a row! To get this party started, it’s onto Phase 1: Know Your Numbers!
We believe there’s a lot more to personal success and happiness than just money. However, as with everything, there has to be a balance.
More money in your business can bring you freedom and flexibility in your life, which are things that can dramatically increase your happiness. Yet, it’s staggering to us how many people we give advice to that don’t have a system for tracking their finances—personally or professionally.
If you’re reading this right now with this face on 😬 because you know you’re one of those people, that’s okay! This program is your chance to change that!
We’re going to break down your numbers into two categories: Revenue and Expenses.
**It’s important to note, none of the methods we’re taking you through are meant to be 100% accurate to the penny. This is not an accounting class. (Thank goodness.) Instead, this is about common sense math and getting ballpark figures so you can make better decisions in your life and business. So try not to obsess over the small stuff and get caught in the weeds with the following exercises. Instead, keep your eye on the big picture and the general aim, which is to get an idea of how money is coming in, how much is going out, and how you can maximize the difference between those two.**
Here’s the first rule of business basics: You need to know how much money is coming into your business by revenue stream.
It’s not enough to see total numbers in your Stripe or Gumroad or PayPal or Shopify accounts, etc. Knowing what percentage of your overall business revenue is attributed to which projects/products/offerings is crucial for making shrewd decisions on what to put your focus and energy toward at any given time.
For example, if you’re spending 80% of your time on a revenue stream that’s only making you 20% of your income and you’re not seeing results, that’s helpful information so you can shift your focus to a product or project that’s going to get you a bigger bang for your buck.
Which brings us to your first action step:
Determine the monthly revenue for each of your revenue streams throughout the current year.
To do this, you can use a spreadsheet tool like Excel or Google Sheets, you can use our favorite database tool Airtable, or heck you can just write it down with pen and paper! Figure out the right process for you, but be sure to keep in mind your chosen process should be something you can continue to update going forward.
If you’re having trouble knowing where/how to start, fear not! We have some example spreadsheet templates you can use based on systems we’ve created for ourselves over the years (along with step-by-step details on how to use each below):
Step 1: Click on the link to the template and hit File > Make a copy… (this will allow you to edit the template.)

Step 2: Download your sales data (in CSV format) from your payment processors one month at a time. Here’s an example using data from Stripe. Under the Payments area, set your filter parameters and Export your data.

Step 3: Import your CSV into your Sales Dashboard spreadsheet as a new tab/sheet by going to File > Import… You can import as a new tab or you can replace the “January 2018” tab in the template.

Step 4: Sort your transactions so you can group by product or revenue stream. For example, in my case I sort by the “description” column because that would group transactions for the same course together. (To do this, go to Data > Sort Range…, make sure “Data has header row” is selected and choose the column to sort by.)


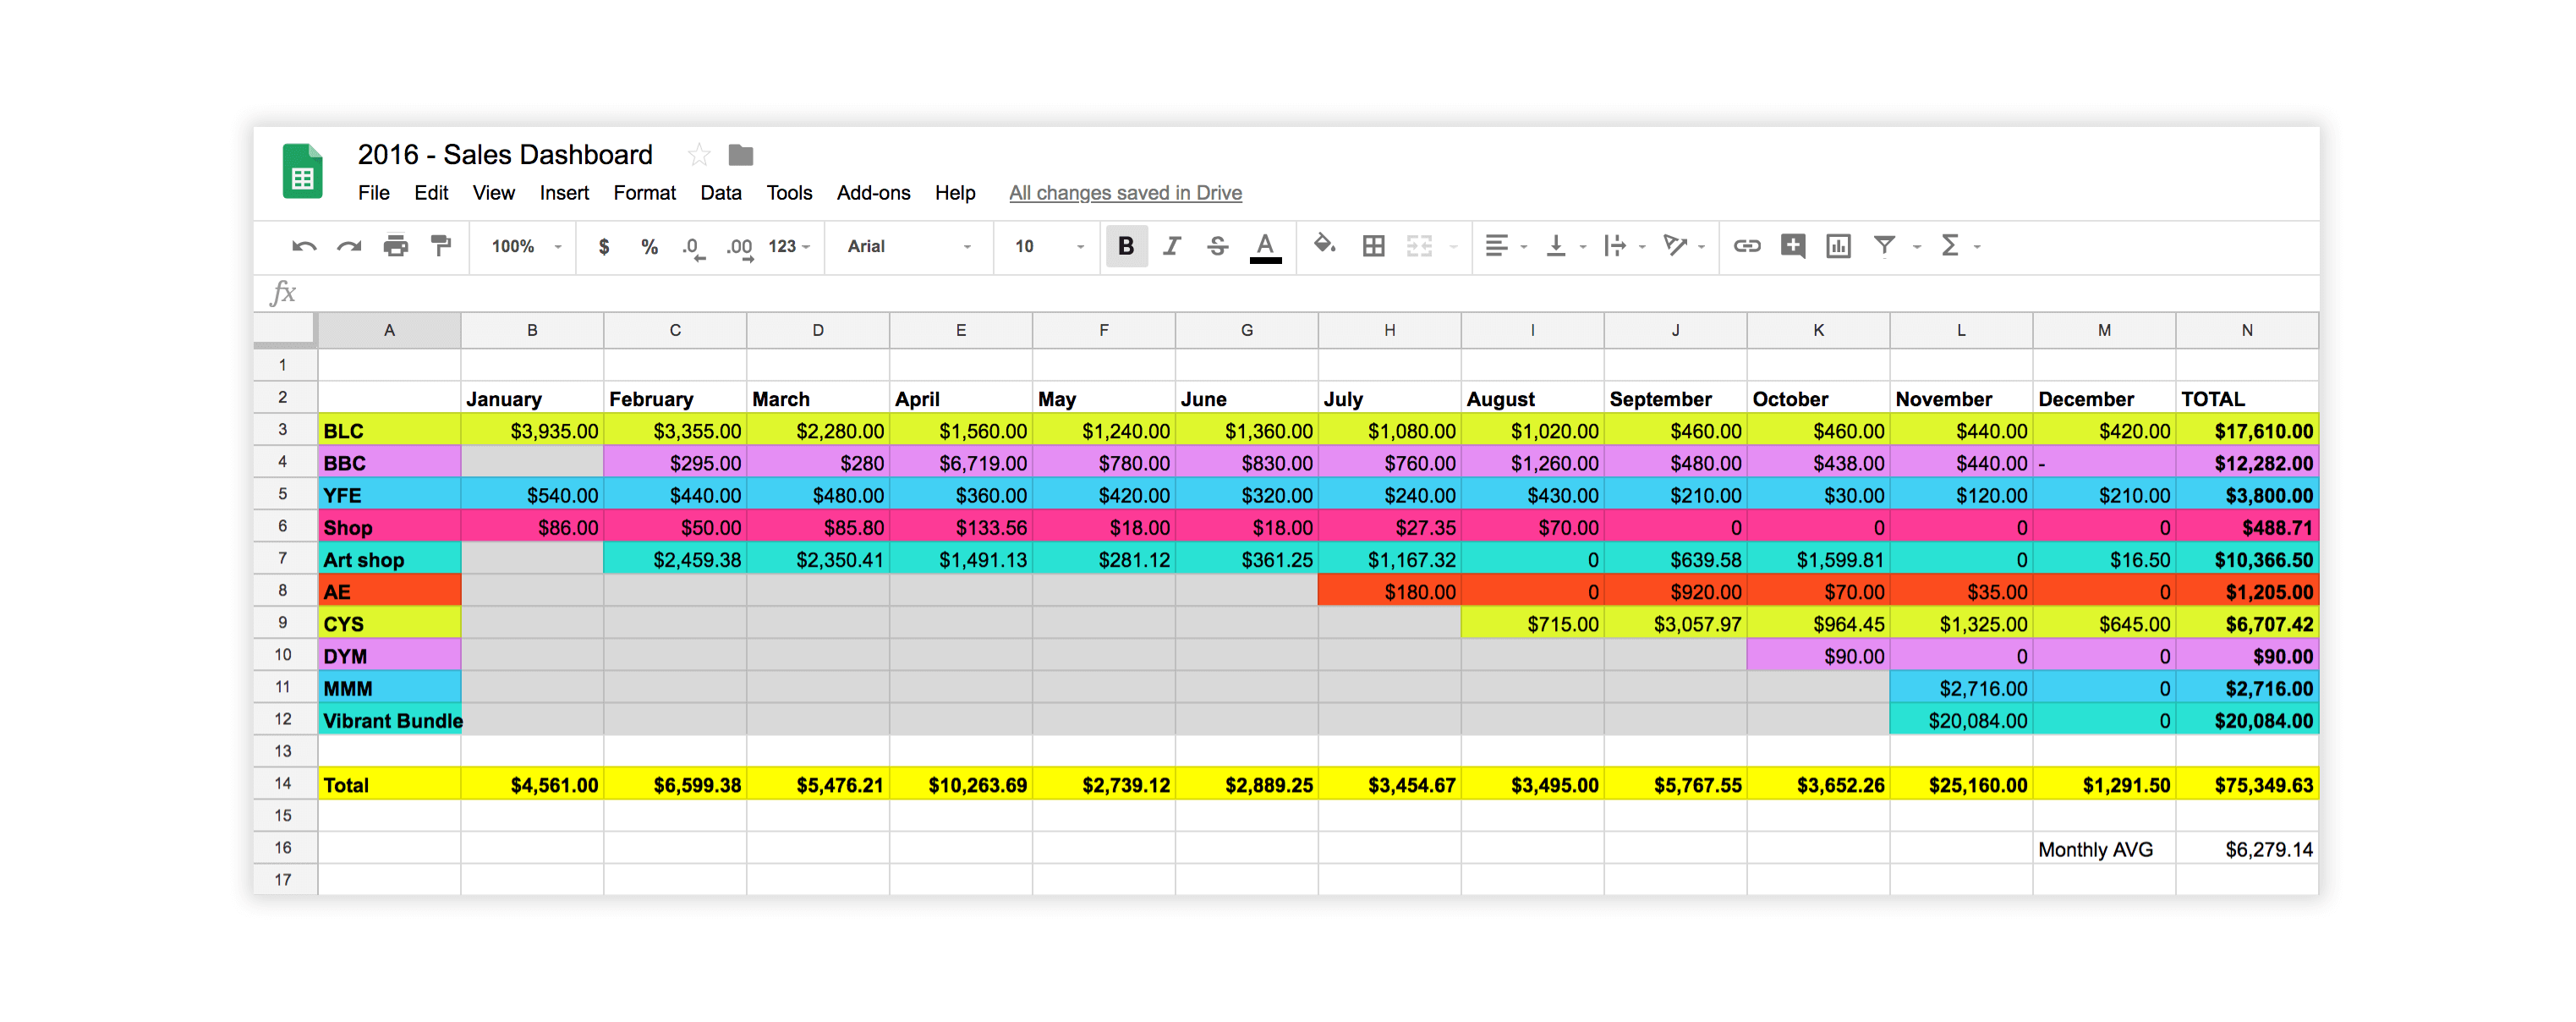
Step 5: Now that all your transactions for the same product are grouped together, I find that it’s helpful to color code each product. For example, in this image I highlighted Acrylic Explorations online course in green, Better Lettering Course in light coral, and Your First E-Course in medium coral. Then, insert a row at the bottom of each product section and sum up the revenue total for that product. (I find it helpful to highlight all these subtotals in a bright color like yellow.).

Once you’ve summed the subtotal for each product, you will likely also want to add up those subtotals to get your overall sales for the month

Step 6: Add your subtotals to the main yearly dashboard tab. (Tip: If you click into a cell and type “=” you can click over to your monthly sales data tab to select the cell with the subtotal for your product for that month OR you can just type the value in, you choose!)

Repeat this for every month. This should allow you to see on the Sales Dashboard tab about how much each of your products brought in each month of the year thus far. Here’s a look at my former business, Made Vibrant, and my own sales dashboard from 2016!
Here’s a walkthrough video just for you on exactly how to use this Sales Dashboard template step-by-step:
Step 1: Click on the link to the template and hit File > Make a copy… (this will allow you to edit the template.)
Step 2: Begin updating the spreadsheet with your client projects. List each client project in the top “Client” section. For each client row, you can color in the corresponding cells for the amount of weeks you spent working on the project. This method is especially helpful on an ongoing basis so you can see how many projects you’re working on at one time and your cashflow of when to expect each invoice coming in.
![]()
Step 3: Input each of your client invoices, entering the totals in the row of the corresponding client and the column of the corresponding week.
![]()
Step 4: The sheet should use formulas to automatically add up the invoice totals for each month from each client so you can see how much you made in total client/project income for each month.
![]()
Step 5: If you also have digital products or other income in addition to your client work, you can use the “Product” section in the bottom section of the spreadsheet to input those monthly totals.
![]()
Once you have all your various income and projects inputted, you should be able to see how much you’ve made by month, by project/product, and what percentage of your income has come from client work vs. products.
![]()
Here’s a walkthrough video just for you on exactly how to use this Income by Projects template step-by-step:
Step 1: Click this link to view the template Airtable base.
Step 2: Click “Copy base” in the top right corner. If you’re already an Airtable user, sign in to see your copied base. If you’re not, sign up! (You can also use our Airtable referral code if you want, we get a $10 kickback if you decide you like it and sign up!) This will now allow you to take our template and make your own edits.

Step 3: We believe Airtable is so versatile and flexible that you can use it for both client revenue and product revenue. But first let’s start by adding your client revenue. You’ll want to do that under the “All Payments” tab. Create a new row or “record” (as Airtable calls them) for each invoice or payment you’ve collected this year. Fill out the date of the invoice, description, amount, along with the name of the client underneath the “Revenue Stream” column. (You can just type the client name and hit enter which will create a new client from the dropdown meaning you will be able to attribute any additional invoices/rows to the same client.)
![]()
Now here’s the cool part. The way we have the Airtable setup, there’s also a “Monthly Summary” tab which aggregates all the revenue for a given month. However, we need to tell that summary tab which records (rows) to add up under each month. The next step is how we do that!
Step 4: For each client invoice record, copy the client name under the “Revenue Stream” column and paste it in the “Log” column that corresponds to the month it was paid.
![]()
These log columns are linked to the Monthly Summary tab, so by doing this step, you’re effectively telling Airtable to attribute that amount for that particular client under that particular month. Once you paste the client name under the appropriate log, the amount pops up in the Monthly Summary tab. Watch it in action:

Notice that because my third invoice was paid in February, I pasted the name of that client under the “February Log” column so it would show up in the February column over on the Monthly Summary.
Do this for every client invoice record, and then under the Monthly Summary tab, you can find your monthly totals in these summations at the bottom of your view.
![]()
The base also has a Total column that adds up the invoices for one client across every month. This allows you to see how much money total each client brought in for the whole year, and then the summation is how you know how much you made in TOTAL across the year.
![]()
Step 5: Download your sales data from your payment processor one month at a time. In this example, I’m filtering my payments in Stripe to export payments made in January that were successful.
Step 6: Import the raw data from your CSV into a new tab on your Airtable. Click the + button and select “Import a spreadsheet.”
![]()
Step 7: Now, format your raw data! The import shows us the messy raw data of our product sales, with each row showing one transaction, but we need this data formatted to match perfectly with our “All Payments” tab setup.
To do this, we’ll need the first three columns to be Date, Description, and Amount…in that order.
*One important thing to note about Airtable: the first column is your Primary Field and is locked, meaning you can’t just drag and drop to rearrange like you can the other columns.
If your primary column is not your transaction date (mine is actually my Description in the example below), you’ll first want to copy that column, add a new column, and then paste that data like I did here. Then you’ll copy your date data and paste that over the primary column. Finally, just drag and drop the amount column so you’re left with the correct order Date, Description, Amount. If that was confusing, see it in action here:
![]()
Now you’ll also want to select the correct Field Types for the Date and Currency columns. To do that, double-click on the column header and select each corresponding field type: Date and Currency.
![]()
Yay! Our data is now correctly formatted.
Step 8: Now, copy/paste your first three columns of correctly formatted sales data into the All Payments tab.
![]()
As a reminder, each record or row represents a payment made to your business. So where in the context of clients each row was a paid invoice, now in the context of products, each row is a sales transactions.
Now we need to assign a revenue stream, but to make that easy, let’s group our transactions so that transactions from the same product are grouped together.
Step 9: Sort all your payments by “Description.” Choose Sort at the top of your tab, then from the dropdown select sort by “Description” and hit Apply.
![]()
This basically alphabetizes your transactions by description, which allows us to easy fill in the Revenue Stream column with the product name.
Step 10: Fill in the Revenue Stream column for each transaction with the product name. (You should be able to tell based on the Description text.) You only need to type it once, then you can drag the bottom right corner down to auto fill the rest of the rows for that product.
![]()
Step 11: Now we need to “log” each sale in the correct month so it will rollup in our Monthly Summary tab. As you remember from the steps above, just copy the Revenue Stream column and paste in the correct “Log” column. If you exported your sales data one month at a time, this will make things especially easy because you can just select every cell in the Revenue Stream column that corresponds to a January transaction and paste it in the January Log column.
![]()
Here’s a walkthrough video just for you on exactly how to use this Revenue Tracker Airtable Base step-by-step:
Hopefully, by now you have an idea of how much money your business efforts are bringing in and exactly how much each of your clients/revenue streams/products are contributing to your bottom line. But money coming in is only one part of the equation. We also need to understand how much money is going OUT.
That doesn’t just go for your business, that goes for your life as well.
This is where tracking your expenses and categorizing them comes in handy.
In our experience, so many people avoid looking at their spending habits because of the shame they feel about how much money they spend. Whether it’s because you’re in debt, or you’re making less than you want to be making, you might be avoiding your bank accounts to avoid these kinds of feelings.
But, the important thing to realize is that ignoring your finances doesn’t make them go away. The only way to stop that cycle of shame is to confront your habits and make changes to start spending smarter.
This was one of the very first things we did when we were trying to claw ourselves out of debt, and it was a crucial step for us in taking back control of our finances.
Not to mention, for every dollar less you spend in your life and business, that’s one more dollar of profit you get to keep and save or pay off debt with.
Track and categorize your expenses for the past three months using our ETAC exercise.
What’s ETAC you ask? ETAC stands for Expense Tracking And Categorization, an exercise we developed after being dissatisfied with the budgeting software we experimented with out there. We wanted a completely custom way to track our expenses and group them into categories, so we created our own method. (Jason also loves that the acronym sounds like the word attack, which is appropriate since we used this method to attack our mountain of debt.)
Just like in the revenue section, we’ll walk you through how to categorize your expenses using both Google Sheets and Airtable.
Step 0: Make a copy of the Expense Tracking and Categorization (ETAC) Google Sheets for yourself (File > Make a copy).
Step 1: Download the data from all your accounts and credit cards for the past three FULL months as CSVs. (CSVs might also be titled “comma delimited tabs” in your account download options.)
Step 2: Import your CSVs as individual tabs into the ETAC spreadsheet. (To do this, go to File > Import > Upload your CSV and select “Insert new sheet” under the import options)
![]()
Step 3: Format your data so it’s all uniform. Make sure you have three columns in this order: Date, description, and then amount. Be sure to format the date column as a date and format the amount column as a currency.
NOTE: I like to keep all expenses as negative numbers. Make sure it’s consistently negative OR positive across every debit or credit account you have because if not, your transactions may cancel each other out giving you an inaccurate total. Whether it was paid for on a credit card or with a debit card, if it was an expense (money going out) I make sure it’s formatted as a negative number.
![]()
Also, delete any transfers or credit card payments. We’re just looking for how much money went out the door, not how much was moved around between accounts. It’s REALLY important you remove these across every tab or else, again, your totals will cancel out and be substantially off.
![]()
Step 4: Once the data in all of your tabs is formatted uniformly, copy/paste each list of transactions into one sheet, the sheet in this spreadsheet labeled “All Transactions.”
![]()
Step 5: When every transaction has been pasted over to the All Transactions tab, sort by date and then fill out the appropriate “Month” column.
(This will make it easier to filter your data and see transactions by month.)
![]()
![]()
Step 6: Once months have been applied, go through every transaction line by line and assign a category in the category column.
You can use the category names already listed out on the Monthly Comparison sheet OR you can create your own.
![]()
Step 7: Now it’s time to add up your monthly totals by category and add to the Monthly Comparison tab. To get all the transactions in a certain month in a certain category, first Filter by one month, and then sort by category.
To do this, go to Data > Create a filter… and select the down arrow on the month column to check off which month you want to view at a given time. We recommend only viewing one month at a time when you’re adding up your category totals. Once you have just one month’s transactions in your view, then select the down arrow on the category column and hit Sort.
![]()
This will show you transactions in the same month AND group transactions in the same category together. This will make it easier to sum your totals over on the monthly comparison sheet.
Step 8: Now that you have transactions for one month only, grouped by category, you can head over to the Monthly Comparison sheet, and use the SUM formula to add up the total for each category within that month.
![]()
![]()
Also notice this will start to adjust your monthly expense totals, your three-month average, and your category average.
You can add more categories or more months to your Monthly Comparison tab, just be sure that you update the total formulas so they include those.
Step 9: Repeat these steps until you have the total amount spent for every category and every month.
Here’s a walkthrough video just for you on exactly how to use this ETAC Google Sheets template step-by-step:
Step 0: Make sure you’re viewing the Expense Tracking and Categorization (ETAC) using Airtable.
Step 1: Download the data from all your accounts and credit cards for the past three FULL months as CSVs. (CSVs might also be titled “comma delimited tabs” in your account download options)
Step 2: Import your CSVs as individual tabs into the ETAC Airtable Base. (To do this, click on the + icon by the tabs and select “Import a spreadsheet”).
![]()
Step 3: Now we need to format your transaction data so it’s all uniform. You want to have three columns in this order: Date, description, then amount.
Be sure to double click on the date column and make the field type “Date” and double-click the amount column to make the field type “Currency.”
![]()
NOTE: I like to keep all expenses as negative numbers. Make sure it’s consistently negative OR positive across every debit or credit account you have because if not, your transactions may cancel each other out giving you an inaccurate total. Whether it was paid for on a credit card or with a debit card, if it was an expense (money going out) I make sure it’s formatted as a negative number.
Also, delete any transfers or credit card payments. We’re just looking for how much money went out the door, not how much was moved around between accounts. It’s REALLY important you remove these across every tab or else, again, your totals will cancel out and be substantially off.
![]()
Step 4: Once your data is all formatted uniformly, copy/paste each list of transactions into the Expense Tracking tab under the All Expenses view.
![]()
Step 5: When every transaction has been pasted over to the Expense Tracking tab, sort by date and then fill out the appropriate “Month” column. (This will make it easier to filter your data and see transactions by month.)
![]()
Step 6: Once months have been applied, go through every transaction line by line and assign a category in the category column.
You can use the category names already listed out on the Expense Summary tab OR you can create your own.
![]()
Step 7: Here’s where the magic happens! In order to pull in the total spent on a given category in a given month, we need to “log” our expenses in the corresponding monthly log column. To make this easy, go ahead and filter all your transactions by one single month.
![]()
Then, copy the category column for that month, and paste it in the corresponding monthly log column. In this case, we’ve filtered only July transactions, so we copy the category names and paste them in the July Transactions column.
![]()
The “July Transactions” field is linked to the Expense Summary tab, so if you go to the Expense Summary, you’ll now see the total spent on each category in the July column.
![]()
Step 8: Repeat this for each month of data. Filter by month, then copy/paste the categories into the log column matching that month.
Finally, you’ll be able to see your total spent each month by category. You can also use the summation bar at the bottom to see how much total you spent on a given month.
![]()
There are a few more fields on the Expense Summary tab you might find interesting.
Here’s a walkthrough video just for you on exactly how to use this ETAC Airtable base step-by-step:
As a recap, here’s what you should have used the steps above to do for this lesson:
Now here are some critical questions to ask yourself as you take a look at the data:
Once you get your numbers in order, come back next week for Phase 2, all about where you’re spending your time and how you’re maximizing your productivity!
It’s time for phase two of Back To Business Basics, let’s not waste a single second! Alright fine, we’ll stop with the silly time puns. We won’t, however, sugar coat how important it is that you start to manage your time like we showed you how to manage your money: By actually looking at where your time goes!
Similar to phase one (Know Your Numbers) we want to show you how we’ve been able to find more hours in our days by examining where we’re actually spending our minutes and hours (just like where you’re spending your dollars). There are two exercises in this section: The first is a more hands-on Time Tracking Journal that will help show you where every hour of your day is actually going. The second includes two apps you’ll install on your computer and phone which will track your daily habits and show you where your time goes.
There is not a doubt in our minds that you can make some drastic changes in how you manage your time in just a few short days. They key is that you need to understand where you’re currently spending your time and not try to fix everything overnight.
If we can help you gain one hour back each day, you’ll have an extra 30 hours in the next month that you didn’t have before!
We have two time tracking exercises for you to do and while each is important on its own, we would HIGHLY recommend doing both (you can do Exercise #2 alongside #1 with almost no extra work!)
The point of keeping a Time Tracking Journal is to see if your mental time accounting matches your reality. We know what it’s like to think: “Where did the day go? What the heck did I do all day?” By keeping a written log of what you’re doing each hour of the day you can see exactly where your time is going and you can be honest about changes that need to be made in your daily life.
Understand how you’re spending every hour of your day and find ways to improve your habits and become more productive.
There are three ways we recommend setting up a Time Tracking Journal and we’re going to let you play a bit of Choose Your Own Adventure here. Because we know you’re an action-taking person and already did Phase One (Know Your Numbers) we’re going to assume you can create your own Time Tracking Journal in one of three ways:
IMPORTANT: We recommend keeping a Time Tracking Journal for at least three days straight. We promise it will not derail your entire life and if you want to track your time for more than three days, feel free to do that.
Because our Time Tracking Journal is exactly the same whether you use Google Sheets, Airtable, or pen and paper, we’re not going to walk-through each one. This should be a very simple exercise to keep up with and we’ll share the step-by-step process using Google Sheets as our example…
Step 1: Commit. Commit to yourself and to this simple exercise. YOU GOT THIS!
Step 2: Set a recurring hourly alarm or timer on your phone or calendar. You’ve probably never tracked your time on an hourly basis, so make it easy on yourself and have some sort of reminder that pops up each hour telling you to record where you’ve been spending your time.
Step 3: Track your time via 30-minute blocks in two ways.
What Where You Working On? The first column you want to track is the bigger task or project you were working on (example shown in image: “Wrote sales page copy for my Branding Course”).
![]()
What Else Did You Do? The second column you want to fill out is if you spent time on social media, checking email, etc (example shown in image: “Listened to Armchair Expert podcast and checked Instagram”).
![]()
Step 4: Track all your time spent throughout the day! Do not wait until the end of the day to go back and fill out your Time Tracking Journal. You won’t remember exactly what you worked on and you’ll continue in the cycle of not knowing where your time has gone.
Step 5: At the end of each day, review where you spent your time. Fill out the final column (Could This Be Improved?) with a YES if it could. How many hours could you improve? How many hours could you apply toward more productive things knowing how you actually spend your time?
![]()
Step 6: At the end of the three days (minimum) identify what small changes you can make in your daily life to get more time and focus back for what matters.
Note: The idea for tracking your time is NOT to optimize your days to have as many work hours as possible. The idea is to make sure you see where your time is going and to ensure you’re not letting time slip through the cracks and that you’re allocating time where YOU want to be spending it to reach your life and business goals.
As we mentioned in Exercise #1, we recommend using RescueTime and Moment alongside keeping a Time Tracking Journal. Using the RescueTime and Moment apps are a completely passive way of tracking where you’re spending your time and attention when using your computer or phone. Does it sound like the results might be scary for you? GOOD! We want you to confront your habits and how you’re currently spending your hours otherwise you’ll continue to do what you’ve always done (just like taking a look at your expenses and revenue does for your money!)
*We are not being paid to endorse RescueTime or Moment, we simply believe they’re awesome tools that can show you some really interesting data about how you spend your time.
Determine where the percentage of your time is going for your business and life, and identify your ideal time split.
The wonderful part about the Action Step for Exercise #2 is that RescueTime and Moment are going to do all the work for you (and with nice charts and graphs)!
Step 1: Sign up for a completely free RescueTime account here.
Step 2: Install the RescueTime app on your computer.
Step 3: Let RescueTime do its thing! That’s it. You’ve done all the steps to get RescueTime installed.
Step 4: View your Daily Dashboard in your RescueTime account after your first full day of having it installed. What do you notice? What stands out to you? What do you need to change about how you spend your time on your computer?
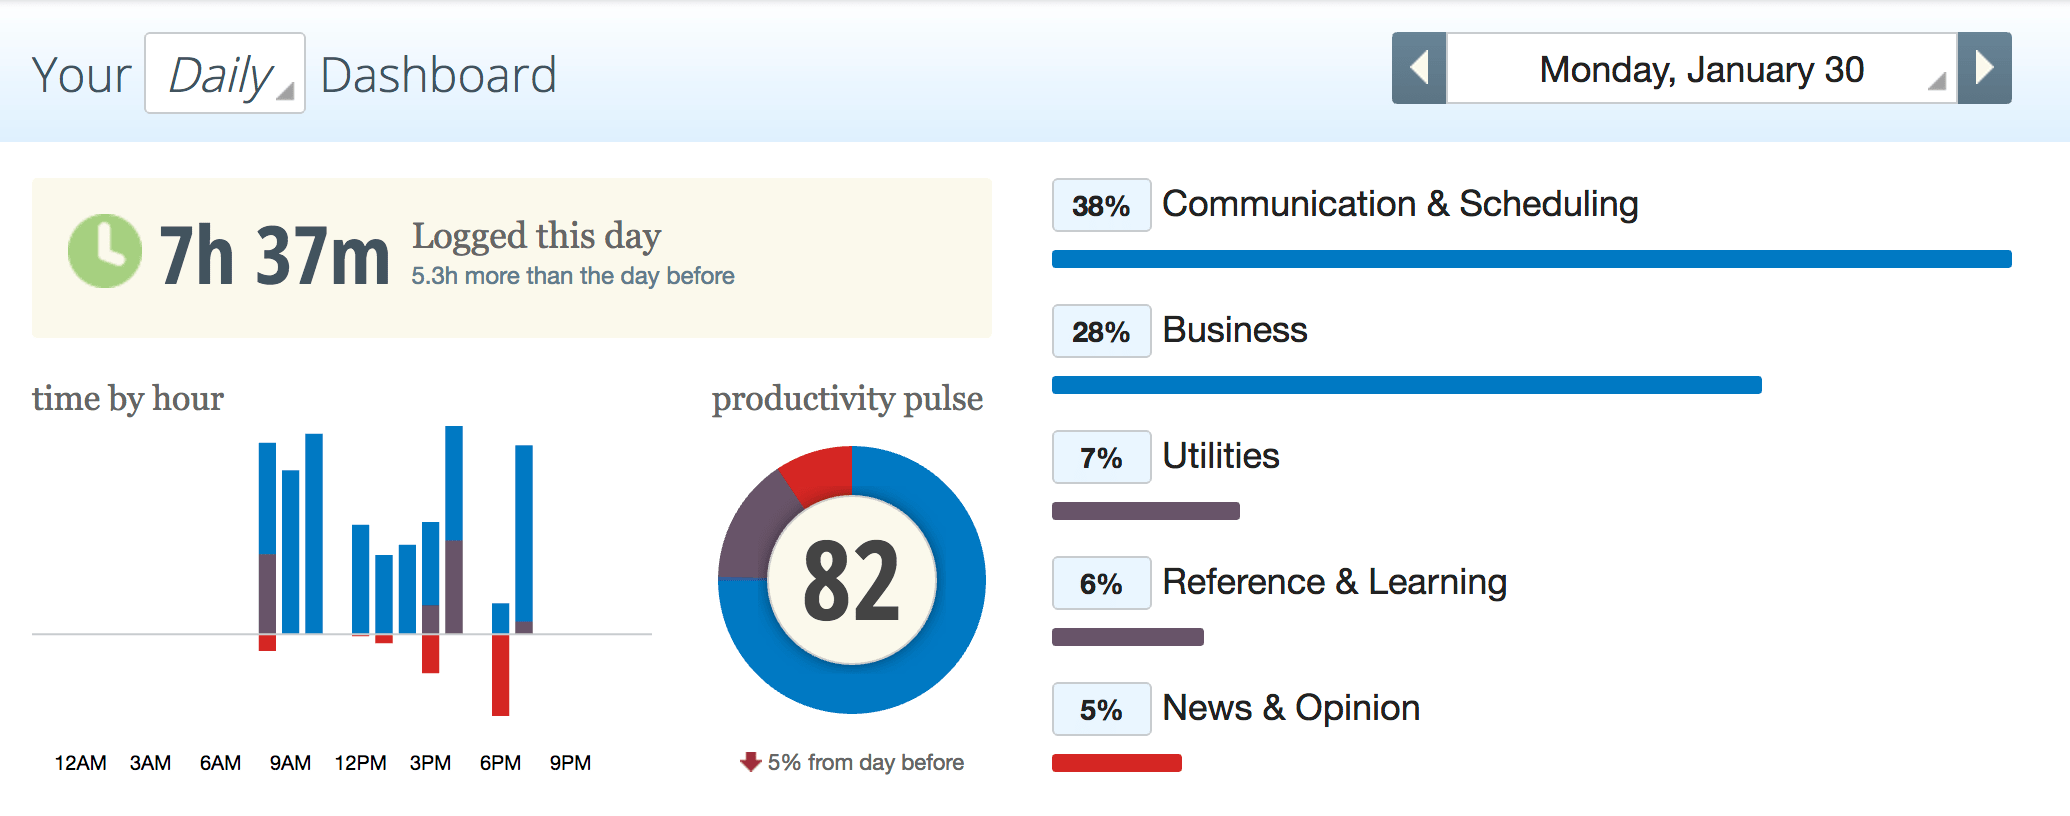
Step 5: Once you’ve had RescueTime installed for a week, you’ll get emailed a nice report. What can you learn from your weekly habits that you need to change?
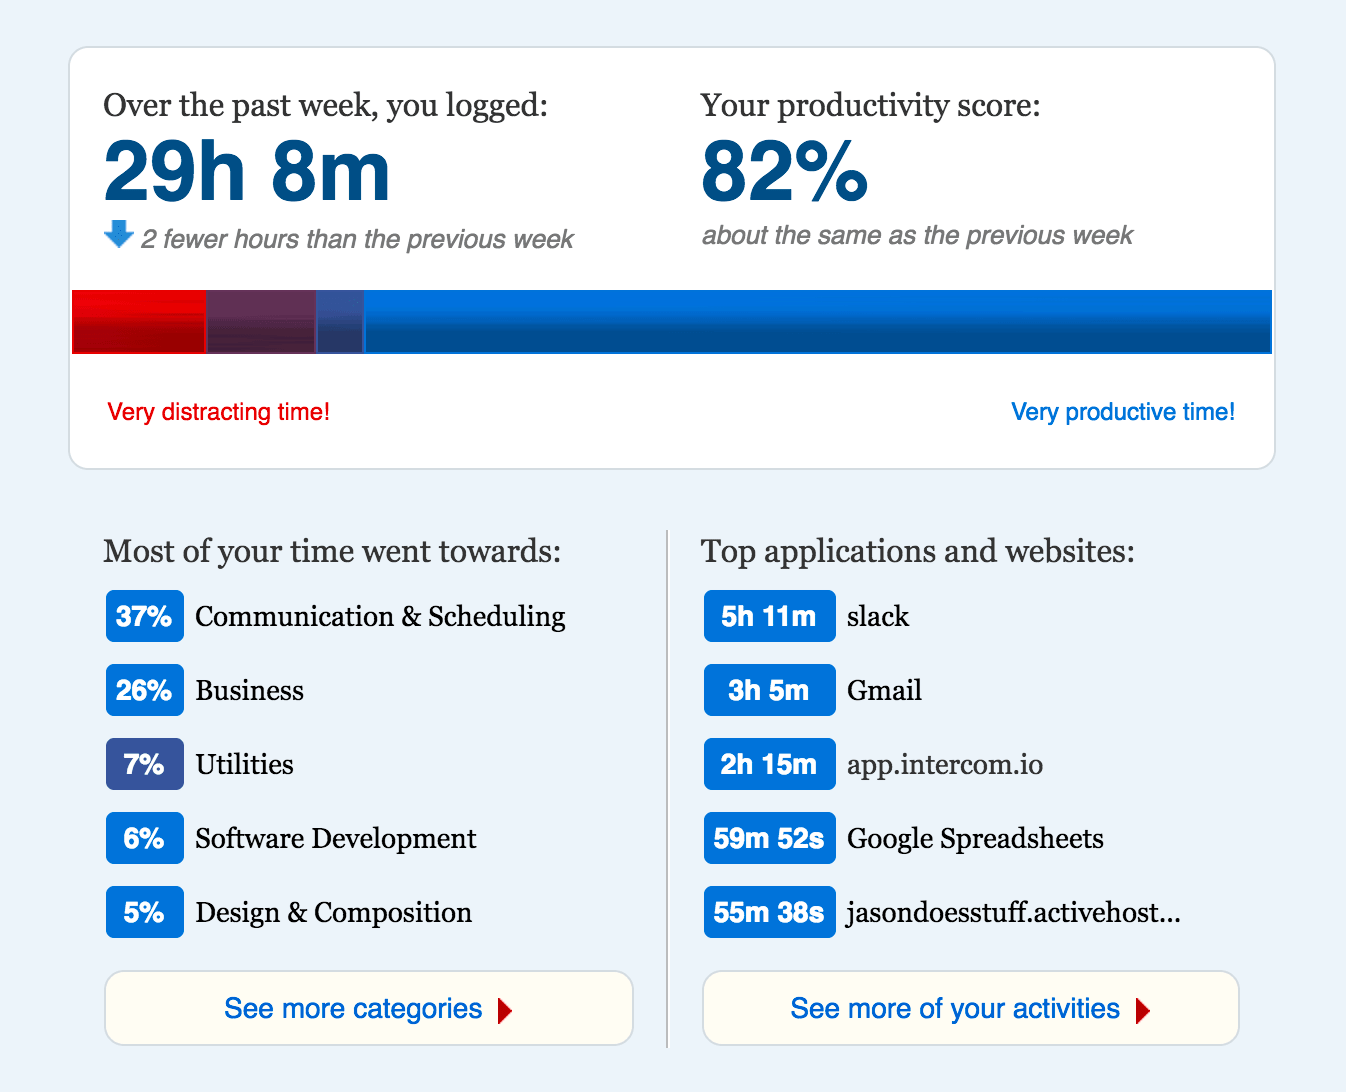
Step 1: Download the app for iOS (for Android checkout App Usage or Quality Time).

Step 2: Say “Yes” or “Okay” to all the steps when you first launch the Moment app. Let it track your time and your location to give you the most accurate time tracking data.
Step 3: Let Moment do its thing! Yep… that’s all you need to do.
Step 4: After a full day of having Moment installed, review your screen time habits. Are you surprised by where you spent your time on your phone? Maybe a bit shocked? What do you need to change? Remember, you don’t have to go cold-turkey, but small changes to your daily usage can go a long way in giving you more time back to put towards other things.
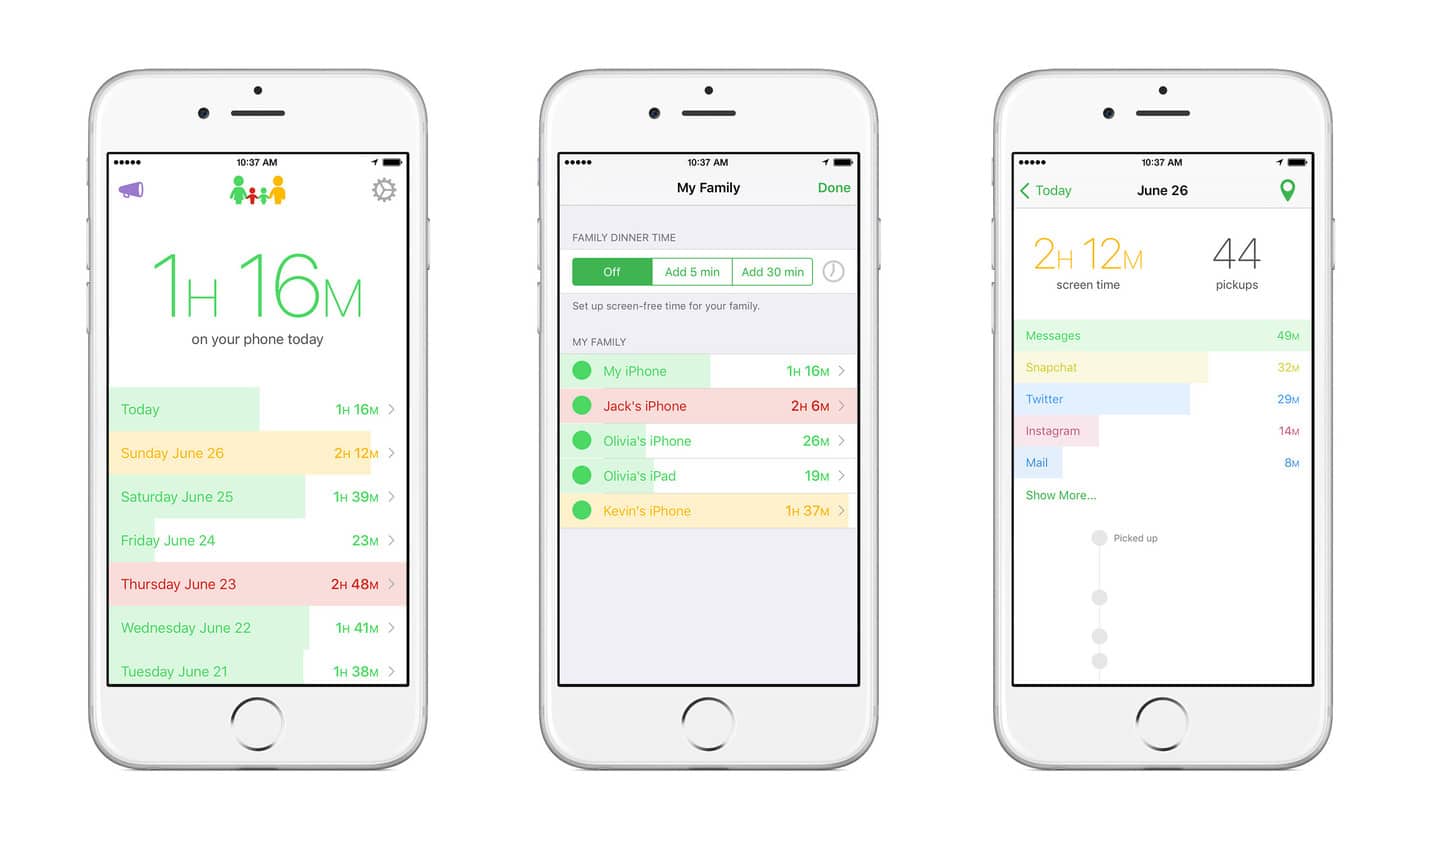
*One thing that’s neat about RescueTime and Moment is that the paid versions of their products have ways to help you block certain activities. Let’s say you have a particularly hard time not being on Facebook, RescueTime and Moment’s paid versions (very cheap!) can help block Facebook for you for certain periods of time.
Recapping Phase Two, here’s what should accomplish by following the two exercises above:
Here are the questions to answer as you track your time and look at the data:
You WILL get more things done and become a more productive person if you take a look at how you’re spending your time each day. The most important part is to admit where you could be doing better and starting making small changes today.
Chances are you’ve asked yourself this age-old question as a business owner:
Well, we’re going to try to help you answer that, but we do have to do a little bit more legwork to get there. Let’s recap what you’ve accomplished thus far.
In Phase One: Know Your Numbers, you should have ended up with a much clearer picture of the profitability of each of your projects or revenue streams.
In Phase Two: Where Does Your Time Go, you should have ended up with a few ways to make your days more intentional and productive.
Armed with deeper knowledge about the two most fundamental resources you have (money and time), it’s time to take a hard look at your revenue streams to understand the single greatest opportunity you have to move your business forward.
In this section, you’ll be evaluating the health of your revenue streams to identify the product or project with the greatest potential upside. We’ll also talk about how to know when it’s time to optimize what you already have going or create something entirely new.
Before you can determine what revenue stream to focus your attention on, it helps to see everything side by side so you can make comparisons.
Fill out the revenue comparison chart with every product or revenue stream from your own business.

Click here to download this template as a PDF
Here’s how we recommend you complete this revenue comparison chart.
Step 1: Download the PDF above or create your own table with 4 columns, listing out your various revenue streams as rows in the first column.
If you have one broad revenue stream such as client work (if you’re a designer, for example) we recommend breaking that down even further into categories. For example: web design clients, logo design clients, etc. This will allow you to make more specific conclusions about what to focus on.
If you have various product offerings, write each one out on a separate line.
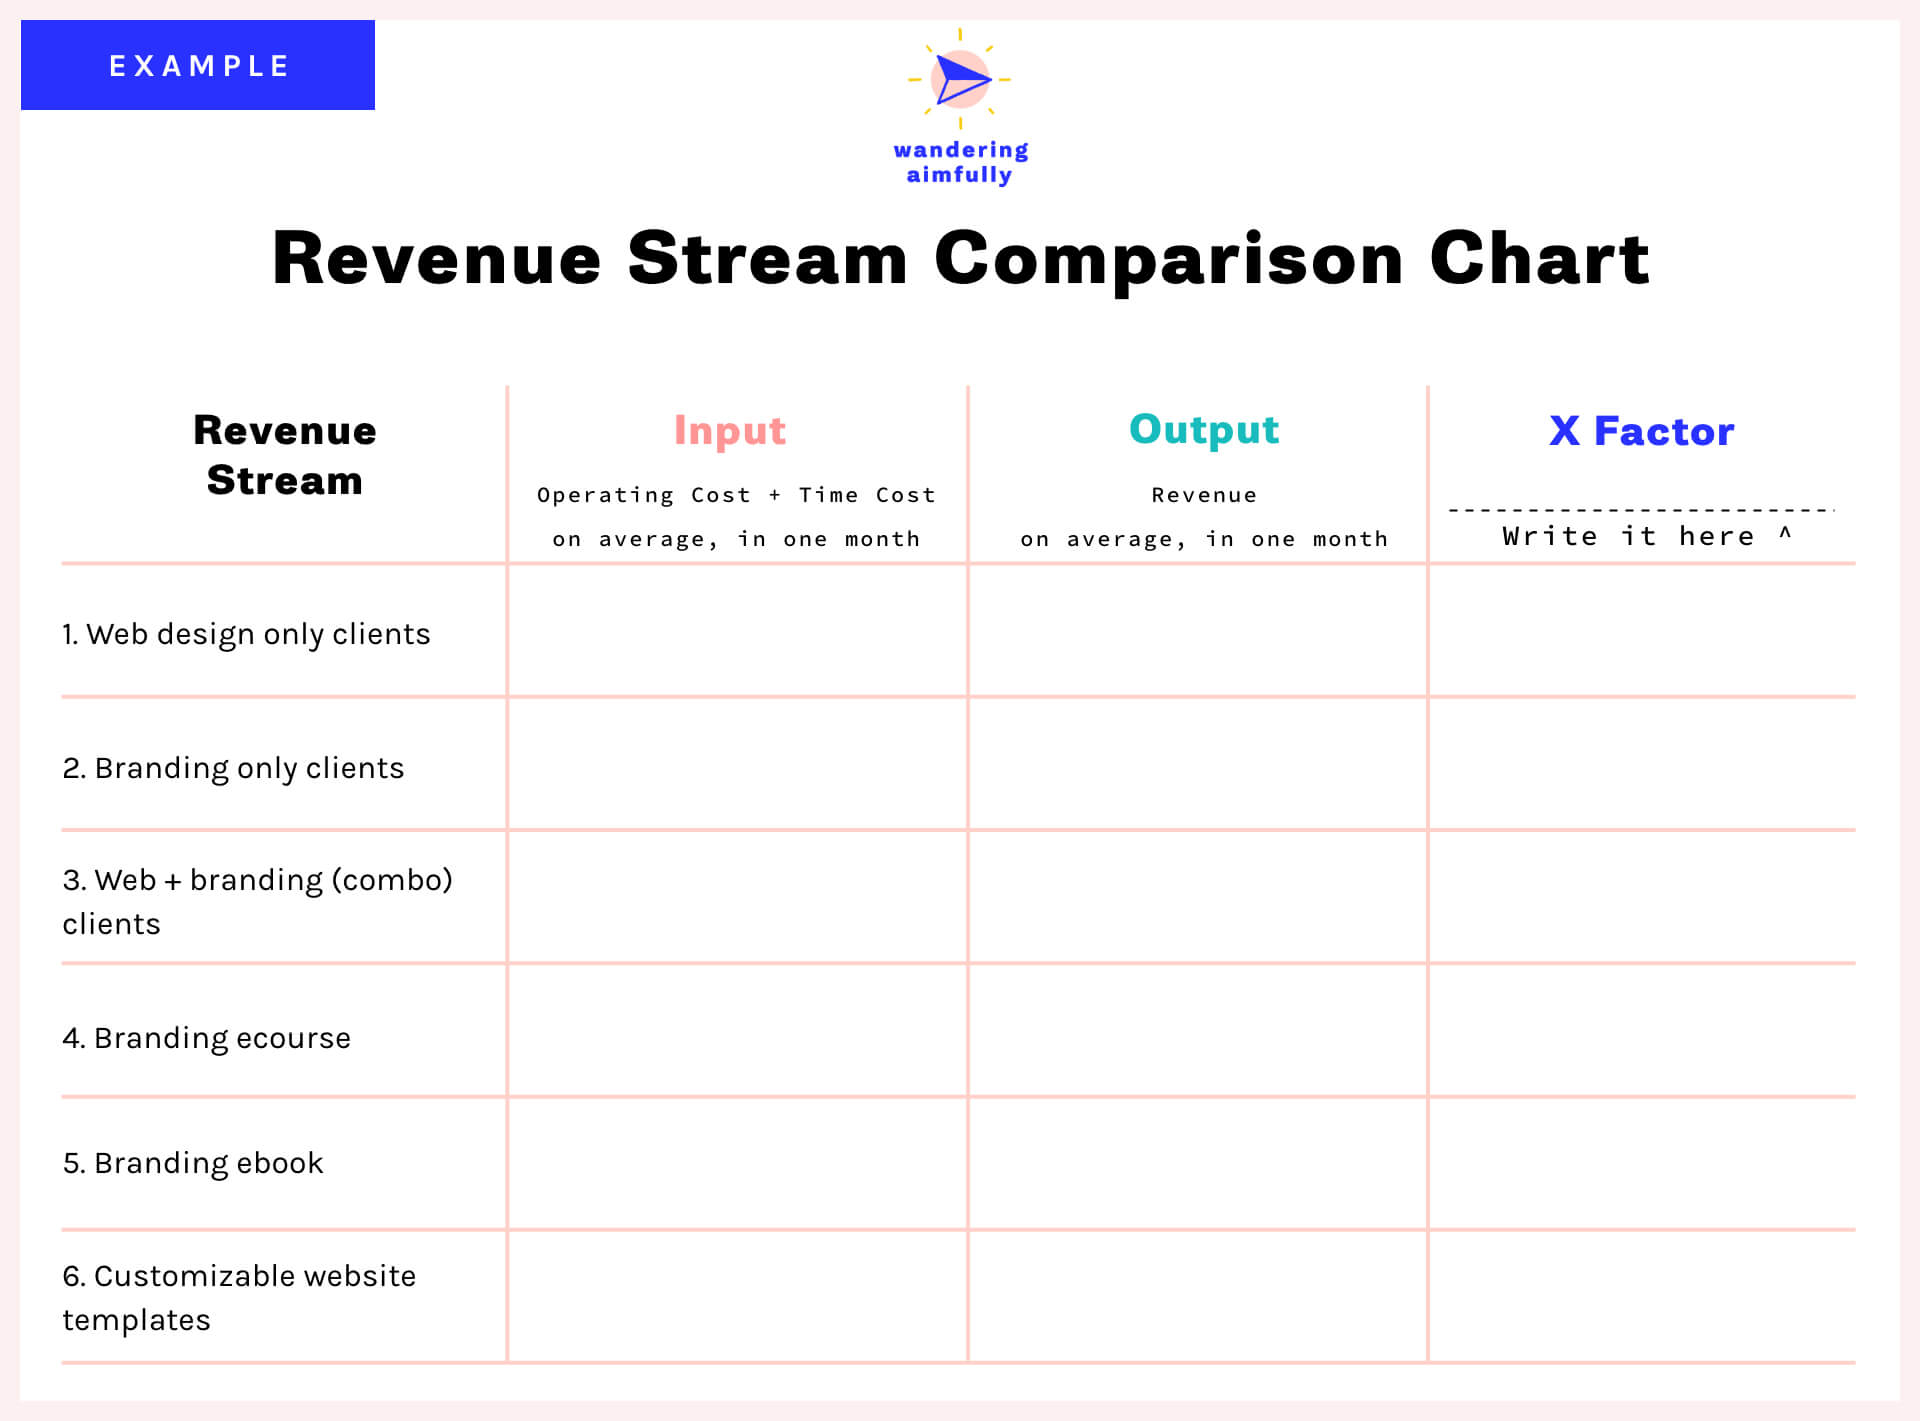
Step 2: For each revenue stream you’ve listed out, now write down the “input” in terms of money AND in terms of time it requires to operate that revenue stream.
Three things to note:
1. It helps to specify a timeframe for the input/output to make sure you’re comparing apples to apples. I recommend using one month. If that’s the case, you want to include how much operating cost you pour into that product or offering in a month’s time and how much time you contribute to it on a monthly basis. It may help to estimate your time by the week and then multiply by 4.
2. You may also want to assign a monetary value to your time in order to later compare it with that revenue stream’s output. For example, you could say your time is worth a flat $100/hour, so a revenue stream that takes 30 hours a month and $300 to run, would actually require $3,300 of input.
3. If you have general expenses that aren’t revenue stream specific, take that monthly total and divide it evenly among your various revenue streams so it’s a distributed cost.
4. As far as time goes, for products you want to think about ongoing input or operating input for the purposes of comparison, not necessarily the time it takes up front to create the product.
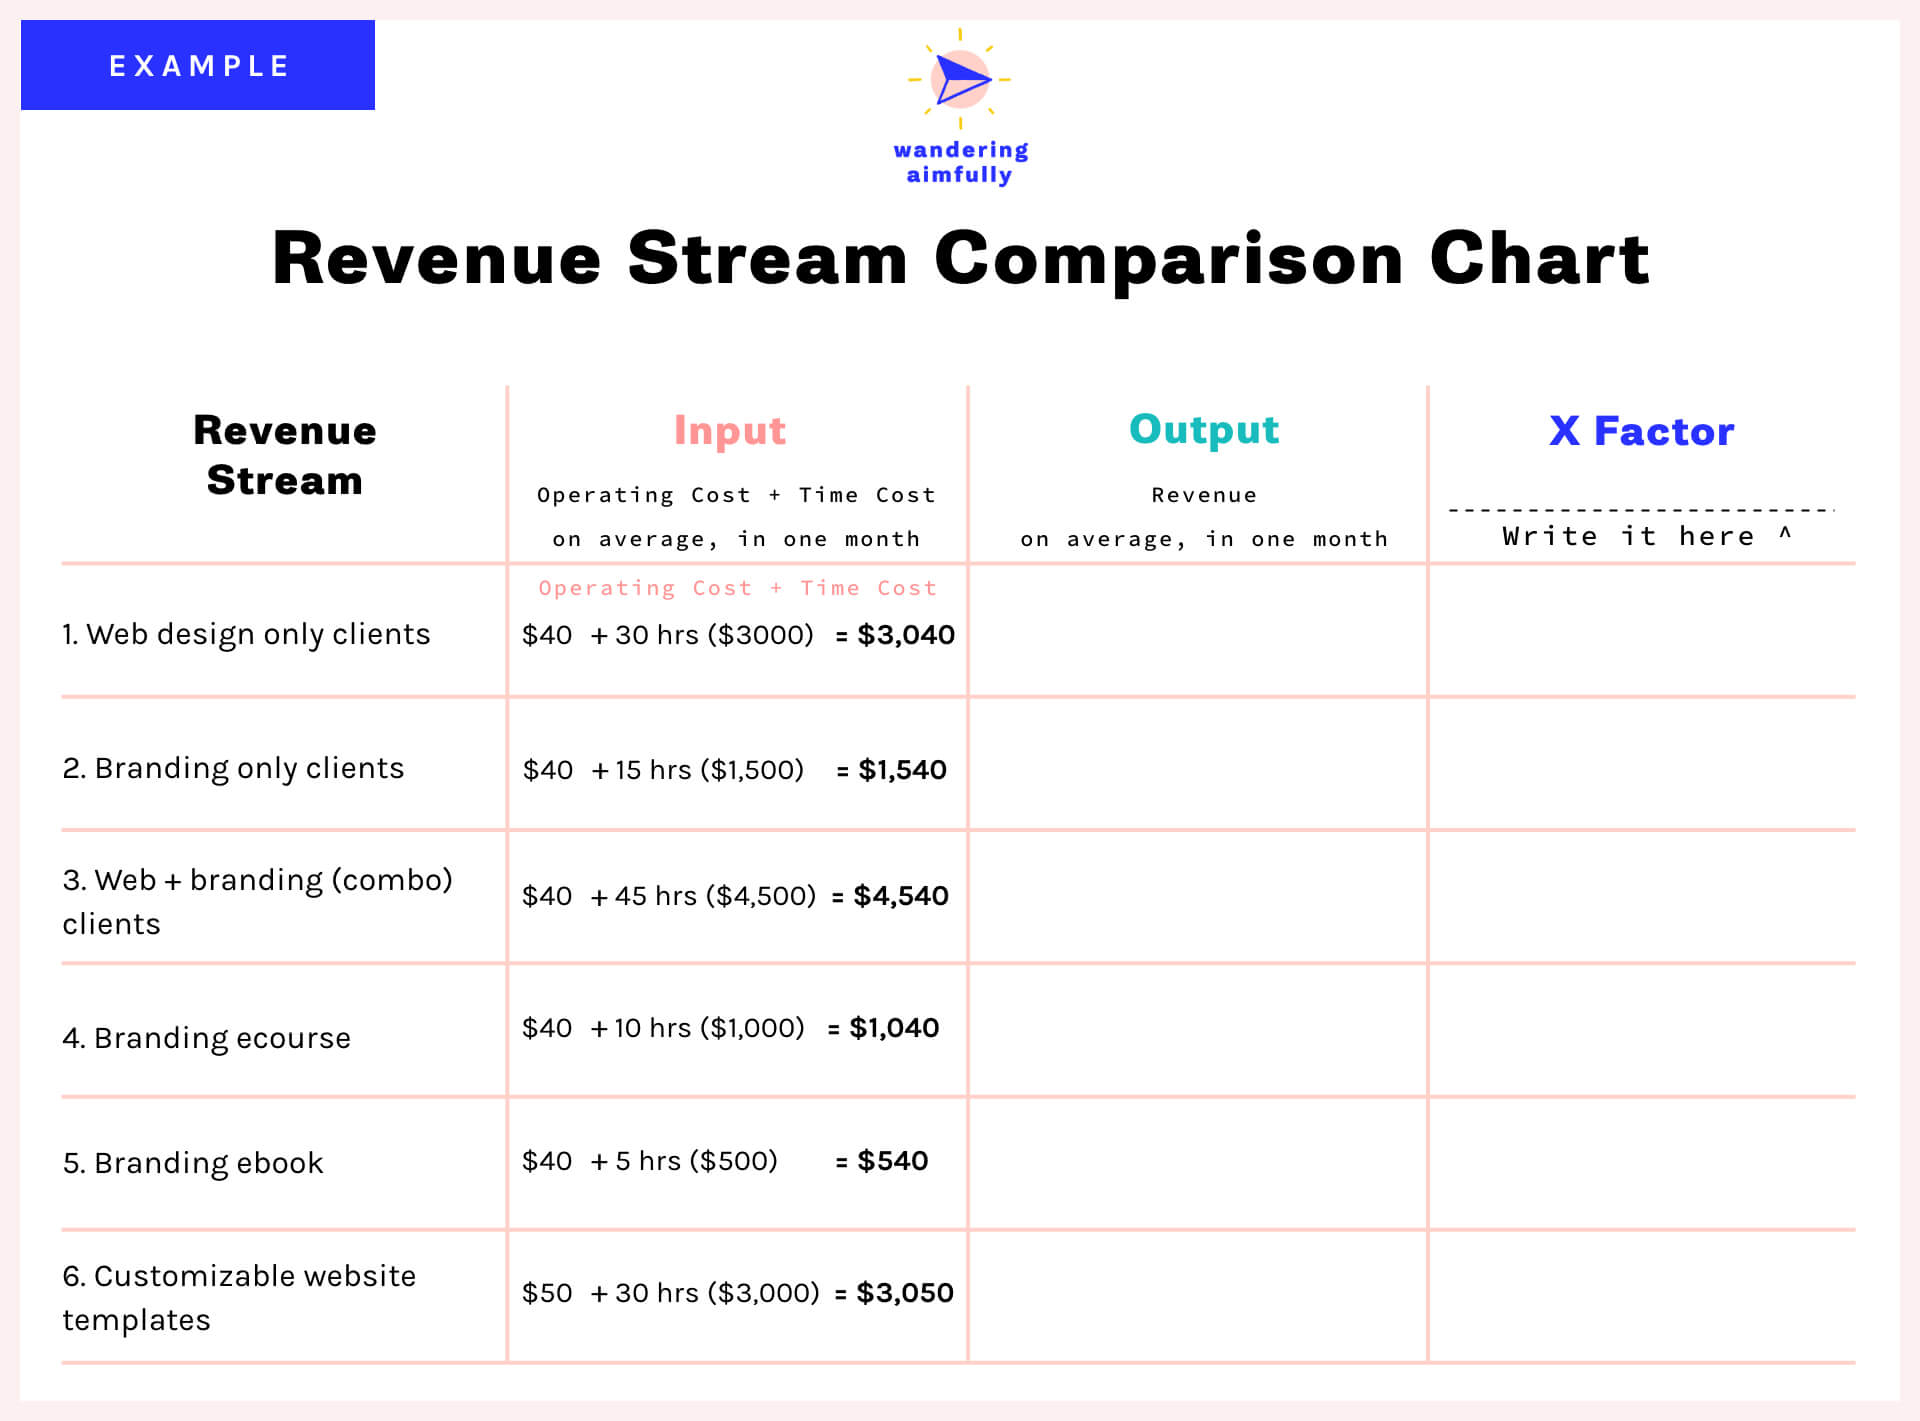
Step 3: Consult your revenue tracker from the Know Your Numbers section and use the totals to fill out the output column.
If you completed Phase One, then you should know how much on average you make in a month per revenue stream. If you didn’t already complete that exercise, be sure to sum up those totals and write them down in the output column.

Step 4: Now this last part is really crucial for the decision-making that will result from this comparison. Finally, use the fourth column as your “X factor”—aka one more comparison criteria that matters to you.
This X factor could be enjoyment (how much you like working on that revenue stream) or it could be alignment (how well it lines up with your personal values) or it could be something like “future vision” (how well it meshes with the vision of where you want to steer your brand.)
The point is, you get to choose. Write it down as the final column header and then write in a number between 1 and 10 for using that criteria for each one of your revenue streams.
That should complete your revenue comparison chart and it should look something like this:

Now that you have all this information, it’s time to use it!
We want to use the comparison chart to look for the revenue stream with the greatest opportunity for impact. This means finding the revenue stream with the most efficient output to input ratio (ie. greatest output for the least input) but also with the highest X factor score.
One way to do that is to divide the output column by the input column to come up with an “efficiency score.” This makes it super easy to see the stream with the greatest output for least input, because the score will be the highest number.
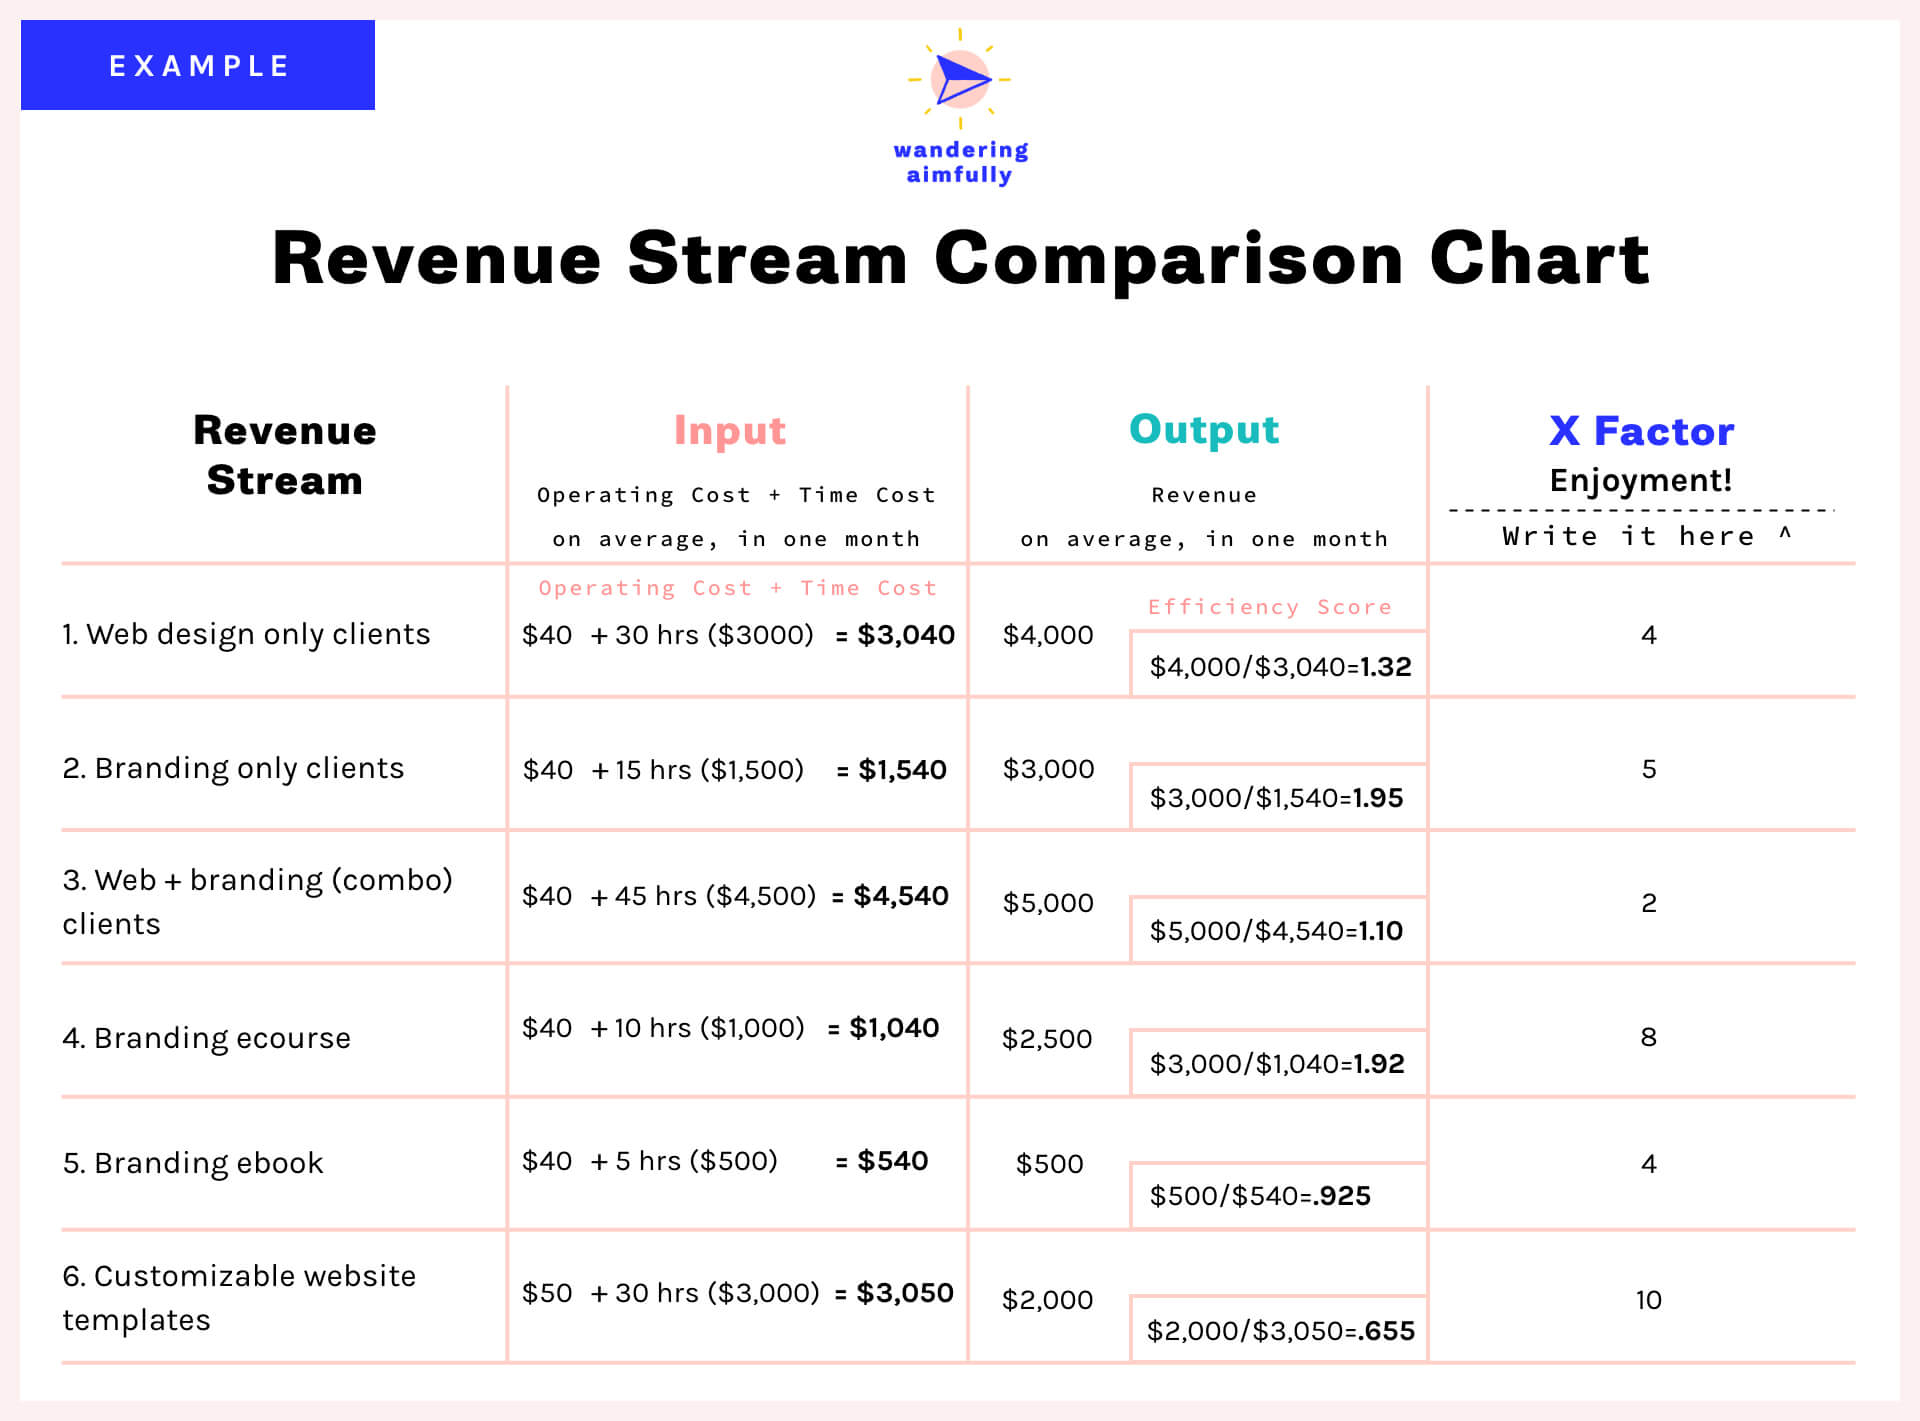
But, don’t forget, we have to also consider the X factor criteria. Your revenue stream with the highest efficiency score might actually be the one you enjoy the least, which isn’t necessarily the best thing to focus on going forward. Instead, look for revenue streams with relatively high efficiency scores AND high X factor scores.
For example, you can see “Branding only clients” and “Branding ecourse” in the example have a similar efficiency score BUT one of them has a much higher enjoyment score:
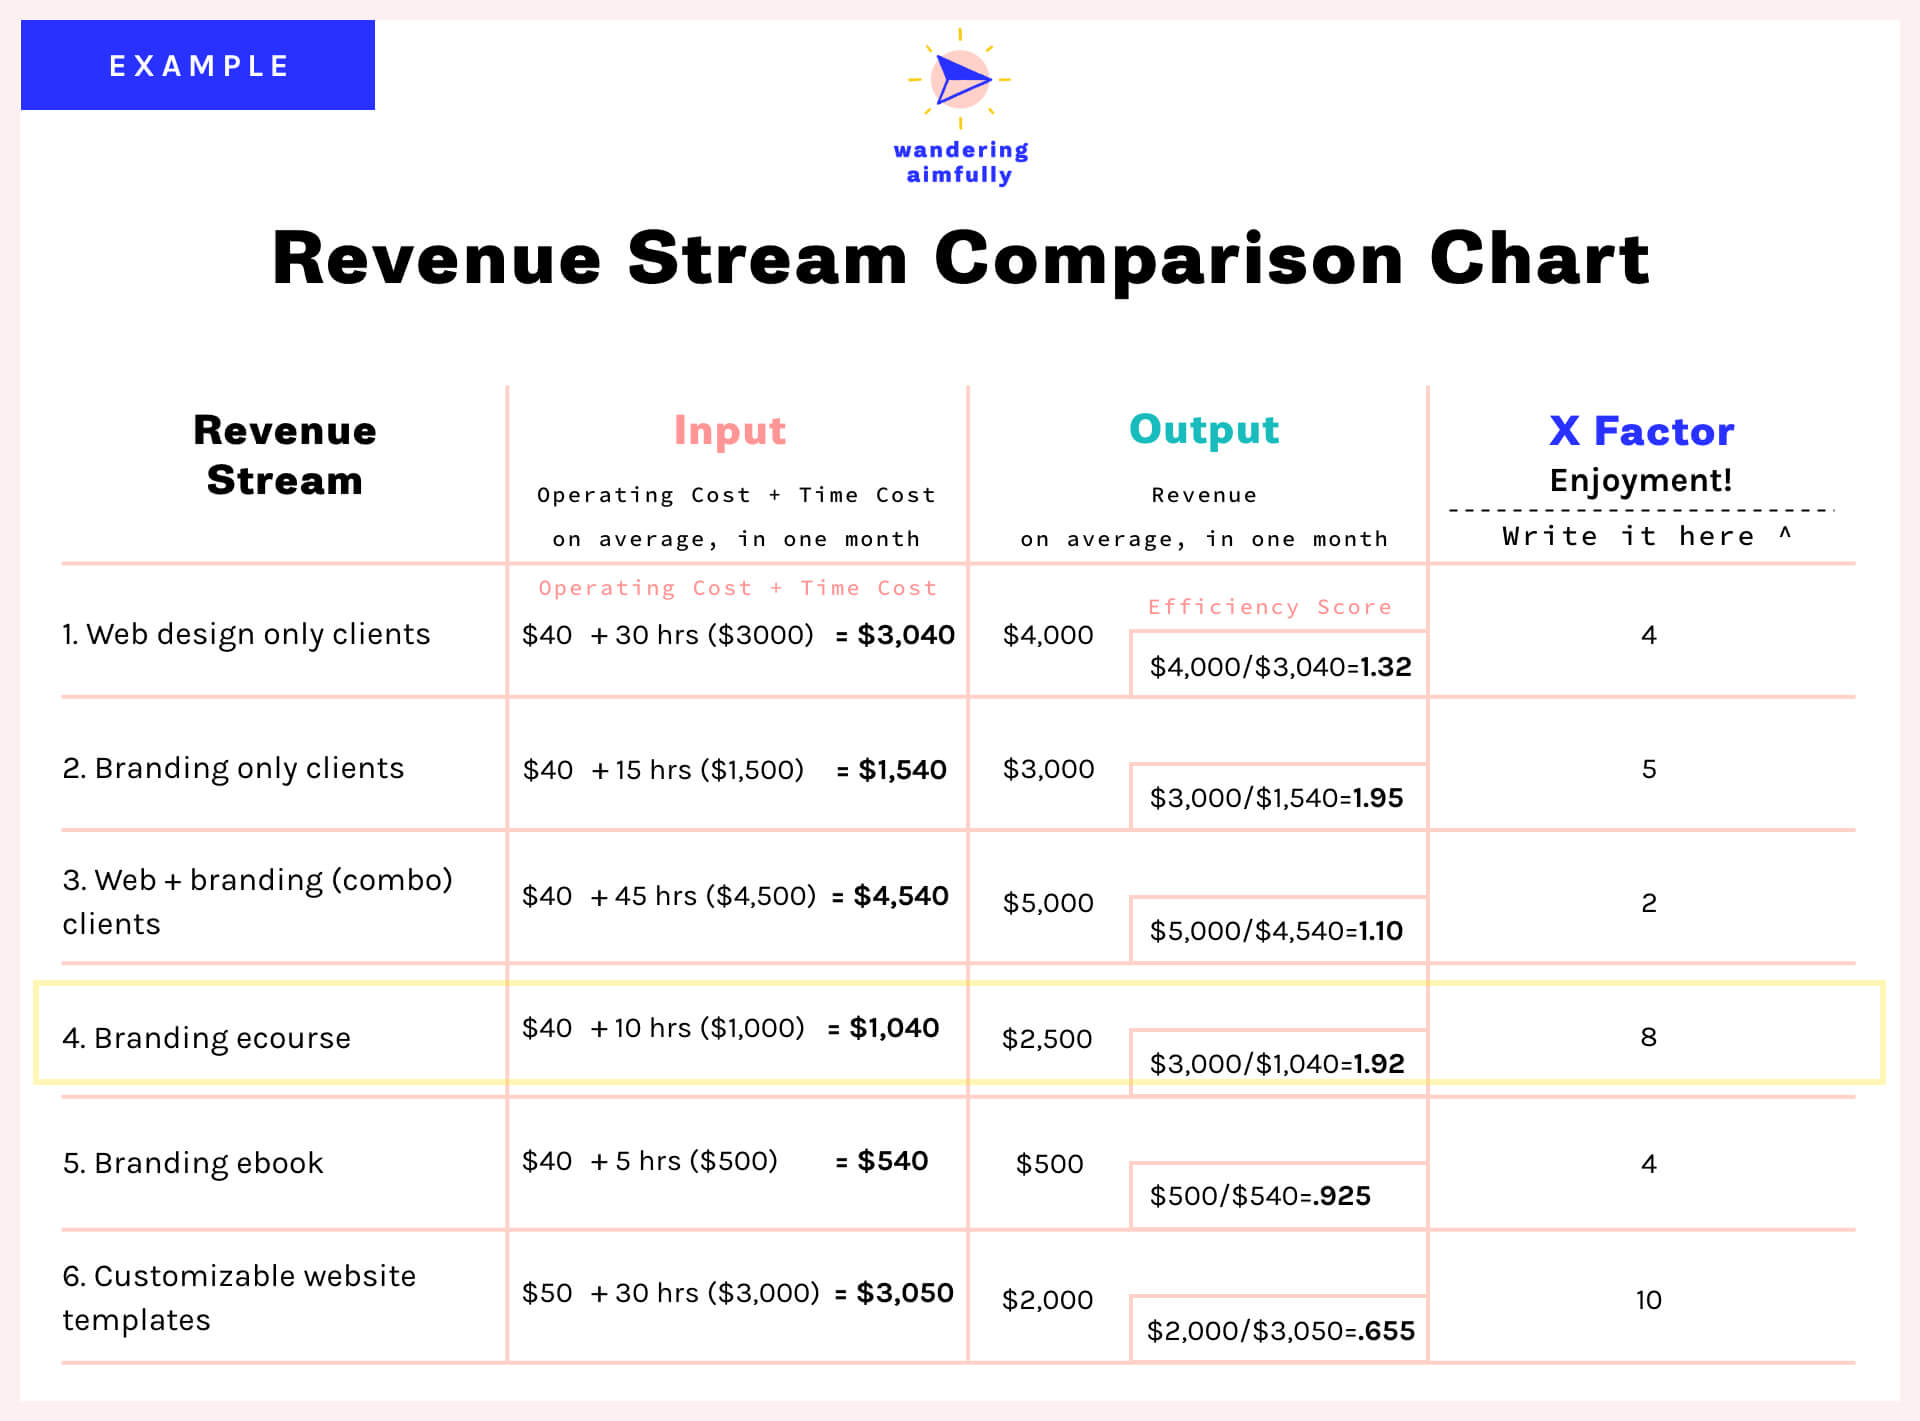
Using the example, now I’m able to see that out of all my various projects, the branding e-course is probably worth investing in and focusing on. While it may not be the source of greatest revenue (YET) it’s efficient at making money (meaning time poured into it will see a notable return) AND it’s something that I enjoy doing.
This is how you can use this comparison chart to choose what to focus on.
Keep in mind, you can make up your own rules too. Maybe instead of the efficiency score method, you want to choose the revenue stream that is making you the most money with the most enjoyment, and you don’t care how many hours or how much money it takes to operate. That’s okay. The idea is just to think critically about your various projects and make decisions based on real data, rather than simply feeling stuck or overwhelmed with no idea of what to focus on.
Now, you might be asking yourself, what if none of my current revenue streams are really working? Is it time to try creating something new?
The answer is maybe. But we always try to caution people about immediately jumping to the conclusion that it’s time to create something new. Why? Because it’s all too easy to get caught up in “shiny object syndrome.” The nature of creativity is that we get excited about projects in the beginning and once time goes on they begin to lose their luster.
Part of running a successful and profitable business is learning how to use your time and energy in the most efficient, impactful way possible. Creating something new often requires you to reinvent the wheel and while it may be exciting, it can be a drain on your resources. Instead, it’s advisable to find ways to fall back in love with your existing projects or find ways to breathe new life into those.
Recapping this phase, here’s what you should accomplish by following the steps above:
Here are some questions to answer as you take a look at your revenue streams:
Hopefully, by now, you’re starting to see a clear path forward on what to focus on next. If not, this final phase of Back To Business Basics is the time to make that decision and create a specific action plan moving forward.
If you haven’t already, start by looking back at Phase Three and your revenue stream comparison chart to determine which revenue stream has the highest potential impact on your business. You can base this decision off the more analytical route we went over in Phase Three about checking your efficiency scores and comparing with your X factor.
If you’re still struggling after that, another thing we consider when choosing where to place our focus to move things forward is to look at everything we’re currently working on and identify what we call the Brick Walls and Cracked Doors.
Brick Walls are what we call obstacles you repeatedly find yourself bumping up against over and over with one of your revenue streams.
Example Brick Wall: Let’s say you’re a designer and you constantly find yourself working more hours on projects than you estimated, meaning ultimately you’re getting paid less than you’re worth for the time you spend on client work. You’ve tried to optimize your process for estimating your time when you quote projects, but inevitably you find yourself logging overtime project after project.
Example Brick Wall Solution: It might be time to consider shifting your focus away from that revenue stream and trying something like digital products so you’re not trading time for money—something that consistently gives you headaches.
Cracked Doors, on the other hand, are what we call slivers of opportunity that present themselves or an area where you feel the momentum building in your business.
Maybe you have a particular blog post on a topic that’s really taking off an getting a lot of traction. Maybe you have a client who you’ve worked with a few times and they’ve floated the idea of paying you a monthly retainer. Maybe you have an influx of emails asking you if you offer a particular offering that’s not listed on your website. These are things to take note of and things that may not come through in the “data” of your comparison chart from Phase Three.
Note when it comes to Cracked Doors: Beware of shiny object syndrome! There’s a difference between spotting a smart opportunity for your business and just being bored of what you’re already doing so you’re craving something new. Part of being a shrewd business owner is being able to spot the difference. Creating something entirely new should actually be the last thing you prescribe your business for all the reasons outlined in the final section of Phase Three.
Now, with all these things considered, it’s time to pick your pony!
Using the revenue stream comparison chart to guide you, choose ONE single area of your business to make the primary focus for the next three months.
Once you know WHAT to work on, it’s important to define what “working on it” is aiming to get you. We need to establish a goal. Yay goals!
Head back to your Revenue Tracker from Phase One and determine realistic revenue goals for the next three months. We like to measure our previous (actual) revenue against upcoming (projected) revenue multiple times throughout the year. Now is the perfect time to project your revenue by project or client for the next three months (feel free to add it right into your Revenue Tracker sheet or Airtable)
You may also want to determine a time-related goal. Based on what you learned in Phase Two: What Do You Spend Your Time On, it’s not just about spending more hours working. It’s about spending the right hours doing the right work. It may make sense for you to write down how many hours a week you’re trying to keep these growth efforts constrained to, so you don’t just find yourself in a situation where you’re feeling burned out. Remember, this is also a way of keeping your input (your time cost) as low as you can, making your revenue stream as efficient as possible.
If you’ve gone through all phases of Back To Business Basics and believe now is the time to create a completely new revenue stream, now is a great time to schedule the production and estimate your revenue. A couple questions to answer that should help you:
You know what to focus on, you know what you’re aiming for, but now it’s time to determine what exactly you’re going to do to improve your revenue and to create a clear action plan to make that happen.
Part of the overwhelm of being an entrepreneur is that there are an endless amount of things you can try or change when it comes to your business in order to improve it. To make these options more manageable, we break them down into three core categories: 1) Process; 2) Product; or 3) Promotion.
Here are some ideas of how to beef up your revenue stream by improving these three areas:
To get the answers, consider getting feedback from existing customers by emailing them simple surveys with just a few questions (we love Typeform for surveys).
Sending a survey via email is great, but don’t hesitate to hop on Skype to chat face-to-face. Some of the best feedback we’ve ever received for our businesses has come from actual conversations with existing or potential customers. Make sure you let them know you want honest, constructive feedback and then see if there are any recurring themes in that feedback.
Similarly, you may want to get feedback from people who don’t buy. For example, with our Wandering Aimfully membership, if someone clicked on our sales page and showed interest but didn’t buy, we email them a few days after launch and ask them to fill out a short survey. This allows us to see if there’s anything we’re missing in terms of what our membership offers or how we’re communicating it.
If you know your product solves a particular problem and its top-notch, it’s possible your problem lies with the promotion. Any of the following could be to blame for this disconnect:
*We’re guilty of this one and we see it all the time. It’s human nature to focus on the features of what you sell in your sales copy, instead of what problem it solves for your customer (the benefits). The easiest way to figure out if you’re not communicating the problem is to refer back to survey results to the question you asked about this. You could also have someone else who has similar experience running an online business review your sales copy to see if it’s speaking to the features (wrong) or the benefits (right!)
And here are some potential solutions to your promotion problems:
Finally, if your product is great and you feel you’re getting a steady influx of customers, it’s possible the improvements could lie in your process.
Does this revenue stream take up too much of your time? Are there parts of the process that could be smoother for your customer or for you?
For example, maybe you find with your clients that a lot of time is wasted on your first call together just getting an understanding of the project specifics. Could you develop an intake survey you could send via email that would give you background info to make your meetings more productive? Then you could have a first call that’s much more streamlined. Things like this may require a time investment up front but will make you more efficient over time.
Ultimately, you should have an understanding by this point of what processes might need fixing in your business (hint: many of them will have to do with time allocation and management). What have you seen after going through the first three phases of Back To Business Basics that need attention?
Using the ideas above (or your own), write down THREE improvements you plan to make to your chosen revenue stream in order to reach your three-month revenue goals. Bonus points if you want to share those with us via email for some extra accountability.
It’s not enough to just write a few tactics and a revenue goal down on paper. You have to find a way to really integrate this plan into your schedule and your existing workflow.
Remember, business is a complicated puzzle. There are so many moving parts, and you may not find immediate success or growth with the first thing you try. If you implement your chosen three improvements and don’t see the life you’d hoped for, experiment with three more. Succeeding with your business is about taking imperfect action, testing your assumptions, and utilizing your newfound focus.
If we can help on your journey, feel free to reach out to us!
Below is a little illustration I posted to Instagram, which many of you (as in like… DOZENS of you) commented on with a collective AMEN and I figured that served as an indication to me that this topic might be one worth going deeper on. When I posted this image, I remember the exact state I was in, and maybe it’s one you can relate to it.

Just a few moments before I had realized I was feeling uncharacteristically tired (typically an indicator something is out of sync), so I took a second out of my day to ask WHY? (High five for recognizing my own indicators that something is off; Double five for getting curious about it!)
Without realizing it, over the previous few weeks I had let myself drift back into an exhausting state of “success chasing.”
“Success chasing” is what I call the state where I’m fueled more by my desire for external validation than I am by my satisfaction with internal validation.
When we think of someone “successful” what attributes immediately spring to mind?
A person who is has name recognition perhaps, whose work is visible on a larger scale than most. Someone who makes good money, maybe has a fancy title, has accumulated accolades or milestones that are recognized as metrics of achievement.
But that’s the thing… all of those attributes have to do with sources of external validation.
External validation is validation that comes from outside of us. It’s a feeling of satisfaction that is dependent upon the opinions of other people. It’s when other people say they like us, or other people offer us accolades and acknowledge them, or when other people see we’re financially well off.
But, external validation is a fickle beast. If your happiness or sense of contentment relies on the opinions of other people, you’re entrusting your happiness to someone other than yourself—and that’s a risky move.
Internal validation, on the other hand, puts the control back in your own hands. Internal validation comes from within us. It’s a satisfaction that doesn’t rely on the opinions of other people, only the opinion of ourselves. For me, internal validation comes from recognizing that my actions match my values, plain and simple.
“For me, internal validation comes from recognizing that my actions match my values, plain and simple.”
Therefore, that is my definition of success: making sure my actions are in alignment with my values.
External validation is a hole that can never filled. When we reach a milestone and get a pat on the back from our peers, it’s not as though we stop craving that feeling of success. Instead, we keep chasing the next opportunity to feel that way. Hence, “success chasing.”
Now the trickiest part of success chasing is that it often disguises itself as motivation. And motivation feels like a very good thing—it fuels us to go after our goals.
The problem, though, is when motivation is coming from a place of lacking—the distance between ourselves and that external validation we crave.
We see what we want. We realize we don’t have it. We work hard to get it. Right? Well unfortunately that particular line of logic also means that our work is stemming from what we don’t have.
The world around us not only feeds us messages reminding us of what we don’t have, but it also makes it pretty clear there are a few traditional things we should have: million dollar businesses, big girlboss-y teams to nurture, and a rapidly growing fan base.
But… there is an alternative based on internal validation instead.
There’s another kind of fuel that actually comes from internal validation instead. It comes from recognizing not what you want to achieve but how you want to feel. Not what you want the outcome to be, but what you want the process to be.
Instead of success chasing, it’s what I call creative satisfaction (satisfaction as in fulfillment, literally the opposite of lacking.) It’s that feeling that you’re designing your life in a way that’s deeply aligned with your values. It’s a fullness; an integration.
And that feeling creates its own kind of fuel, a different kind of propulsion that isn’t rooted in a sense of lacking or deficiency. Instead it’s one that’s rooted in abundance—an overflowing sense of joy, authenticity confidence.
Here’s a little diagram to show you the difference as it sits in my head (I’m a sucker for diagrams!):

In our culture, we often label the external validation framework as the one that outlines the path to “success.”
Why? Because it’s the one we can see.
It’s the one that gives us things we can measure like money and followers and best-selling books and website traffic.
The other framework is much more personal and intangible. Oftentimes, the only one who can even identify it or quantify it is the person engaging in it.
In fact, most of us would probably agree that out of the two, it’s the only one that’s really sustainable.
Again, in the traditional version, the joke is actually on us because we never actually catch up to that nebulous benchmark of external validation. We experience tiny milestones along the way, but without cultivating a practice of appreciation, we end up staying in that “hungry” state, resulting in an excruciatingly endless hunt.
And the other framework? Well that’s the one I finally came around to with my revised definition of success in that first illustration.
I found my way back to it by reminding myself that every Monday morning I wake up with equal amounts of peace and excitement. No dread, no expectations hanging over my head, no orders to follow. I’ve reached a point in my professional life where I thankfully control every facet of how I run my business, and that includes NOT waking up on Mondays in a frenzy. It also includes making things I love, that I’m proud of, and answering ultimately to my intuition.
As a sensitive and creative soul who values flexibility, that is my ideal. That is living life in alignment with my values.
“What could be more successful than carving out a life for yourself that allows you to live your values daily?”
Another reason to shift our success metric from achievement to alignment is because it removes the need to constantly compare ourselves to others.
Throughout my career, there have been several times when self-doubt has crept in my head as I’ve seen someone doing something similar to my work and the question has popped into my head:
Is there even room for one more personal growth blog?
Is there even room for one more acrylic abstract artist?
Is there even room for one more online business in a sea of so many?
Have you asked yourself a version of this too? My guess is you have because this is a cunning way for our Fear to stop us from ever trying or pursuing the projects that call to us. “There’s already so many ____________ out there, why should I even bother.” That’s a convenient way for us to excuse ourselves from making things or taking a risk, isn’t it?
But it’s a question born out of a scarcity mentality about how the world works. What does this idea of ROOM mean anyway? It assumes that there is one Table of Valid Successful People and that there is a finite number of chairs around that table.
But that’s kind of BS, right? Life is not a zero sum game. There is no such table, and there certainly isn’t a finite number of ways for us to become Valid Successful People.
And that’s when you start to ask yourself: What is “success” anyway?
This question of “room” inadvertently defines success based on achievement rather than alignment.
When we ask ourselves “Is there room for me?”, what we are actually asking is “Is there room for me to be successful?” We don’t realize it, but it’s our ego hungering for validation and fearing failure.
No longer do I define “success” exclusively in the sense that people buy my products or like the things I make. Those things rely on achieving some form of external validation, and I’ve found that no matter what milestone I hit when pursuing external validation, ultimately it only leads my ego to hunger for more or to aim even higher. In other words, it’s a recipe for dissatisfaction.
On the flip-side of that, however, alignment-based success says that my goal is to design a life and business where I can live out my core values on a daily basis. That is the source of all things good for me: happiness, satisfaction and freedom.
So when I ask “Is there room for me?” and I do so in the context of comparison or self-doubt, I’m slowly allowing myself to drift right back in that old achievement-based success framework, one where something isn’t worth doing unless I can gain financial success and visibility. That’s NOT what I want my life to be about chasing after.
When I shift this framework back to alignment, I can ask the question again, this time with a clarifying addition:
“Is there room for me to do the work my heart is calling me to do?”
When I frame it that way, I’m able to see that the primary goal in pursuing this idea or project in the first place is to express my core self. To follow a hunch or a passion or a curiosity or desire that is stemming from inside the deepest part of me.
And when I frame it that way, I can see much more clearly this definitive answer: YES.
“There is ALWAYS room in this world for people doing the work their hearts call them to do.”
There is room for me and there is room for you and there is room for us ALL to make the things we’re called to make. There’s a galaxy’s worth of infinite room where we can all try and learn and experiment and teach and lift each other up as we do so.

If there’s one thing I want you to take away from this article and my wacky diagrams, it’s this:
Keep in mind though, if you do select Diagram #2—the path of alignment—you WILL have to choose it over and over and over again. Your instinct WILL be to drift back into Diagram#1 and into the chase for external validation. You’ll want the milestone, the public pats on the back, that glorious feeling of being accepted into the tribe of humanity.
Trust me though, all of that will ring hollow compared to the glorious, sustaining satisfaction of being accepted BY YOUR INNER SELF every single day.
Last week I came across an interview of Maria Popova, founder of Brain Pickings, on 99u.com and this excerpt that speaks to this notion perfectly:
“…I frequently get emails from young people starting out and asking, ‘How do I make a successful website or start my own thing?’ And, very often, it’s tied to some measure of success that’s audience-based or reach-based.’How do you build up to seven million readers a month or two million Facebook fans?’ But the work is not how to get that size of an audience or those numbers. That’s just the byproduct of what Lewis Hyde calls ‘creative labor,’ which is really our inner drive. The real work is how not to hang your self-worth, your sense of success and merits, the fullness of your heart, and the stability of your soul on those numbers—on that constant positive reinforcement and external validation. That’s the only real work, and the irony is that the more “successful” you get, by either your own standards or external standards, the harder it is to decouple all of those inner values from your work. I think we often confuse the doing for the being.”
A few weeks ago I was gifted a Five-Minute Journal and every day the journal has a line for you to write your own “I am” affirmation—a guiding belief that you can repeat every day to yourself. Here’s mine:
I challenge you to redefine your own idea of success and write your own “I am successful because” statement, one that acknowledges the way(s) that you are already a success—to no one else but YOU.
Remember, this doesn’t mean that you have to stop striving, stop wanting to be better, or stop trying to create a brighter life. It just means that you take a moment of gratitude for how far you’ve already come.
When you already feel successful, you move forward from a place of abundance, not scarcity.
“When you already feel successful, you move forward from a place of abundance, not scarcity.”
When you are fueled from that place of creative satisfaction, you’re striving from a sense of peace, not poverty; fullness, not famine. From a place of WANT, not from a place of need.
I hope this article has given you the permission you need to redefine success on your own terms. Be careful not to confuse the doing with the being, dear friends.
Sometimes, though, I fear the way I talk about personal growth makes it seem as though once we discover what actions we want to take to live as our best selves, that seemingly overnight we’re able to simply make those changes and accomplish just that.
Like…
We decide we need to be more self-disciplined so we wake up the next day able to stay focused and on-task, and suddenly we’re living our best life.
We decide we need to rest and take better care of ourselves, so from then on we no longer overwork ourselves and burn out and, ta-da, we’ve changed!
But that’s NEVER how it actually works, is it?
It took me so long to learn this. For so long I tried this strategy: I’d find myself in a moment of “I know I’d be so much happier and brighter if I just did better with xyz.” I knew what needed to change, and maybe I even made better choices for a while, but a month or two later when I went back to my old ways, I felt like a failure. I would judge myself for sliding backward, not making that change.
That awful feeling of letting yourself down… I’ve realized that’s often the most powerful force that holds us back from real growth. We judge ourselves for “failing” and the next time we don’t even try to do better because we’re tired of feeling the guilt and disappointment of not being able to suddenly wake up and do a 180.
But last year I tried something new. I realized I needed to stop making the goal to do a complete 180-degree change in whatever area of my life I was focusing on.
Instead I started asking myself: What if I just focused on trying to get 10% better at whatever I wanted to change?
What if I just focused on trying to get 10% better at whatever I wanted to change?
What if I drank more water 10% of the time? What if I was better about reaching out to friends just 10% more? What if I managed my daily schedule better just 10% of the time?
By changing the goalpost to something so seemingly manageable, I stopped finding myself in the dreaded loop of self-judgement.
Lasting change and living your brightest life ultimately comes down to tiny micro choices. In any given moment, you can choose what feels easy and comfortable OR you can choose what that best version of yourself would choose.
Imagine you are a dial or compass pointed in one direction. Most of us view change as a complete 180 degree rotation to get ourselves pointed in a new direction. Instead, this new philosophy has me viewing change as the sum of tiny 10 degree turns toward whatever that “best” version of you looks like.
Jason calls this 10% better strategy “18 not 180” (which, coincidentally, feels especially appropriate for the year 2018).
So my challenge for you this week is to think of the one or two most pressing areas of your life or habits that you are trying to change, and I want you to try getting just 10% better.
Try rotating those measly 18 degrees, not a full 180. See if it feels easier and more doable to slowly drift toward your brightest life, rather than feeling guilty or disappointed for not being able get there overnight.
#18not180. I’m making it a thing. A gentle reminder. A mantra. A cheat code. Whatever you want to call it, I hope it helps you make 2018 your best year yet.
Thanks for reading!

Dreaming is a wonderful thing. That feeling when the wheels in your head start cranking, the sparks begin flying and the muses frenzy about because you’re feeling inspired. It’s one of the best feelings, especially as a creative person fueled by ideas.
Dreaming allows you to imagine possibilities and let your heart lead you to beautiful new corners of your mind.
In a business context, this kind of dreaming comes naturally to me. It’s why I have notebooks full of ideas and about a trillion (scientifically accurate number) three-paragraph Notes started in the app on my Mac.
Every few months I have an evolved vision for where I want to take Made Vibrant and the new things I want to create within my business. As a creative whose goal is always to build an ever-evolving business around my ever-evolving sense of self, this ongoing time I carve out for dreaming is a great thing.
But lately I’ve been reflecting on my various experiences as a business owner these past four years and it’s allowed me to pluck out some new lessons I didn’t quite see before, lessons that have me seeing my ideas and visions with a new perspective. One of those lessons is this:
The reality is ALWAYS different from the idea, so you better make sure you love the reality.
“The reality is ALWAYS different from the idea, so you better make sure you love the reality.”
Whatever romantic notion I had about a grand vision of mine, whether it was writing a book, starting a digital magazine, teaching an online course, selling my art prints… the doing of the thing was always different than the glossy idea version I had in my head. This doesn’t mean the reality was bad in comparison, just different.
When you’re navigating the waters of intentional living (whether in business or not), it’s important to separate these two things in your head: the idea version of something and the reality version of something.
While it’s impossible to know what the day in and day out reality will look like for an idea you have, it IS possible to challenge yourself to think more granularly and specifically about how your vision will come to be.
For example, if it’s starting a local brick-and-mortar shop, what are the steps involved? Is there someone who’s done it before you can talk to? What does it take to get a retail space? How often will you be working in the store?
Don’t let these questions overwhelm you, let them guide you — if you’re energized by answering these questions you’re likely on to an idea that you’ll want to follow through with.
As for me, I had this notion of what I wanted next year to look like for myself and Made Vibrant. I didn’t spend much time on the details, just the big vision. The big vision felt good and fun and satisfying (things tend to feel that way when you don’t get into the nitty gritty!)
So, coming from this place of my grand vision, when Jason and I sat down to explore a different idea about what next year could like, I was feeling MAJOR resistance. Looking back I can see it was because I was so in love with MY idea already — I was already so connected to this rosy version of the future without really asking myself what the reality would look like.
That’s when we decided to break my idea down into REAL parts. The work it would take. The potential return. The impact it would have on our big goals as a family, both financial and lifestyle based. When we wrote it all out, the conclusion was pretty clear: the reality wasn’t all that great. It was a hard pill to swallow but a hugely important one that may have saved me a lot of time and heartache.
Here’s the other thing about separating idea from reality:
You have to be able to react to what is in front of your eyes, not a vision that’s still stuck in your head.
Then ask yourself… is this big idea the reality you really want? Or were you just the idea you’re in love with?
Listen, I think ideas are beautiful, and optimism is something I hope I never lose. I’m always down to shoot for the ideal at least as a starting point and still allow myself the luxury of seeing a vision form.
But, if we want to earn a sustainable living as creatives, especially ones that want to design a lifestyle that supports the brightest version of ourselves, we HAVE to pay attention to the reality version of our ideas. If not, we’re likely leading ourselves down a path that could carry us further away from our true selves, rather than bring us closer.
It could be moving across the country or starting a new job or ending a serious relationship or deciding to start a family.
In general, Big Change can be quite terrifying, mostly because the uncertainty that it brings about is overwhelming. It’s not like you’re swapping out one tiny piece of the puzzle; it feels like you’re busting up the whole dang thing, mixing up the pieces, and starting over again.
That alone is enough to get someone’s anxiety going. But what makes Big Change even scarier is when it’s brought about by something that is not your choice.
Maybe it’s a relocation because of your job that you didn’t see coming, or a landlord deciding to sell your rental property ?, or being broken up with out of the blue, or even a family crisis that completely turns your world upside down. Whatever the circumstances, this kind of Big Change curveball can send you down an especially stressful spiral because on top of the overwhelm there is a lack of control.
I don’t know about you, but uncertainty mixed with lack of control is the recipe for my ultimate cocktail of stress (aka Anxiety On The Rocks… I do not recommend it.)
When we humans start feeling a lack of control, our natural instinct is to reassert it in any way we can. That’s why, when confronted with Big Change, you’ll likely find yourself tightening your grip on whatever reality you feel you’re about to lose.
Your mind will become preoccupied with all the parts of your day or life that will no longer be the same. Things you never paid any attention to will suddenly feel like precious treasures. (During a break-up:) We’ll never brush our teeth together in the morning again… (Or a move:) That barking dog next door is so cute, I’ll really miss him… (Or a shake-up at work:) I know I always complained about that project, but I’m going to miss complaining with Rhonda after our status meetings…
These are not the things we’re actually grieving the loss of, though. We’re actually just grieving the loss of familiarity, of comfort, of certainty.
In our case, this move wasn’t our idea. It was brought about by something completely outside of our control. Our initial reaction to that was exactly what I described above — clinging as tightly as possible to the home and life we’ve assembled over the past year and a half.
My mind became obsessed with all that we’d no longer have around us: the ocean view from our bedroom ?(#firstworldproblems), our perfect walking loop to take Plax on twice a day, our amazing neighbors that are just a few feet away.
The more I focused on these things, the sadder I became for our impending move because it was beginning to feel like a big loss.
What I started to realize though was that while those things aren’t necessarily trivial, they’re not the real source of my sense of loss. It’s not about the ocean— it’s more about losing the certainty that we’ll have a way to connect to nature every day. It’s not about our walking loop—it’s about losing the sense of comfort in a daily routine with Plax. It’s not about moving farther away from our friends—it’s about not knowing for sure that we’ll make the time to hang out and maintain our sense of community.
Once you recognize that the discomfort isn’t necessarily coming from losing the elements of your life themselves but just the overall loss of certainty, then you can work on solving that.
First, find ways to make the uncertainty of the future more concrete. List out all the positive things you know this change will bring.
With Big Change, there’s always something you’re losing but there’s also always something you’re gaining.
The secret to embracing Big Change and minimizing the discomfort of uncertainty is to shift your attention to what you’re gaining.
For us, that’s embracing the awesome new neighborhood and location our new place is in. I’m looking forward to having an entirely new environment to set up my art studio in and my workspace — those kind of changes often leave me feeling renewed and refreshed.
We can also start replacing those “losses” I listed above with new interpretations. Our daily dose of nature becomes the park just up the road. I can start envisioning our new walking route with Plax, and look forward to the patch of grass we have in our new backyard so he can roll around. I can make a goal to host a dinner with our former neighbors at least once a month.
Bringing these new puzzle pieces together might help you feel energized by the changes before you rather than terrified by them.
Once you start to bring your focus to the future and find things to get excited about, the final step is to release that death grip you have on the past.
It makes us feel more comfortable and in control to think about what’s right in front of us, but clinging tightly to a reality that’s expiring only makes moving forward more painful. It leaves us with one foot in one reality and one foot in a new reality. I’ve seen enough science fiction shows to know that’s a recipe for being torn right in half.
So your challenge this week (whether you’re in the midst of Big Change or any kind of change) is to:
“Let go of what WAS in order to embrace what IS.”
Share it on Instagram:
If you’re the type of person that has trouble embracing change or relinquishing control, I know these strategies aren’t the easiest thing in the world.
But I also know that life never stands still for long. The more we can learn to embrace the never-ending process of evolution, the more we can continue to live as our brightest selves, whatever curveballs may come our way.
If you’re not in the midst of change right now, I hope this week’s letter encourages you to take a moment of gratitude for the chapter you’re in. What are those things that you’d miss if you were moving away? Try finding a way to enjoy them today as you would if you were moving soon.
I’m talking about any kind of pain — physical, emotional, spiritual. We experience pain in a way that makes it almost impossible to describe to someone outside ourselves. And for that reason, the experience of dealing with pain can be an immensely isolating experience.
Have you ever had an injury or an illness or even an emotional wound that affected you in such a way that you wished for someone to just climb in your head and share that experience for a second, just to make you feel like you weren’t alone? To have someone say, I know what this feels like and I know how badly it hurts.
I know I have.
The reason I began thinking about this is because I identify as an HSP — a “highly sensitive person.” This designation refers to an innate personality trait in 15-20% of the population in which the wiring of a person’s central nervous system causes “hypersensitivity to external stimuli, a greater depth of cognitive processing, and high emotional reactivity.”
Basically it’s like FEELINGS are my superpower—all kinds of feelings, the good ones and the hard ones.
What that means for my daily life is that I’m hyperaware of sensations in my environment, and I’m also often unable to cut off my cognitive and emotional processing of those sensations.
Over the years I’ve come to accept and appreciate this as a superpower. It allows me to be highly empathetic to others, extremely self-aware, and a simple smell or the heat of the sun on my face can send a wave of the deepest joy throughout my entire being. I wouldn’t trade the capacity for that kind of transcendent beauty for anything.
BUT… because of this trait, I’m quite literally wired to experience pain differently.
Anything from the smallest paper cut, to a pounding headache, to a broken bone, to a broken heart… there is no blocking it out for me. I can’t compartmentalize it or bury it or rationalize it away, and the sensation often consumes my thoughts.
Jason and I often joke about this by referencing my need for a “pain journal” where I can write down the various sensations I’m aware of on a regular basis. The truth is though, while we joke about it and make light of it, when I dig deeper I can admit that my relationship to pain is something that I actually feel incredibly self-conscious about.
I’ll find myself in situations where even the tiniest sensation of pain becomes problematic. For example, since I started my running challenge two weeks ago, my toe joints in my left foot are incredibly sore. Objectively, it’s such a simple and insignificant injury, one that most people probably wouldn’t think twice about. But, with every step I take through our house, a neurological signal pulses throughout my entire body alerting me to this pain in my foot.
That’s when the inner conflict starts.
On one hand, out of self-compassion, I want to honor my authentic experience of pain, however mild or severe it might be. I want to be my own loving guardian saying “This feeling is real, and it’s okay.”
Yet on the other hand, I find myself judging my experience of pain, judging myself for being weak and fragile, and wondering why I can’t push past a simple sensation—especially when other people experience far greater pain or adversity on a regular basis.
This conflict becomes even more heightened when someone else is involved.
For example, if Jason and I are in the gym, I know (cerebrally) that I have to push beyond a certain threshold of discomfort in order to get stronger. But there’s a difference between discomfort and pain, and sometimes an exercise creeps past discomfort and into pain. It could be a sharp sting in my wrist or a tweak of my knee or those pesky sore toes, but suddenly I have to stop what I’m doing and listen to my body.
Those are the moments I feel most isolated because I want to be able to push that pain aside and challenge myself, but I also recognize the reality of what those signals are telling me. I do my best to communicate this to Jason, but the more I try to explain it, the more critical I become of myself and the more alone I feel in my experience.
Now this next part is going to sound strange to some of you, but this is the most honest discovery I’ve made about situations like this. In those moments of vulnerability and isolation, I can feel myself clinging to my pain in a weird way.
I can feel myself defending my pain, and in doing so I hold onto it. I can feel myself wanting to stay there in that sensation, as if to provide my own source of empathy and validation that I can’t seem to find any other way. Can you relate to that feeling at all?
But here’s the danger with that behavior: In seeking someone who will say “this IS real, this IS painful, this IS hard” I only end up giving that pain more power over my thoughts and my decisions.
You, reading this right now, may be someone who deals with chronic pain. To you I just want to say I can’t begin to understand what you go through on a regular basis. It’s possible that this talk of sore toes and weak wrists is so insignificant compared to what you have to deal with (there I go judging myself again?), but I’m hoping you can still relate to how complicated and isolating the experience of dealing with pain is, and in being able to relate I hope you feel seen. I’m betting you too have struggled with just how much attention to give to the very real sensations and challenges you’re facing.
I’m not saying I have the right answers for you or your unique situation, but I’m hoping that my personal lessons from dealing with my own experience of pain might shed light on things in a new way for you.
Universally speaking, I feel it also should be acknowledged that this conversation is applicable to our society at large right now. There is SO much personal pain that is playing out through conflict on a national scale here in the US. There are people—especially those that identify themselves as people of color, immigrants, Muslims, LGBTQ+, people with disabilities, the poor—who are likely experiencing emotional pain beyond what I could ever imagine as a white woman of privilege. I know that. And yet I still can feel the collective pain that our nation is trying to make sense of.
Every time someone says “it’s not that bad” or “you’re overreacting” or tries to otherwise minimize the pain that is being felt across all kinds of cross-sections of our society, I see this same phenomenon play out. I see humans clinging to their pain, holding it up and declaring “my experience is REAL and I won’t allow it to be minimized.” That instinct is understandable and truly valuable because my hope is that in sharing our pain, we’re able to become more empathetic to one another.
However, whether it’s on a personal level or societal level, clutching tightly to our pain doesn’t necessarily serve us. Defending our pain only keeps us locked in a room with it, unable to see the light that lives on the other side. But then judging ourselves for feeling pain doesn’t help us either, it only compounds the hurting.
So where does that leave us then? What do we do with this pain that is so very intimate and personal and very REAL, but that doesn’t always serve us in living our brightest, freest life?
Well, the way I see it, we have a few choices.
Option #1: We can let pain own us. We can give it the power to affect how much joy we let in, how many people we let close. We can use it to build walls instead of bridges, and we can cling to it so we feel seen. We can give it permission to make us doubt ourselves and our capabilities. We can let it steer our thoughts to self-loathing or self-criticism or despair. But when we do that, we are letting it define us. We are letting our human experience begin and end with this pain that we feel.
OR…
Option #2: We can make room for our pain to exist without giving it ultimate power.
We can let it be seen without letting it stay fed.
We can acknowledge it without cozying up to it.
We can experience it, learn from it, be angry at it even—without letting it cloud all that is joyful and beautiful and hopeful.
I know which of those options I’d prefer for myself.
As I finally put these thoughts to paper, eventually I came to this mantra for myself: “Your pain is real, but it doesn’t have to define you.”
“Your pain is real, but it doesn’t have to define you.”
This is what I say to myself so that I can acknowledge whatever pain or sensation I’m feeling—physical, emotional, spiritual— and I can give myself permission to sit with it without judgment. Not to “push past it” or cast it aside. Not to pretend it doesn’t exist or that it’s a figment of my imagination. But it is also what reminds me that I can acknowledge its presence without defending it to the point that it defines me. That I don’t have to cling to it so tightly that I never learn what good things are on the other side of it.
I want to leave you with this incredible video, one that I stumbled across on Twitter months ago but that I had forgotten about until I started reading this week’s letter. It’s the story of Ruthie Lindsey whose path led her to chronic pain but who has chosen not to let her life lead with that pain.
It’s incredibly inspiring, and I hope whatever pain you may be encountering in your life right now, however big or however small, that Ruthie’s story helps you see the light and beauty that exists as well.