As a designer, I spend almost every day inside Photoshop.
Even though I taught myself how to use the program, after a couple years of near-daily use, I feel pretty comfortable with it. But, it occurred to me the other day that there is still SO much that I don’t know about Photoshop.
I can always do whatever I need to do with the foundation of skills I have, but every once in a while I take a look at the various tools and options that I don’t use on a regular basis and think to myself: What if there’s some awesome tool out there I’m missing out on?
So I recently went on a mission to expand my design horizons.
And while I’m a big fan of learning new things, I have to admit, these days it’s hard to find the time to sit down and watch endless Photoshop tutorials (plus, let’s be honest, most of them are boring! My coffee-induced ADD can’t handle it!)
So, in this post I thought I’d include 10 simple TipGIFs that will change your Photoshop game big time!
Side note: “TipGIF” isn’t technically a thing (I made up the term.) BUT I think tips are most helpful when you can see them in action, so I looked up how to make GIFs in Photoshop, and behold, the TipGIF was born. Maybe it‘ll catch on?
Another side note: I use Adobe Photoshop CC on a Mac (though I’ve included PC alternatives as well.)
10 Photoshop Tricks You May Not Know About
1. Use “Step + Repeat” to create patterns and shapes.
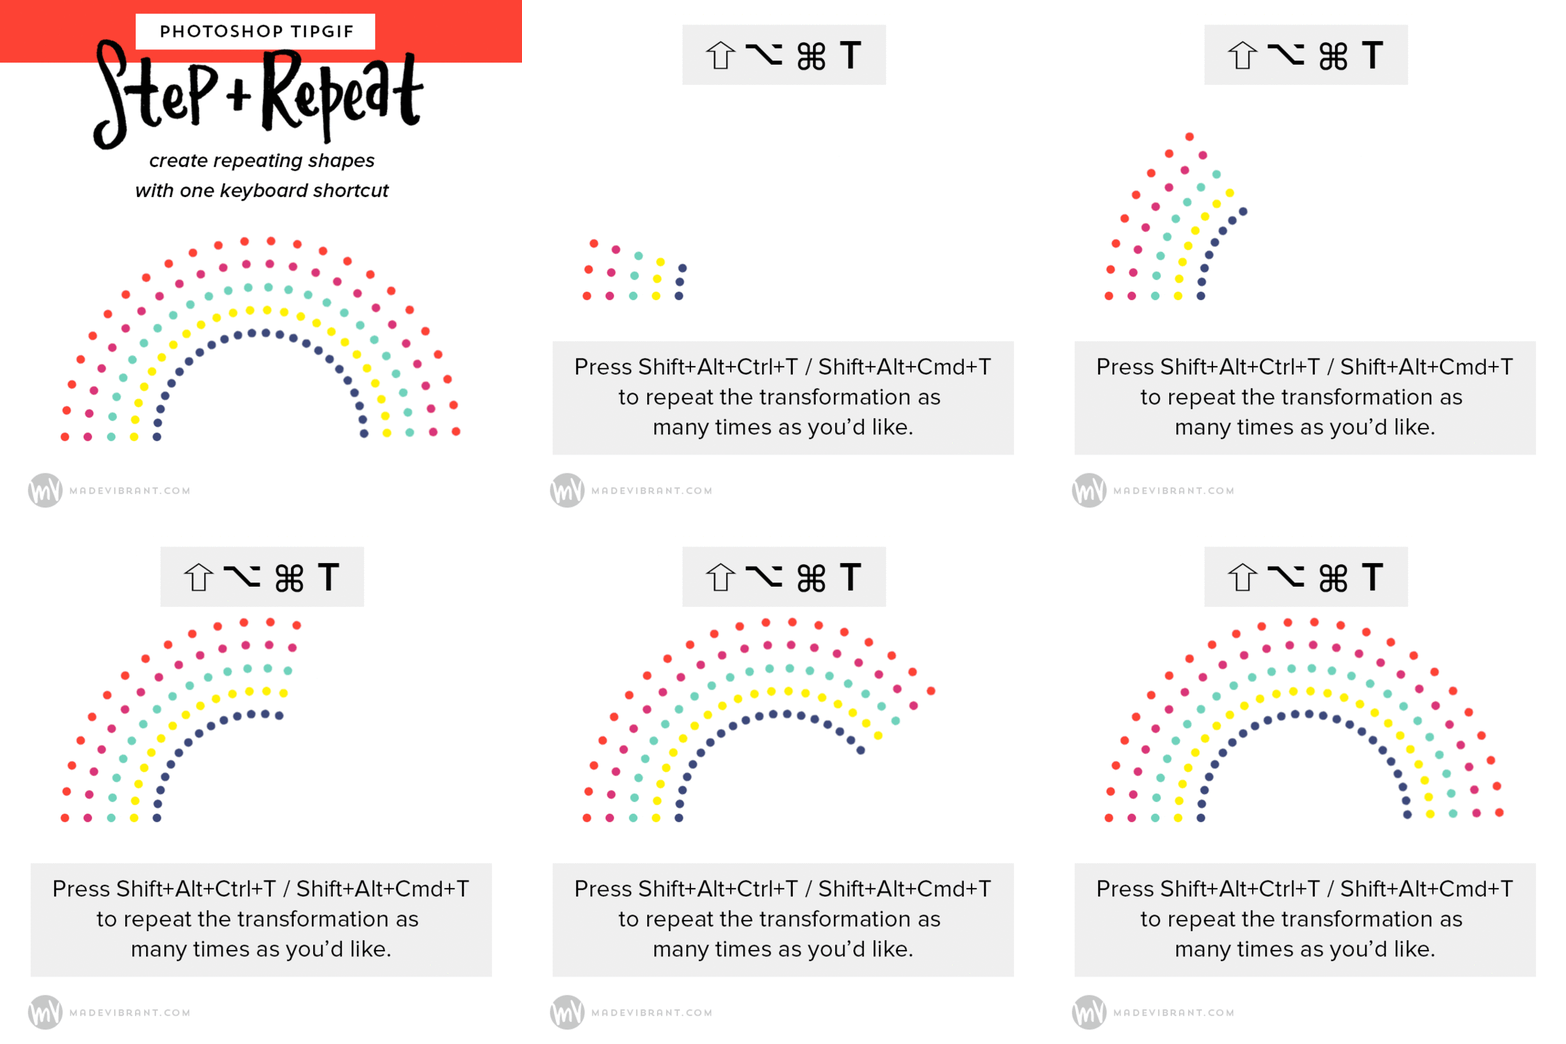
- Create your shape or object that you want to make a pattern of.
- Make an initial rotation of your object by pressing Cmd/Ctrl+T and transforming it slightly (keep in mind this will be the transformation that repeats!)
- Hit Enter to apply.
- Press Cmd/Ctrl+Shift+Alt+T repeatedly to repeat your transformation and create your pattern.
2. Use Select > Color Range.. to remove a white/solid background.

This is especially helpful when creating graphics with hand-lettering because you can remove the white background of your paper to isolate your hand-drawn element.
- In your menu, choose Select > Color Range…
- In the options pop-up, make sure the “Select” dropdown is on “Sampled Colors” and the eyedropper tool is selected.
- Click the eyedropper in your document area on the color you wish to remove. (In the case of lettering, click on the white of your paper.)
- Adjust the “Fuzziness” spectrum based on the level of contrast in your document and how detailed you’d like your selection to be. The higher the number, the more detailed/expanded the selection will be.
- Click OK.
- Now you’re free to hit delete to remove your selection! (Make sure your image layer is not locked in order to delete your selection.)
**You can also set layers with white backgrounds to Blending mode “Multiply” and their white backgrounds will become transparent, allowing you to place the layer on top of whatever you need!**
3. Make duplicates by using Alt + Drag.
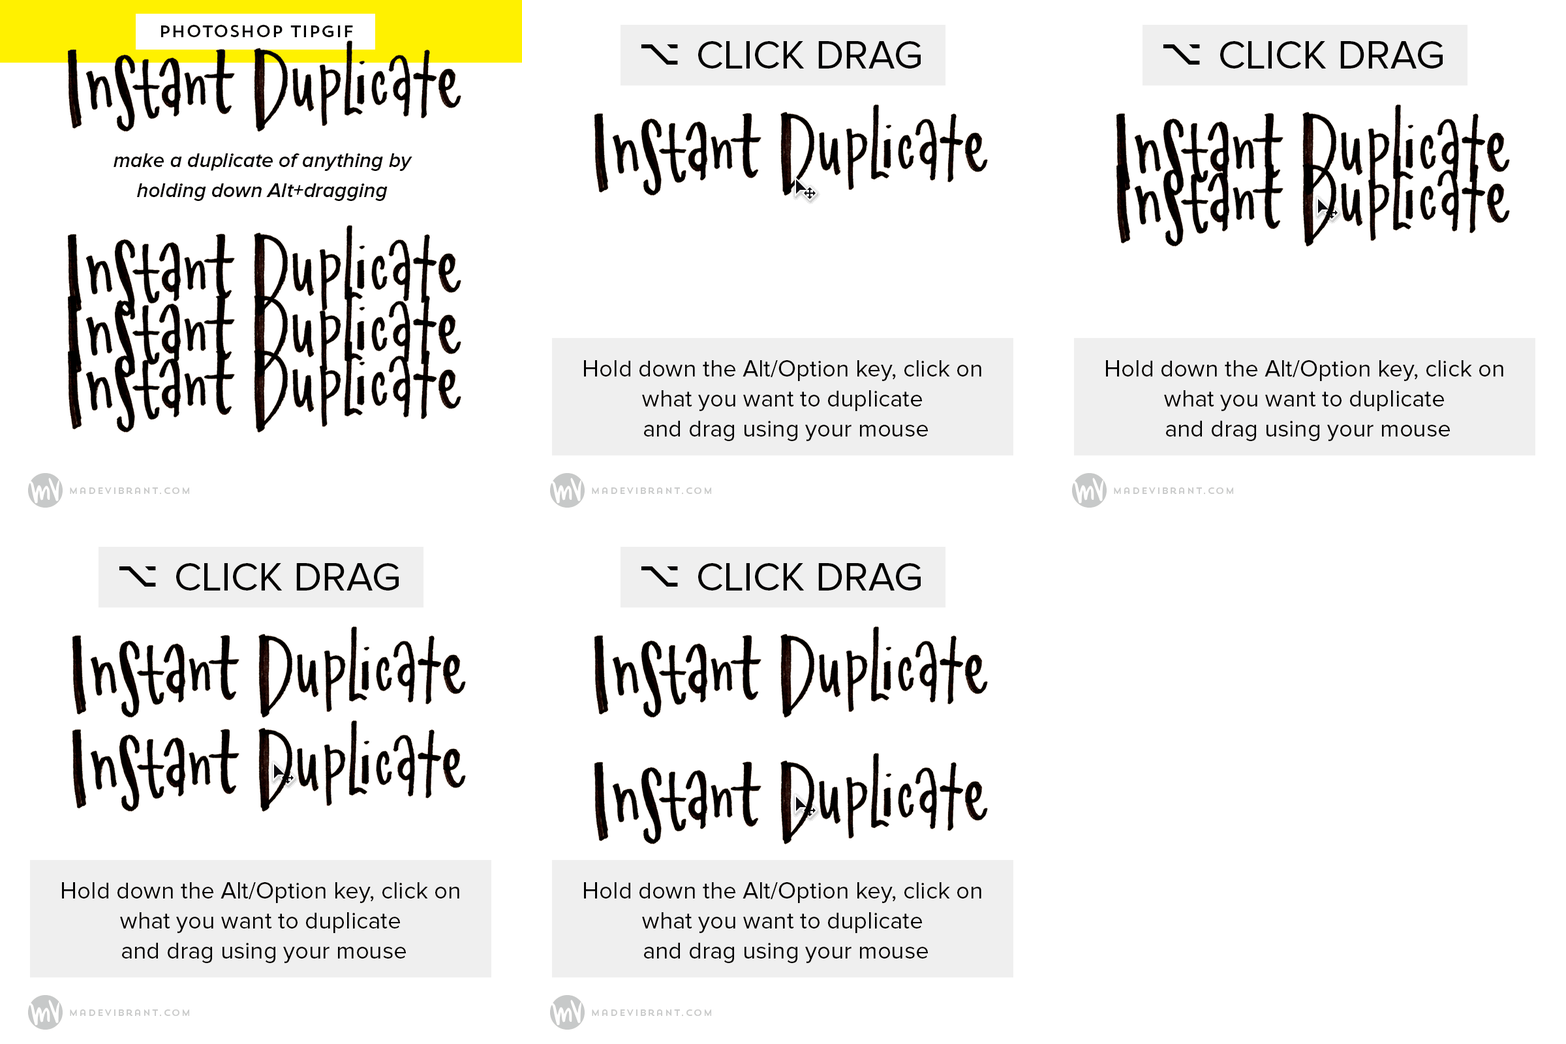
I first learned about this little tip in an Intro to Illustrator class at Alt Summit back in 2012, but it was one of those simple ones that changed EVERYTHING for me. By holding down Alt, then clicking and dragging, you can duplicate shapes, layers, images, even layer styles!
4. Use “[” and “]” to change your brush tip size.
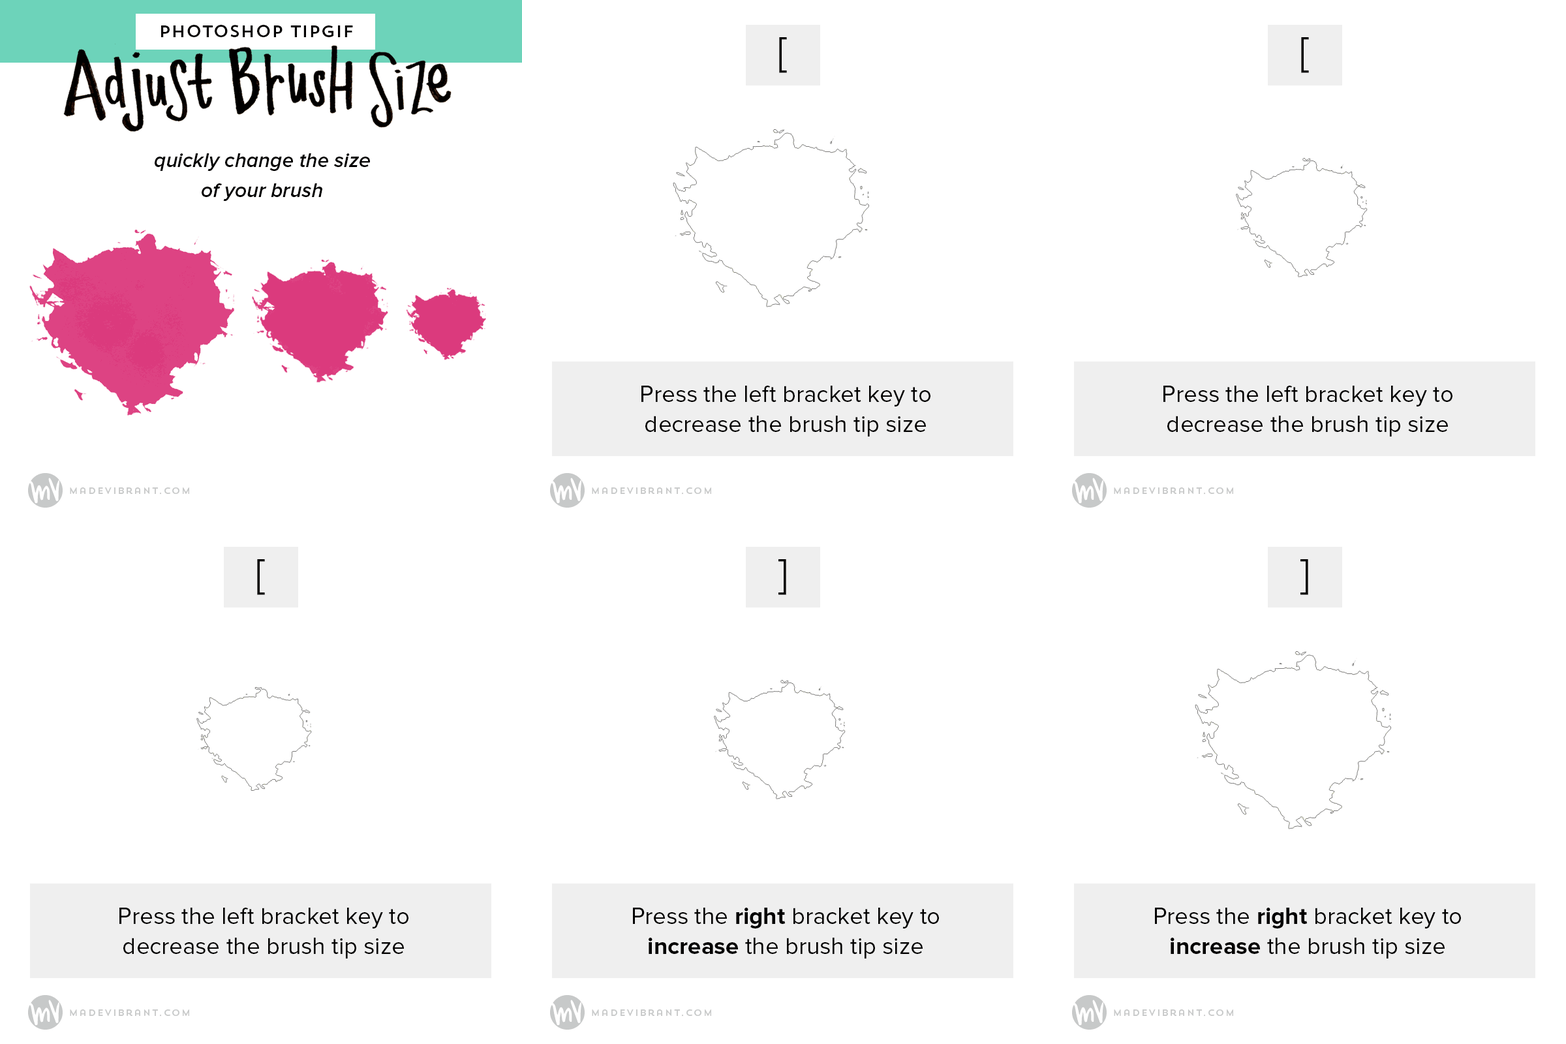
Just a handy little keystroke here, but to adjust the size of your brush, simply press the left or right brackets!
5. Easily select multiple layers and group them.
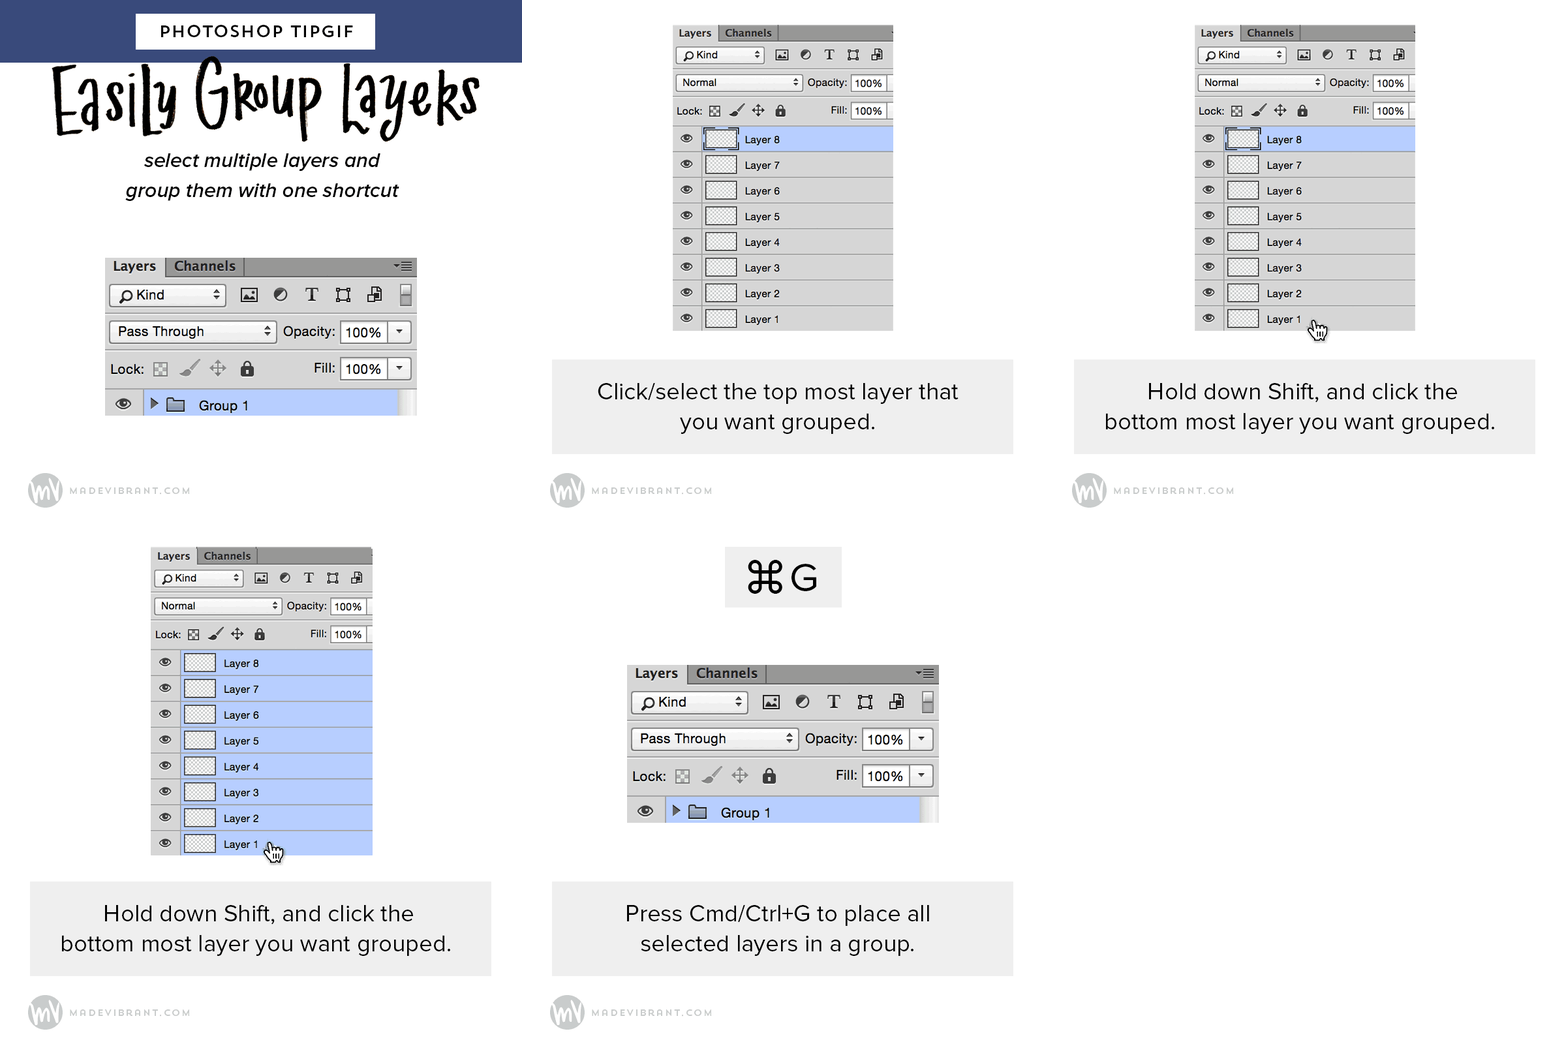
Grouping layers can be especially helpful if you need to quickly hide/unhide certain layers or apply a layer style to a group. To easily place multiple layers in a group:
- Click/select the topmost layer, hold down Shift, and click the bottom-most layer. This will select every layer in between.
- Press Cmd/Ctrl+G to place all selected layers in a group.
6. Change the color of your canvas background.
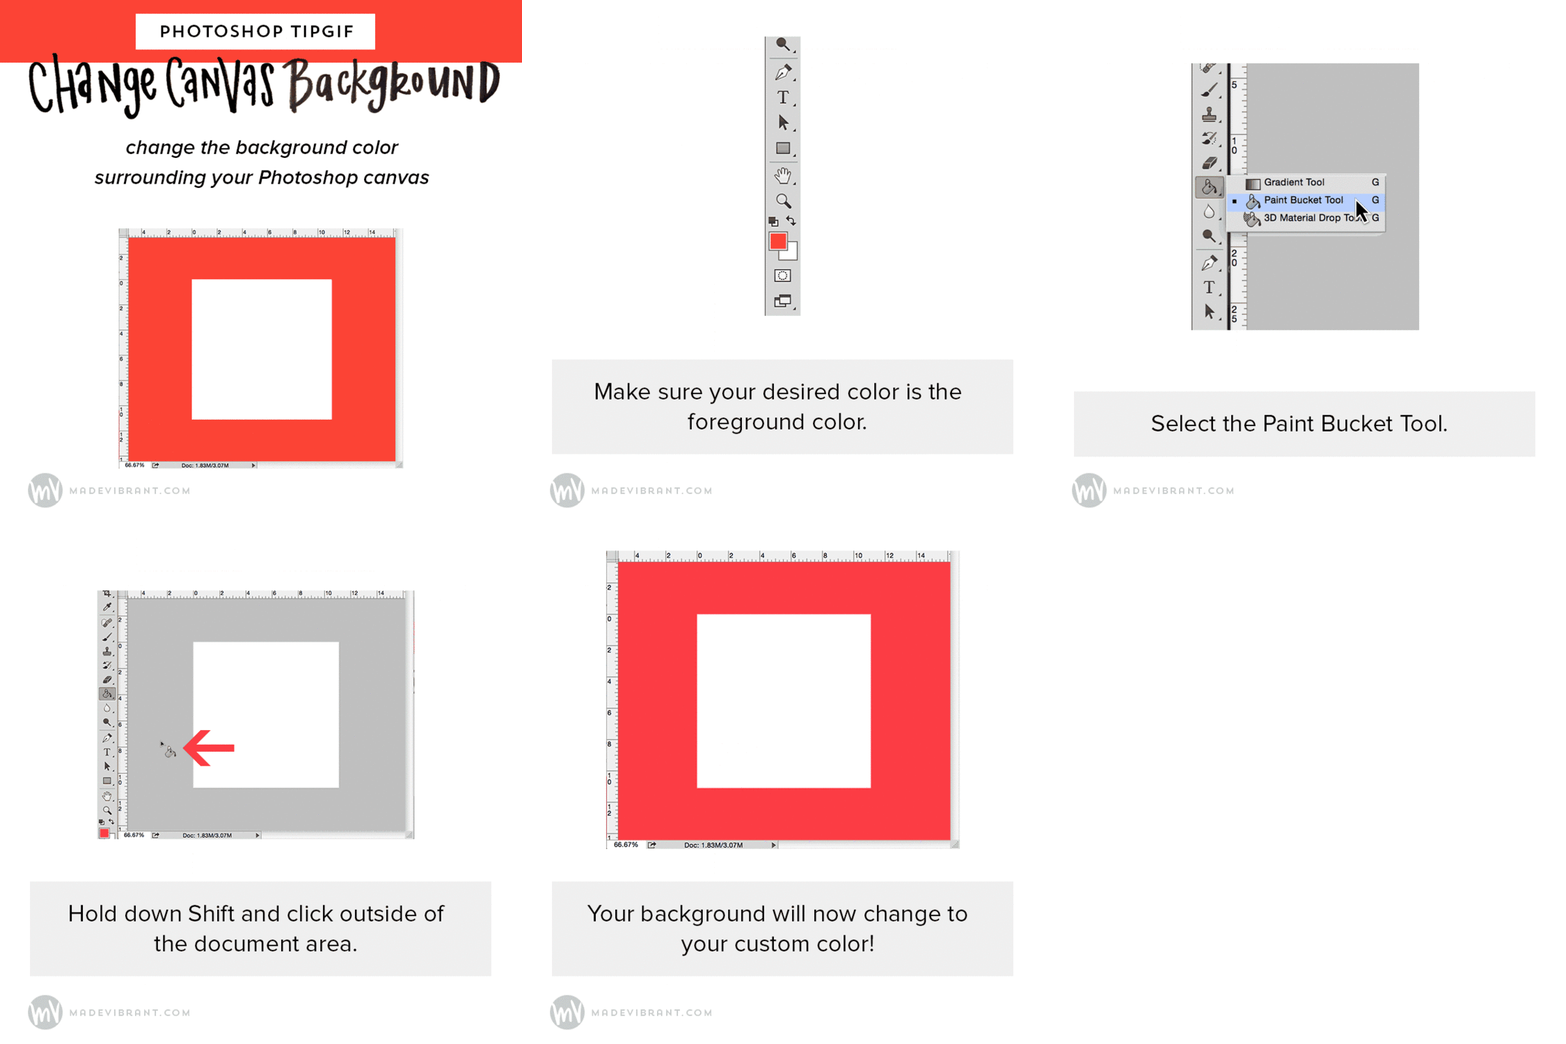
Depending on your Photoshop settings, the background color behind your canvas area is probably some version of gray. However, if you want to see how your photos/graphics look on a white background or black background (or you just want to jazz up your workspace with some bright colors) you can use this shortcut to customization.
- Make the desired color the foreground color.
- Click on the paint bucket tool.
- Hold down Shift and click outside of the document area.
(If you want to undo this action, right-click outside the document area and select one of the default gray options.)
7. Create a clipping mask by Alt+Clicking between two layers.

I use this trick a lot when I put together mood boards. By creating your grid of rectangles in your mood board, you can then drop your images on top, Alt+click and keep your nice crisp gutters between your images!
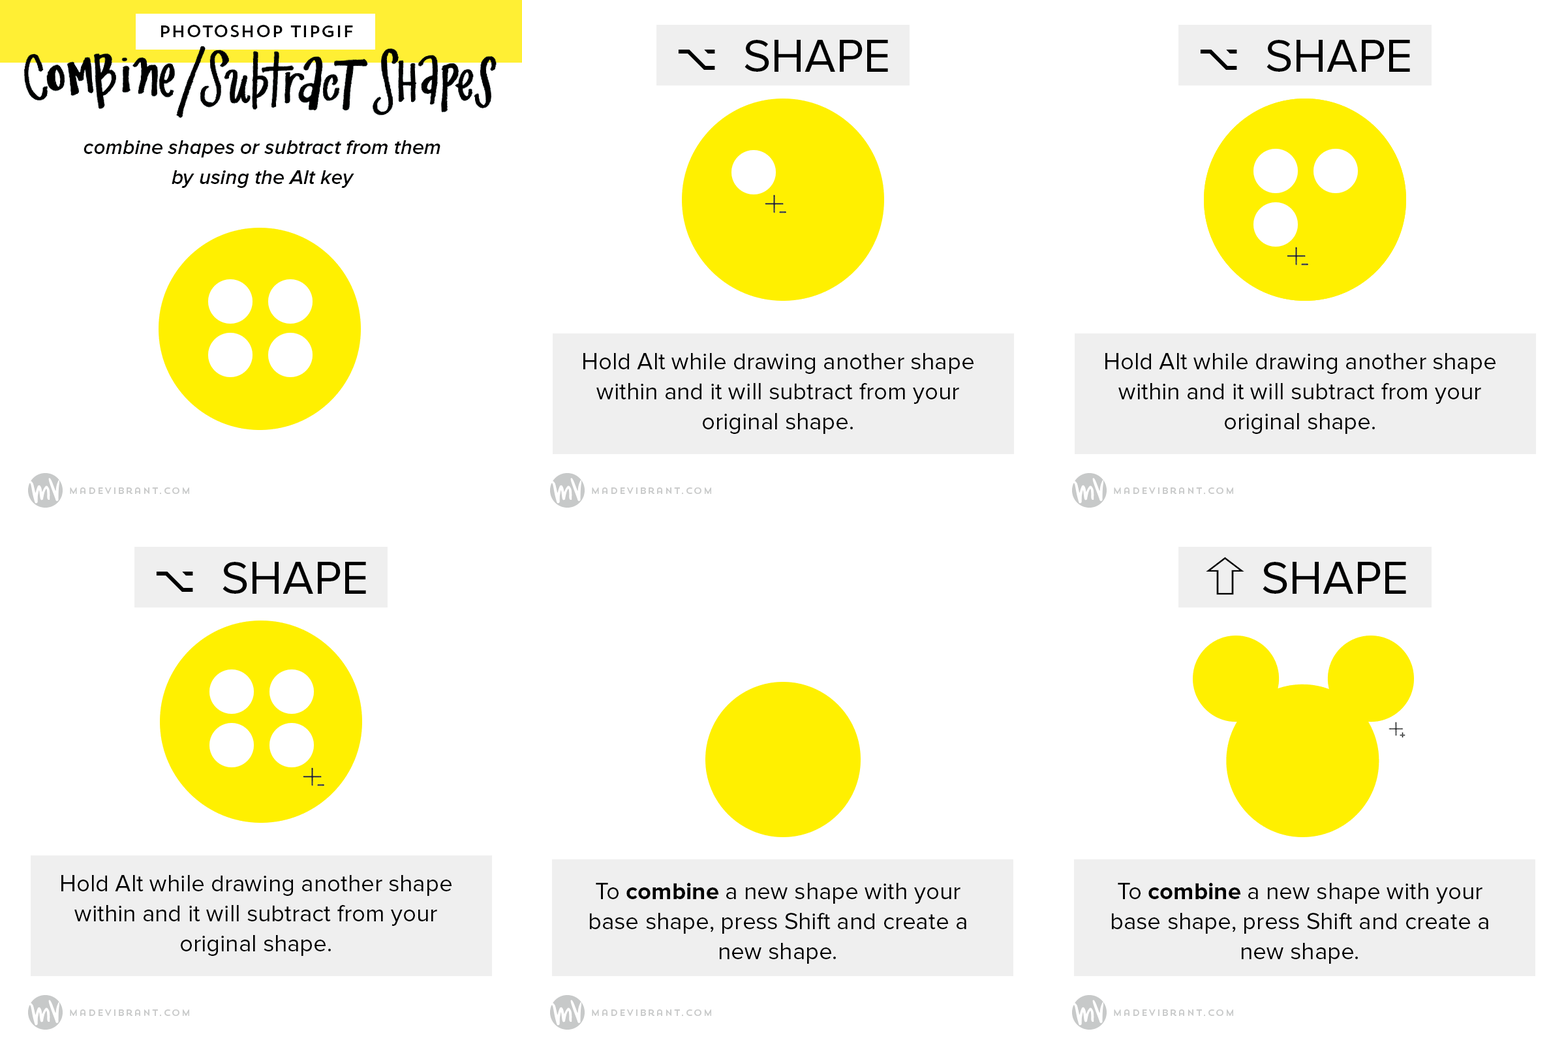
8. Quickly subtract or combine shapes.
9. Hide all but one layer or group.
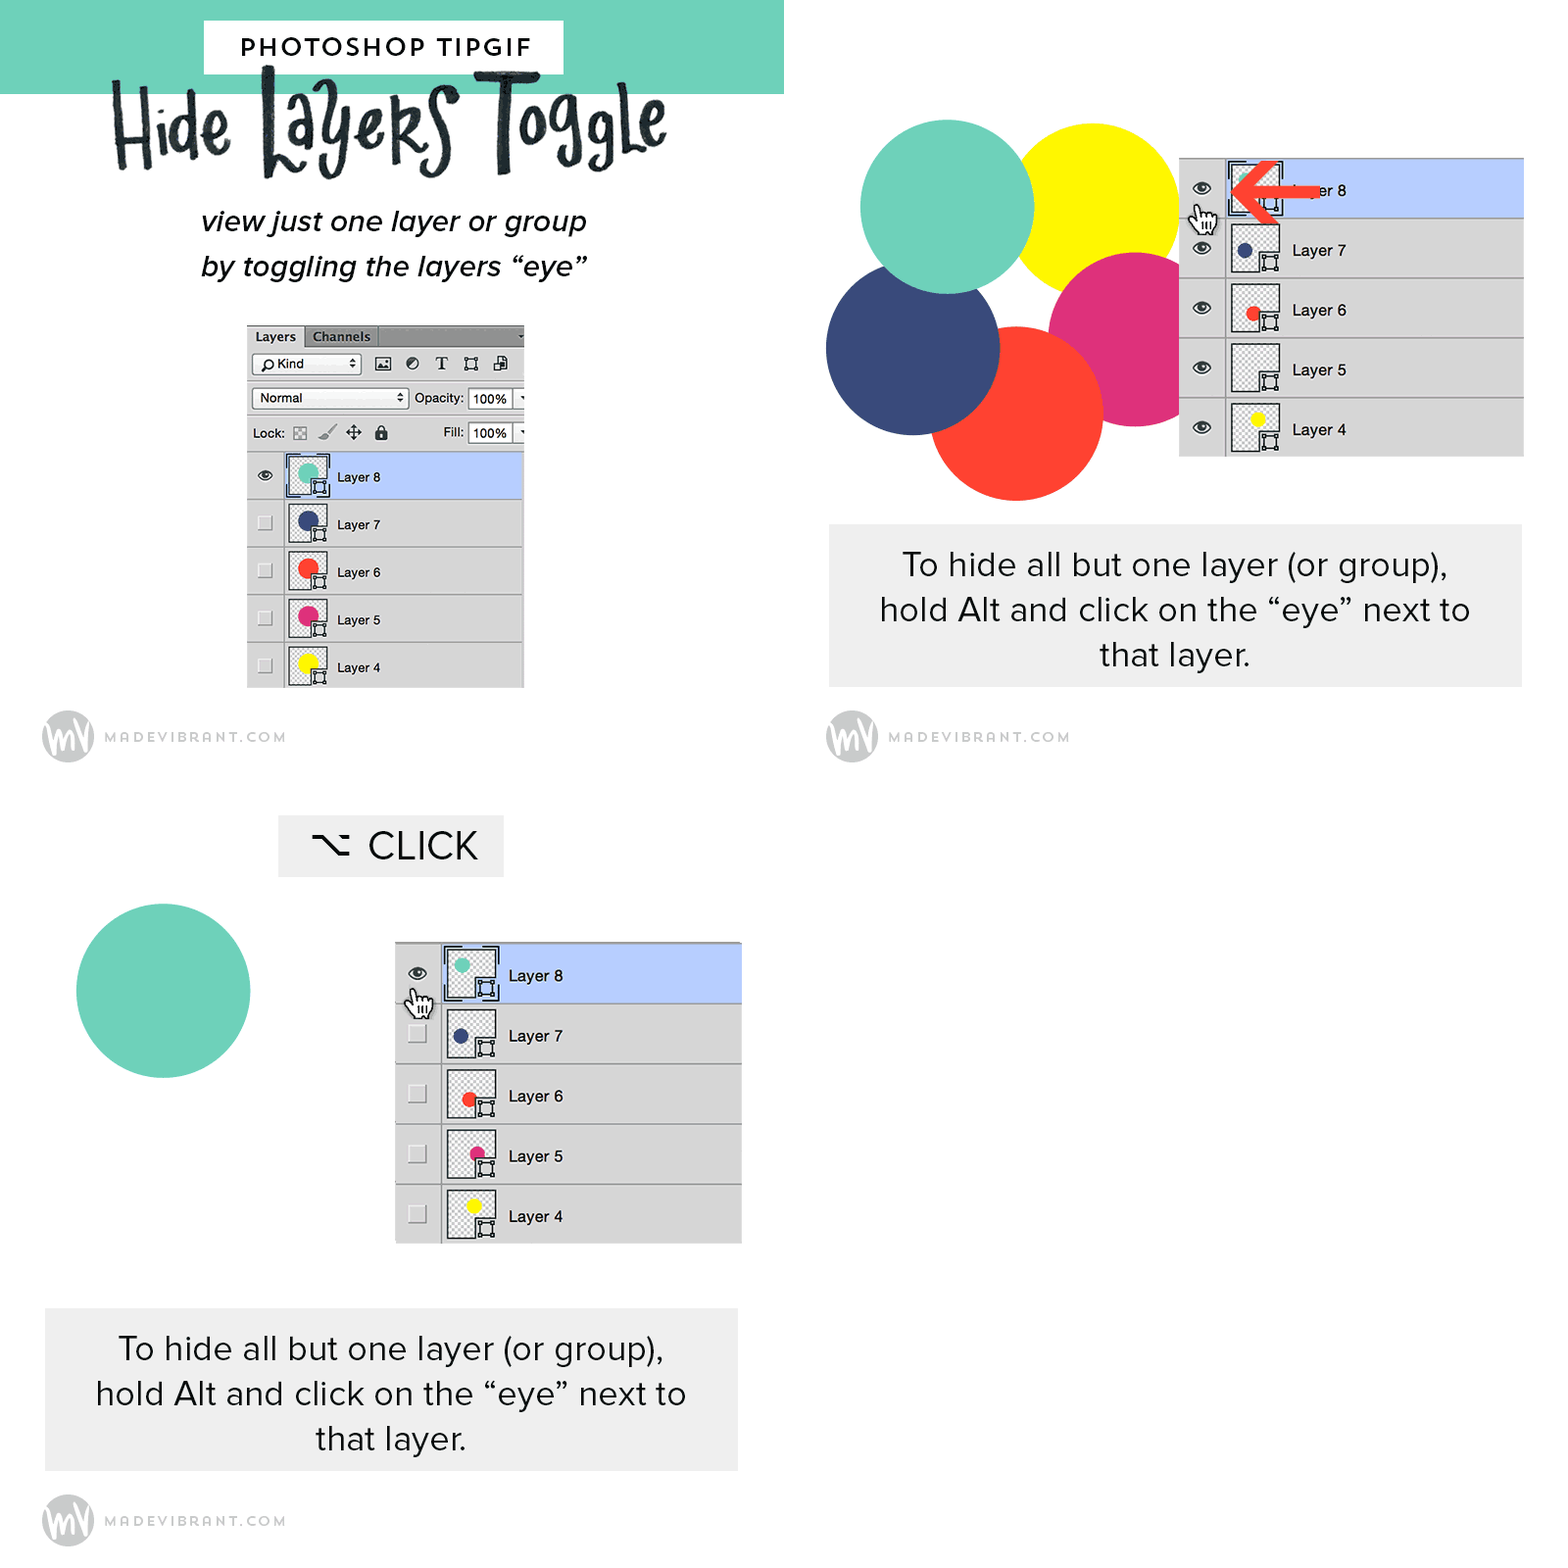
I’m sure you know you can hide the visibility of layers by clicking on the “eye” in the Layers palette, but did you know that you can Alt+click the eye icon to hide all other layers except that one? And to reverse it, simply Alt+click the layer again.
10. Use tab to rename your layers.
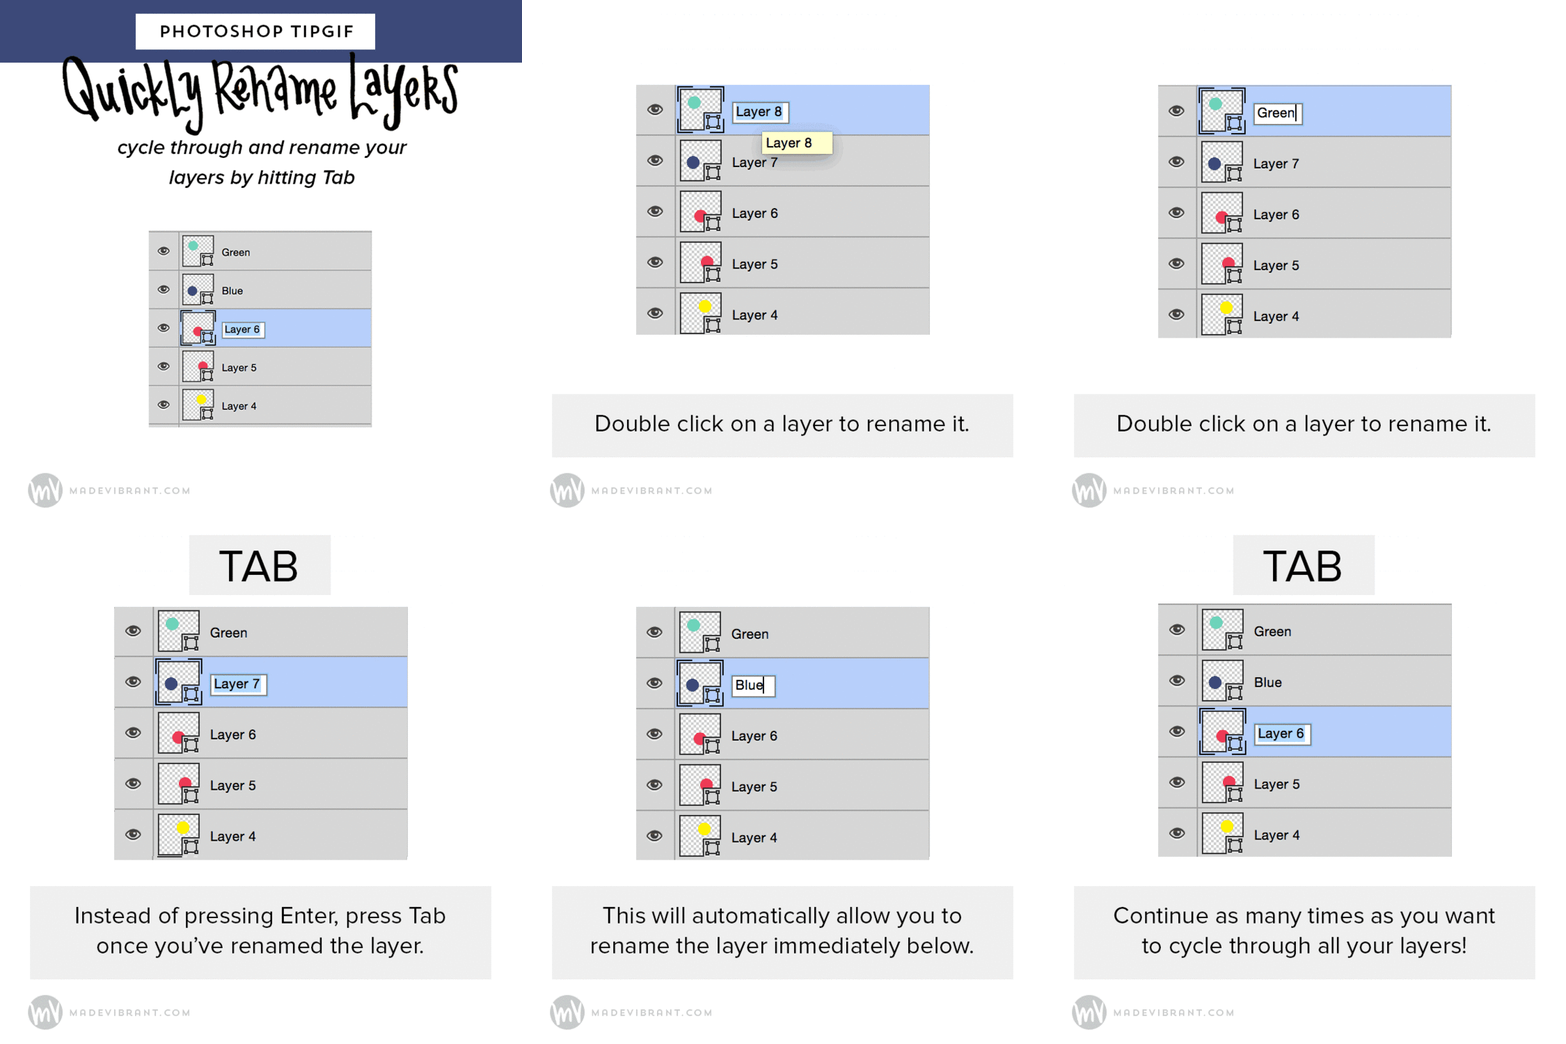
Naming layers properly can be a HUGE help when you’re dealing with complex files. Cycle through and properly name your files by:
- Double clicking on a layer to rename it.
- Instead of pressing Enter, press Tab.
- This will automatically allow you to rename the next layer.
I hope you found these little tricks helpful!


